12 Dialogflow CX Quickstart Templates
Lesson: 1 Getting a list of inputs from user
[00:00] So in this video, I’m going to show you how you can save user input in Dialogflow CX. Now, what we are going to do here is we are going to take the combination of the quick start template that you see here, how to collect user input without follow up intents and how to use session variables to save user input. And we are going to combine them into a single agent in Dialogflow CX. And of course, the big advantage of using Dialogflow CX is that it makes tasks like these very, very simple, much easier than how it is in Dialogflow ES.
So in the case of ES, what you had to do is you had to create an output context called session bars with a very large context lifespan. And then you had to collect the information from the user. And you can see that I have this intent called user provides name, user provides email, user provides URL. And once they provide all this information, you’re going to use the session bars context and then you’re going to echo the information back to the user.
[01:02] So here we are showing the user that we got all the information by using the session bars. And to create the same bot in Dialogflow CX is actually much easier. I would say it’s actually trivial. So here I have an empty bot in Dialogflow CX. What I’m going to do is I’m going to add a new intent. And here the user is just going to say they want to add a website chat bot. And the training phrase will be add a website chat bot, add a chat bot to my website.
And let’s go ahead and save that. And here, as soon as they do that, you notice that it’s going to ask them for their name. So let’s do that over here. May I have your name, please? And let’s add it. And then we are going to transition it over to a new page called await user name.
[02:05] So let’s go ahead and do that. And if you’re not able to follow this yet, I would also recommend you go and look at the other videos in this course where I go through something very similar in the beginning of the course. So it’s not something new if you’re already a course student. So I’m going to go through this fairly quickly. And in the await user name, you’re going to add a route.
So provides.name. And it could be something like Aravind, which is my name. You see that it’s already annotated it. And the parameter name is person, the entity type is sys.person. They might say my name is Aravind, I am Aravind. So all these are getting annotated with the name appropriately, as you can see. So provides.name is the intent. And in that case, after they give their name, it’s going to ask them for their email address.
[03:04] So let’s do that. What is your email address? Add it. And here it’s going to be the page name, it’s going to be await email address. Save it. Now let’s go to the await email address. Do the same thing, really. Add a new intent, provides.email.address. And they’ll say something like it is Aravind at gmail.com.
That’s not my email address, obviously. Aravind at gmail.com. You can see that it got annotated in the same way. And then it’s going to ask them for their URL of the website. So then it’s going to be, what is your website URL?
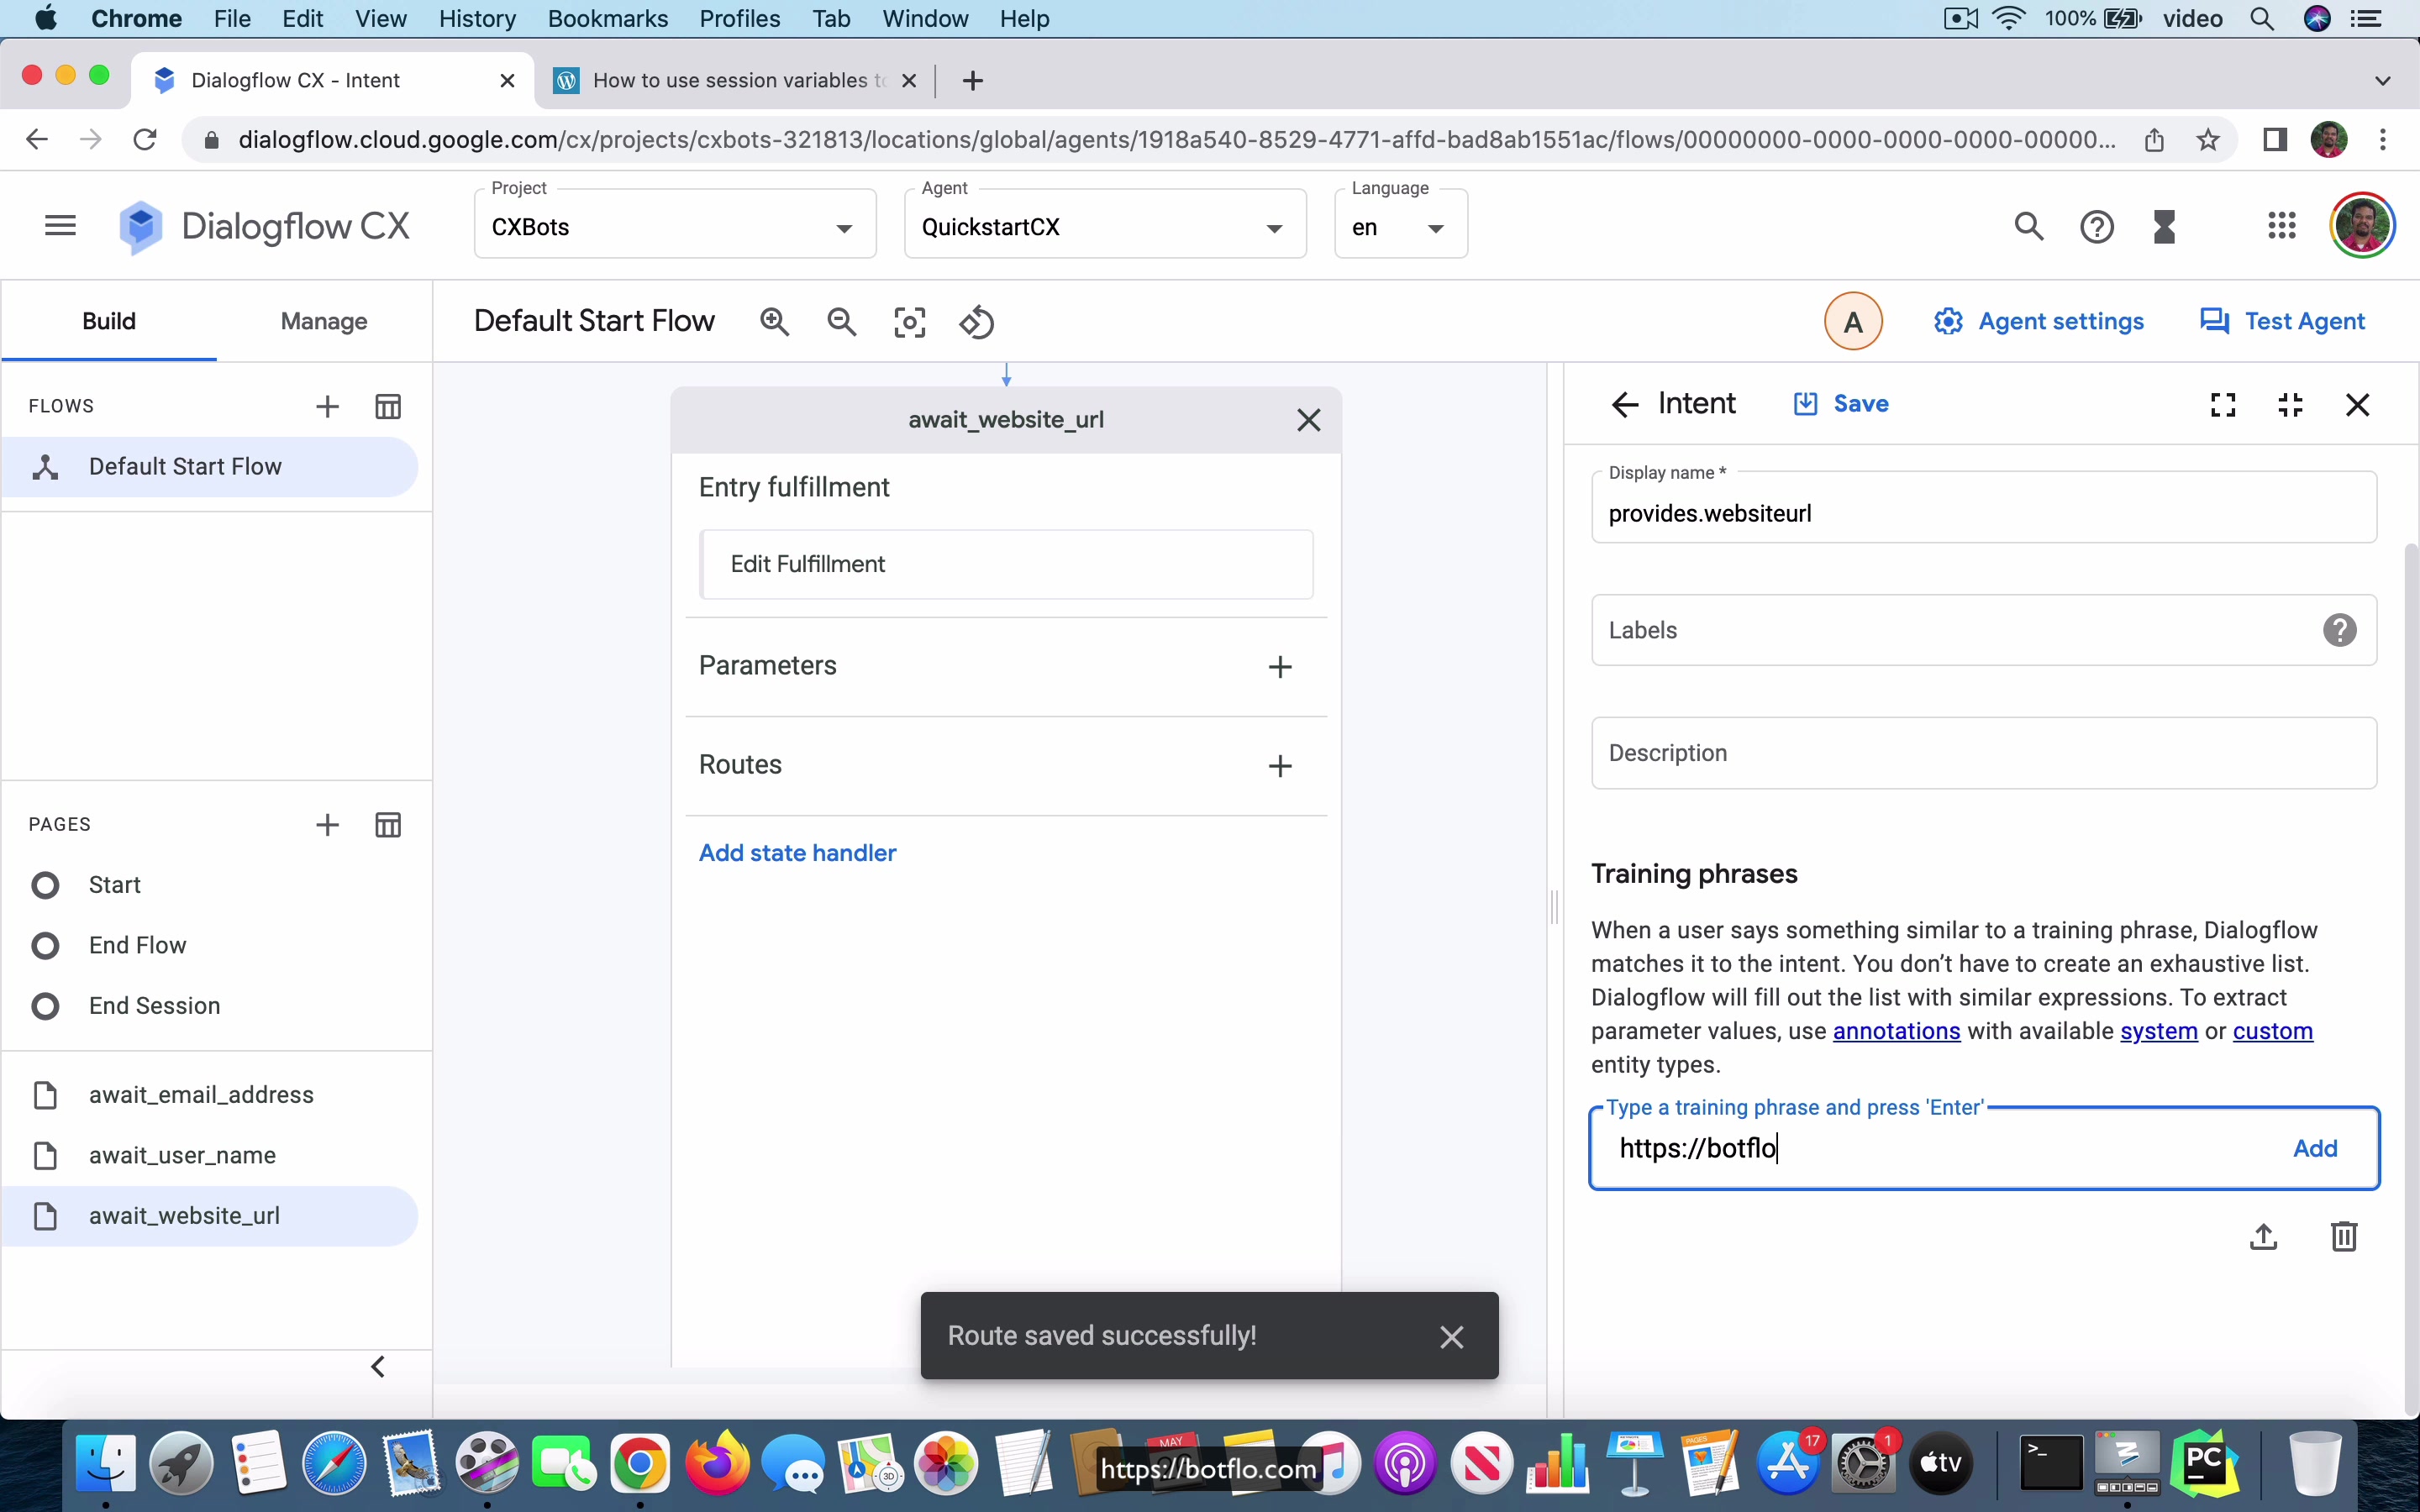
[04:02] And let’s go ahead and add that. So you’re going to have a new page. Await website URL. Save it. And you know that that’s going to create a new page. And here we’re going to say add a route, I mean add an intent. Provides.websiteURL. And I’m just going to type in workflow.com.
You can see that it’s getting annotated as a URL correctly. Let’s go ahead and save it. Let me just add one more. It is workflow.com. And now I’m going to save it. And so what you’re going to do here is you know that you can use the session params. You can go and check out the series of videos where I talk about session variables in Dialogflow CX.
[05:02] So here you know that you can do this to echo all the information back. You can say your input. You can do shift and enter to go to the next line. And you should say something like name $session.params.person. Email will be $session.params.email. URL will be $session.params.url. So let’s go ahead and add that.
And let’s go ahead and save it. You don’t have to do any transition here. Let’s go ahead and test the agent. Add website chatbot. I’m going to say aravind. aravind at gmail.com.
[06:00] https://botflow.com. You can see that it’s echoing back all the information. Your input name is aravind. Email is aravind at gmail.com. URL is https://botflow.com. So that’s pretty much all you have to do in the case of the Dialogflow CX bot. So let’s also go ahead and test it out in the Messenger integration. It’s going to be the same thing, of course.
So let’s go ahead and try it now. And add website chatbot. It is aravind. gmail.com. https://botflow.com. Let me just change it to google.com. So you can see that this is the information that is echoing your input, which is name, email, and URL.
[07:01] So what happened here, if you’re noticing, is that Dialogflow CX is built in such a way that it makes user input, collecting user input, really easy. And this is the overall flow diagram. So you can see that all you did was, as soon as the user said they want to add a website chatbot, you will create this intent transition route. And the intent transition route will use the add website chatbot as the intent, provide something as a response, and then it will transition to the await username page.
And you can do the same thing for the other two inputs. And this is all the same thing that we built in Dialogflow ES. The difference, of course, is that in the case of Dialogflow ES, it’s not natively provided, this feature, the session params feature. So you had to create it yourself. Now, you might say, well, it doesn’t look like it’s much harder to do in ES. But the problem with ES is that if the user does something which is not expected, as they are providing the input, you will find that it’s much, much harder to control the conversation flow in ES.
[08:09] Because ES is not built to provide the state machine as the underlying framework for building the conversation. It’s just all intents and context, and that’s pretty much it. On the other hand, CX is built with the state machine as the fundamental primitive.
That’s what powers Dialogflow CX. You can check it out if you go and look at the API methods that CX supports. You can see that it’s built from the ground up to support this conversation as a state machine. So in other words, we are able to roll all these different things together into Dialogflow CX much more easily. And we were able to build this bot which collects user input in Dialogflow CX very quickly.
Lesson: 3 Save data to Airtable
[00:00] So in this video, I am going to explain how you can save user input to an add table database in Dialogflow CX. It is based off this article I have about saving this input to the add table in ES. And you can see that it is actually going to collect three pieces of information. The first piece of information is going to be the user provides their name. And this is triggered as soon as the user says that they want to add a chatbot to their site. Then it’s going to ask for their name, then it’s going to ask for their email address, and then it’s going to ask for their URL.
And once it collects these three pieces of information, it’s going to save it to an add table. I have over here, the base is called CX templates, and the table is called customer info. And you can see that it has these three fields. So let’s go and take a look at this bot over here. And let’s just close this and I’m going to go to this build view.
[01:05] And in the start page, I have this add website chatbot intent transition route. And if you preview the training phases, it just has add a website chatbot and add a chatbot to website. And then the agent is going to ask, may I have your name, please. And then it’s going to transition to the page called await underscore name. In the await underscore name page, you have a route called provides name.
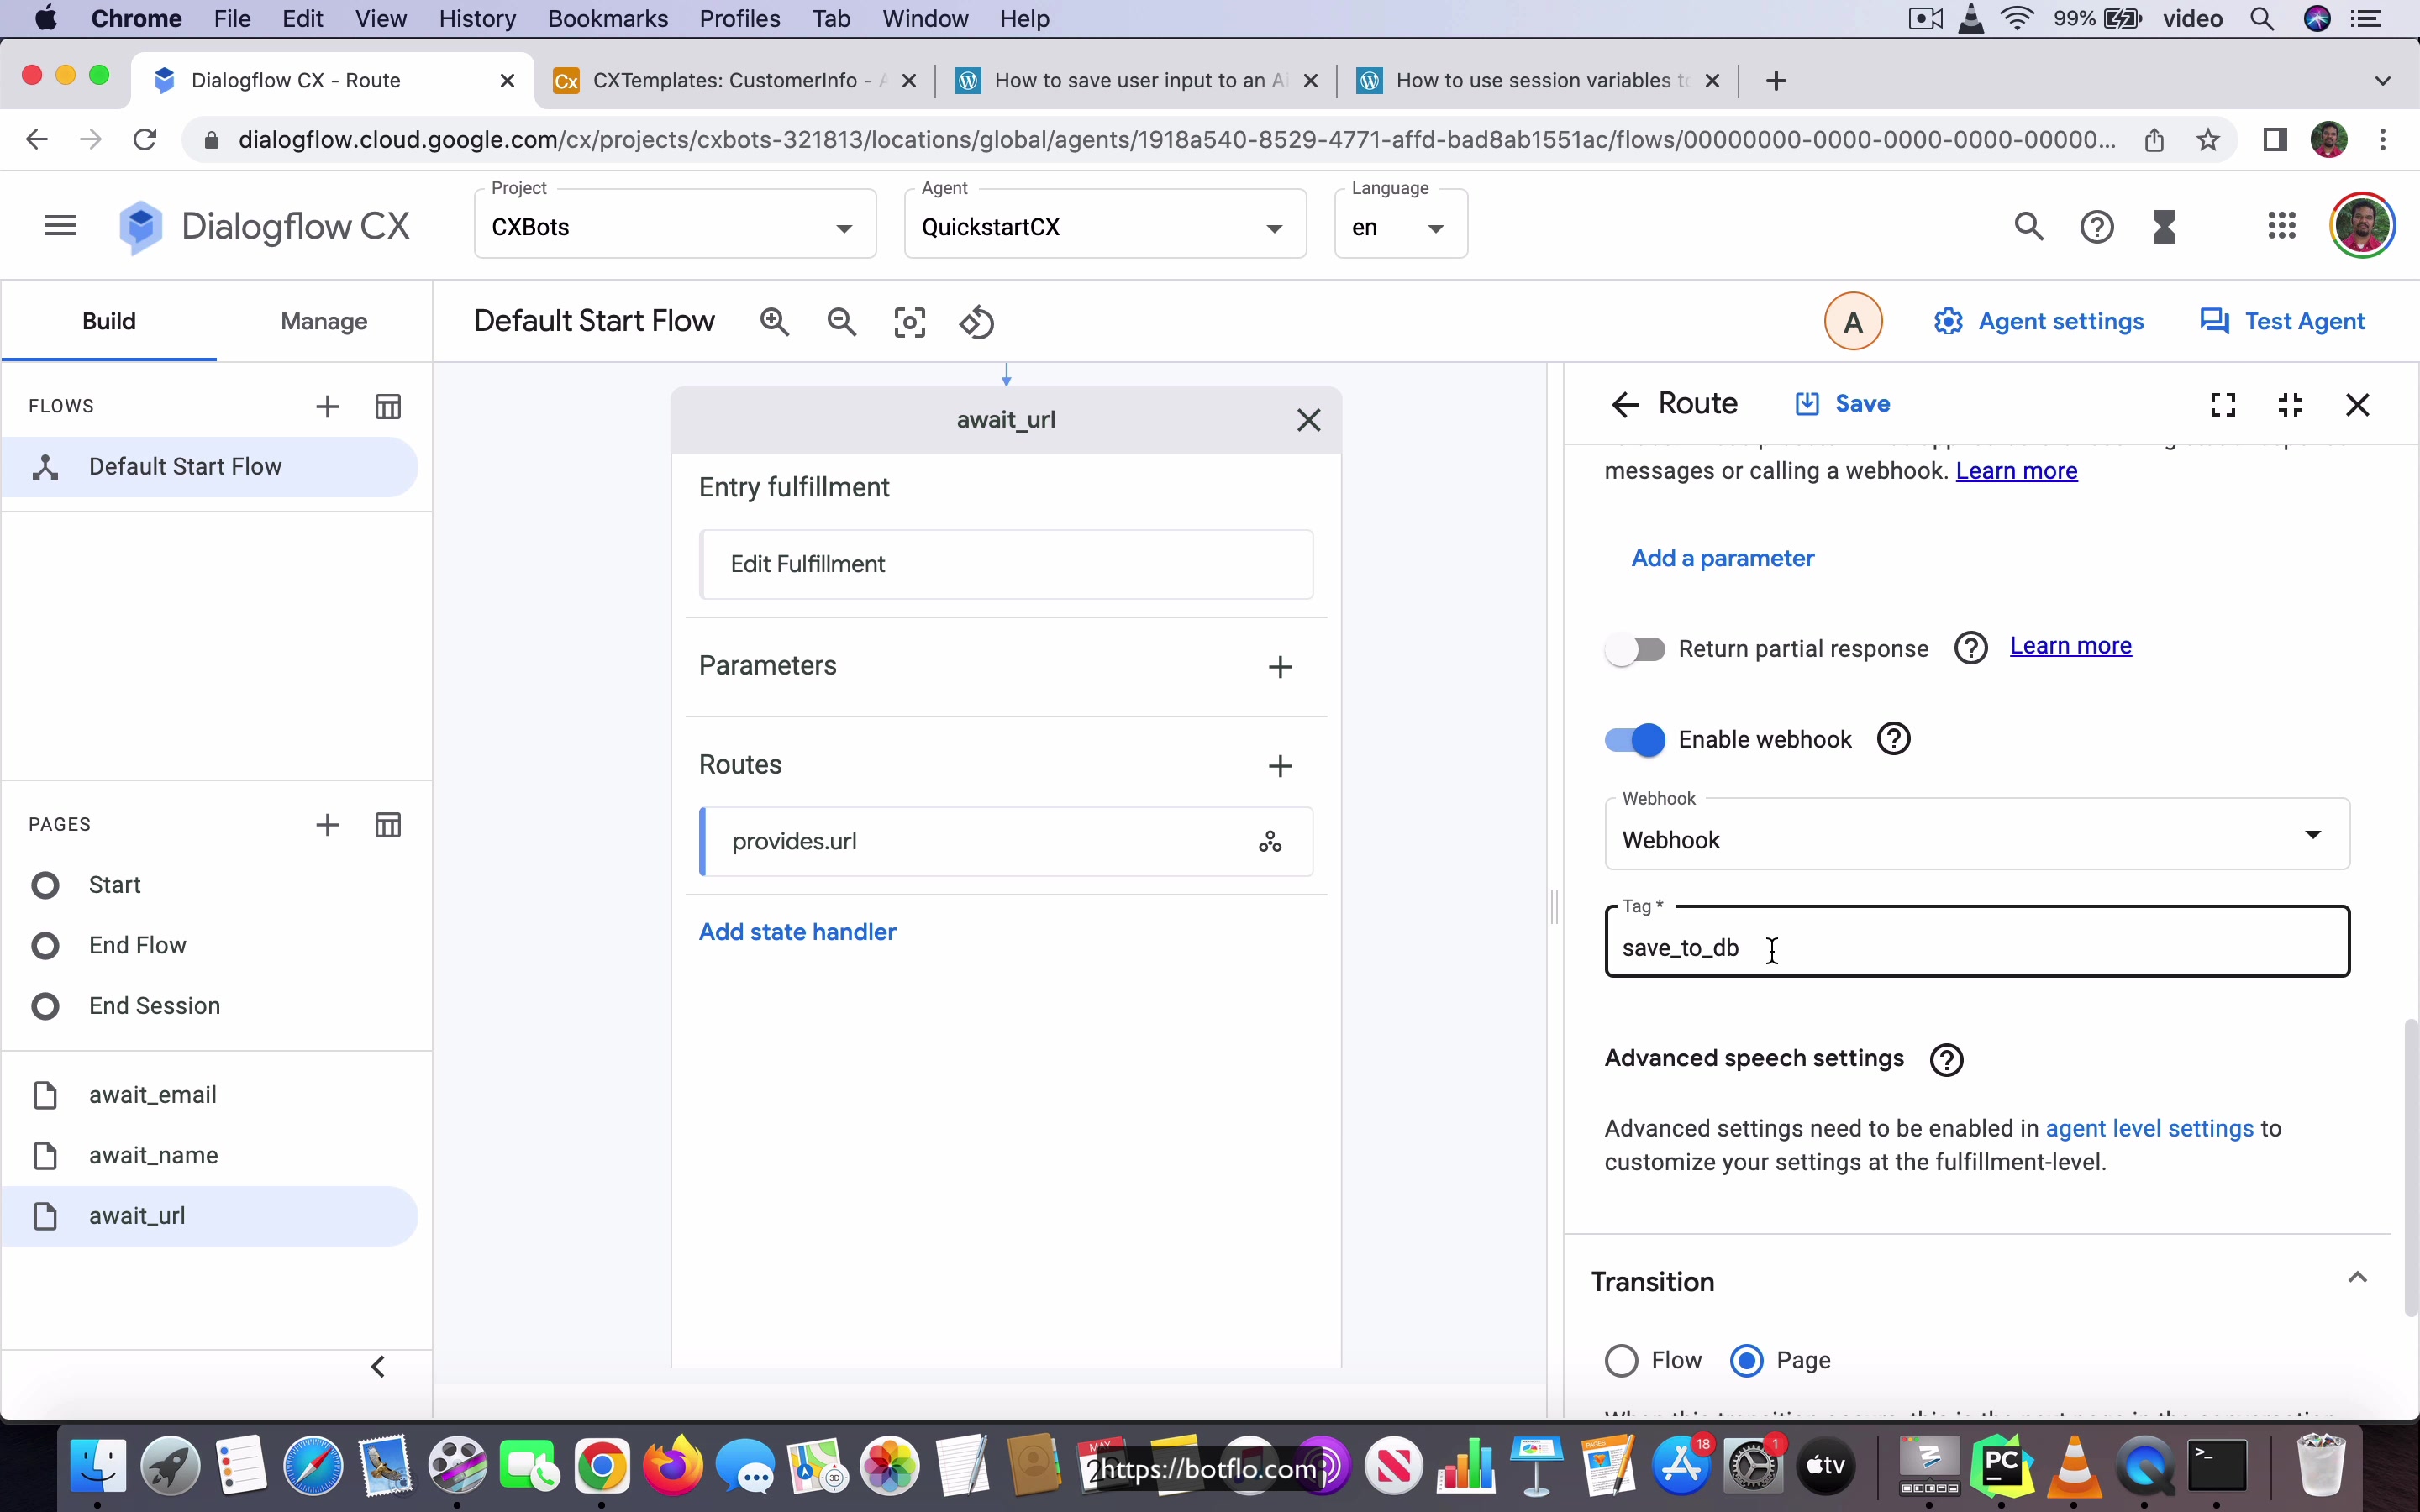
And this is where the user provides their name. And once they do that, the bot is going to say what is your email address, and then transition to this await email page. Await email page is similar. The user provides their email, and it’s going to transition over to await underscore URL. In the await URL page, as soon as the user provides the URL, we are going to not put anything in the agent says because it’s coming from the webhook.
[02:01] But we are going to enable the webhook for this particular transition route. And you can see that it has this tag also. And in the webhook, if you go and take a look, you will find that it has this ngrok based URL. And I have an article on my site on how to set up ngrok on your local machine. It’s a way to write code and debug the code, and also step through the code as you trigger the webhook so that you can debug it more easily.
That’s the reason why you use ngrok. And that’s what I am using here. I have this Python code in my PyCharm editor. And I’m running this. And what I’m going to do is just give a quick demo of this agent. And website chatbot. I am Aravind Mohanlal. Email address is aravind.gmail.com. And then I’m going to give my website URL.
[03:04] You can see that it takes a few seconds and then comes back with thanks. We will be in touch soon. And if I go to the CX templates, you can see that this information has been populated. So this is how you will create the bot, as well as this is how you’ll save this information to the add table database. I have added the Python script as well as the bot, you know, the blob file, this agent zip file is the equivalent of the zip file for CX into the course.
And you can take a look at it. You can download it and also you can inspect it. And the ngrok URL is something which you can use when you’re running the code from your computer. And when you deploy it, of course, you’ll have to deploy this Python code or whichever programming language you use, you have to deploy that code to an actual server for you to be able to run this without having your working development machine as the place where you host this backend code.
[04:07] So this is how you will save user input to an add table database in Dialogflow CX.
Lesson: 4 Basic slot filling
[00:00] So in this video I am going to show you how you can migrate this slot filling bot which I built in Dialogflow ES, how you can migrate that over to Dialogflow CX. Now I have mentioned this many times on my website, I think that the Dialogflow slot filling implementation is actually pretty robust in Dialogflow CX. In fact, I tell people to avoid slot filling in the case of ES, but in the case of CX from what I have seen till now I think that is pretty robust and I do not really see a good reason for people to avoid this feature in CX.
Okay, so with that said let me just go over the bot. We need to get six pieces of information, the from, so this is for a flight booking and the six pieces of information will be the from city, the to city, departure date, return date, flight class which can be one of first or economy or business class and then the number of passengers. Okay, so let us go to this bot here, it is an empty bot that I have and what I am going to do is I am just going to add an intent and I am going to call it book flight and the training phrase is going to be just very simple, book flight and then I am going to save it.
[01:17] Okay, and once I save this I am going to transition it to a new page called collect params. This is going to just collect all the parameters and in the collect params page you go inside and what you do is you add these parameters that you want to actually collect.
Okay, so this is going to be the from city and it is going to be of type geo city and you can see that it is already marked as required and we leave it as required and here this is the initial prompt fulfillment, where are you flying from. Okay, so that is going to be the initial prompt fulfillment and I am not going to do anything else right now, let us go ahead and save this.
[02:05] Let us add one more parameter, this is going to be the to city and once again it is going to be of the same type and the prompt will be where are you flying to. Okay, and let us go ahead and save that and the third will be departure date, sys.date, what date will you leave, let us add that and save it and the fourth parameter will be return date and that is also going to be a date, what date do you return, add it, save it.
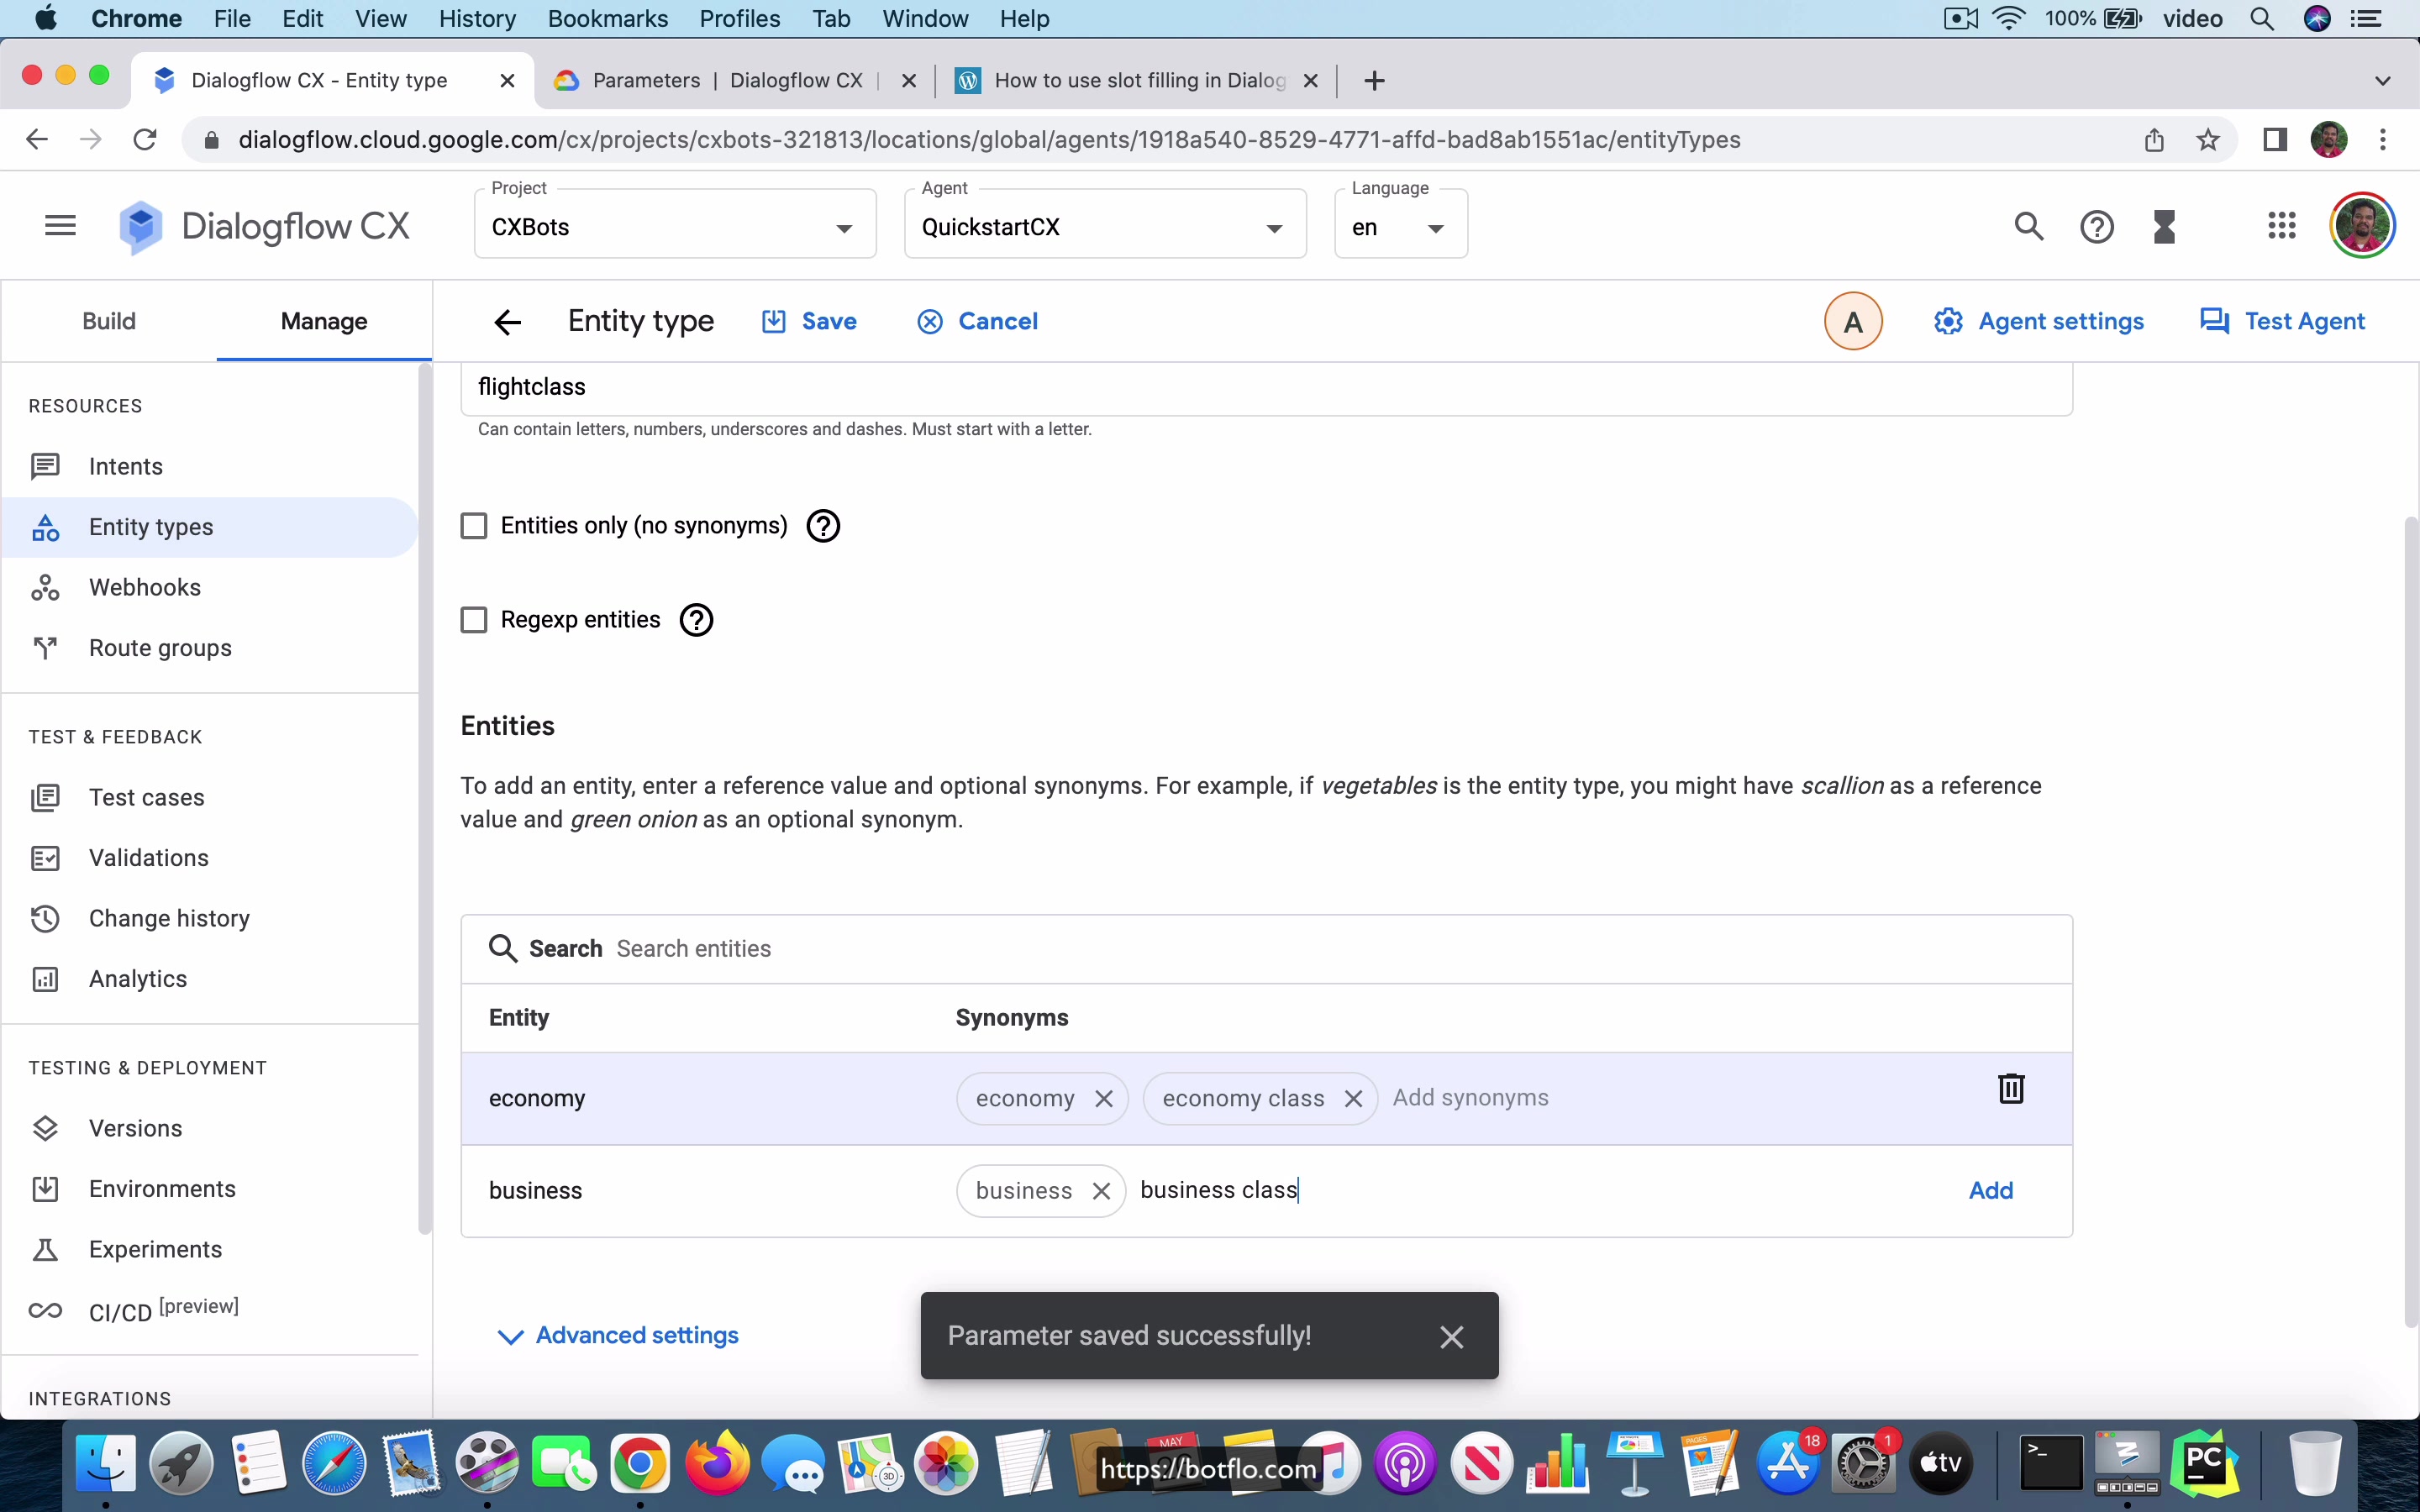
Now, we have to ask for the, okay, this is let us go for the number of passengers, number of passengers and I am just going to have a number, the number integer and this is going to ask how many passengers and finally we need the flight class and that has to be a new entity type.
[03:23] Let us create an entity type called flight class, so we can have economy class, business, business class and first will be first class, okay.
We have all these and I have added it and save it and I do not know why this keeps coming up but I see this, it is some kind of a bug but what I can see is I can go back and see that that entity has been created, it has been saved, so that just seems to be some kind of a transient bug.
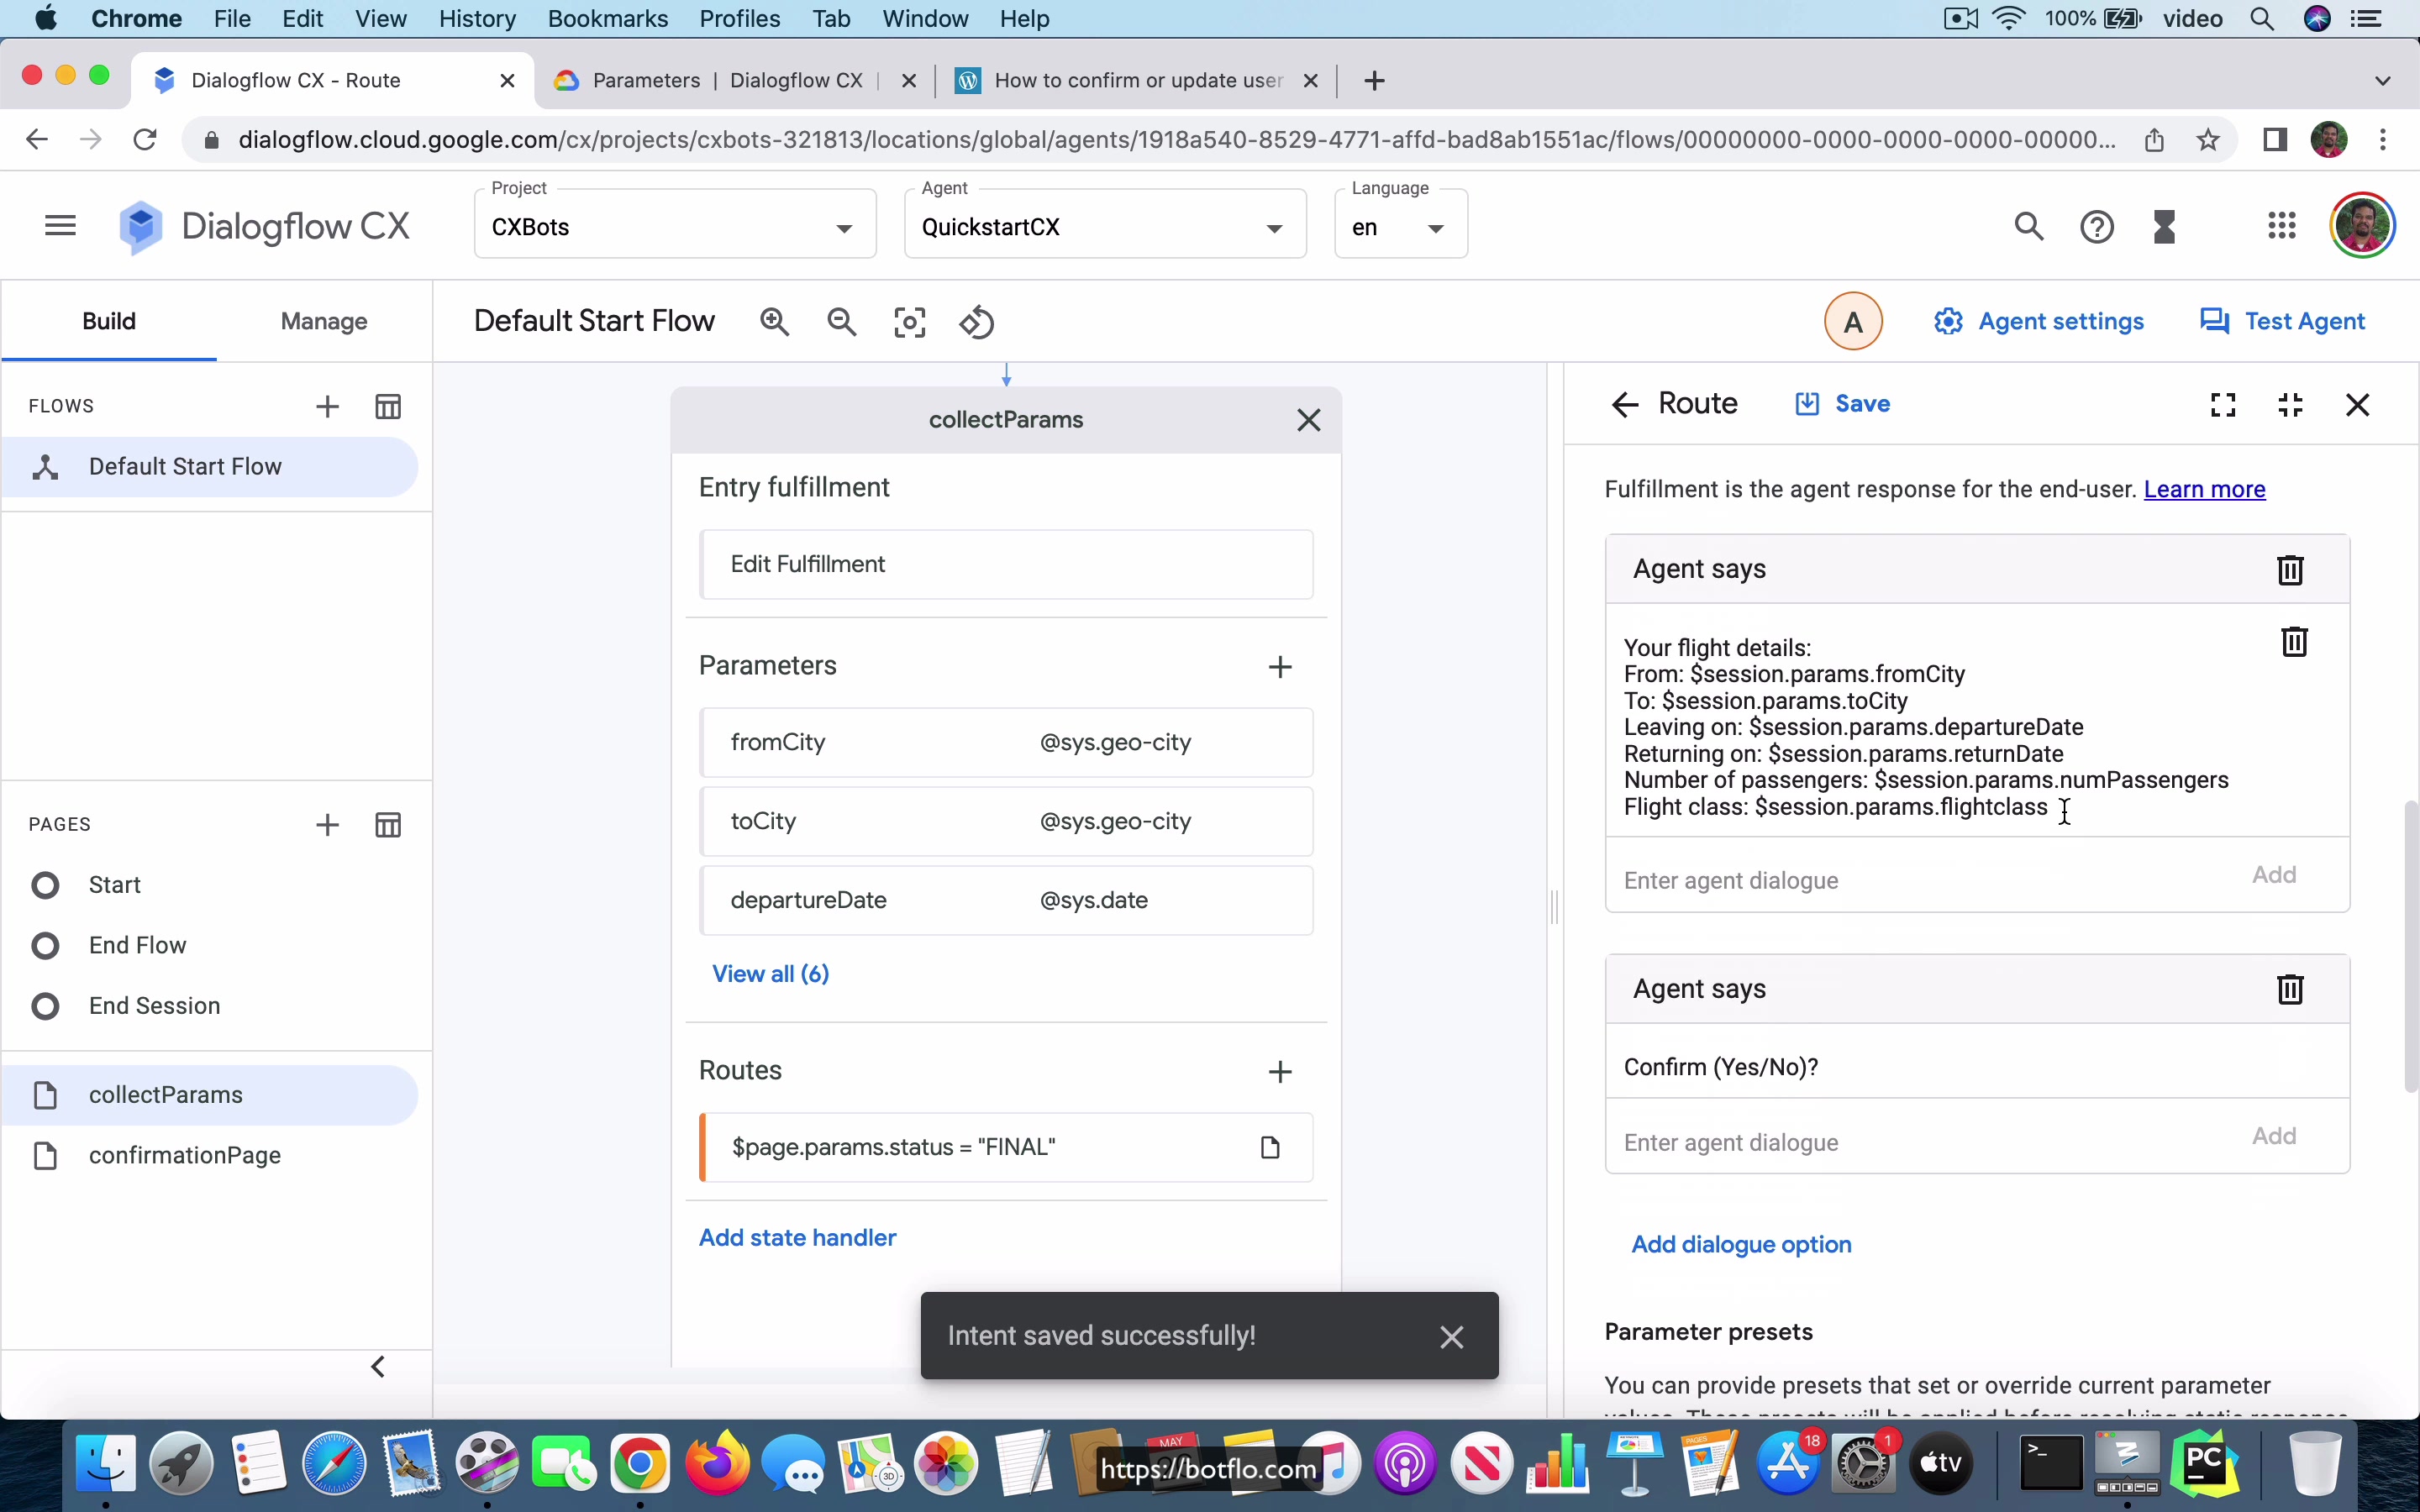
[04:06] Let us go back to the collect params page and now I am going to add one more and this is going to be the flight class and if you type flight class you can see that it is also showing up, so which flight class is going to be the prompt. Let us go ahead and save it and how do you end the slot filling? In the case of the, in the case of slot filling what you have to do is you have to add a condition, okay and the condition is going to be like, this is what you have to use there.
It is going to be customize expression and this is the expression, the page parameter status is final which means that it has collected all the parameters that this page is waiting for. Let us go ahead and save that and once that has happened the bot is just going to echo all the information, your flight details.
[05:10] We go for from city is dollar session dot params dot from city to just call it to dollar session dot params dot to city leaving on dollar session dot params dot departure date returning on dollar session dot params dot return date number of passengers will be dollar session dot params dot num passengers and finally flight class will be dollar session dot params dot flight
[06:09]
class, okay. We add this as the response and let us just go ahead and save it and let us go ahead and test this agent. You can see that it starts prompting this information one by one, book, flight, where are you flying from, let us say I say Seattle, flying to New York, what date do you leave, let us say I say 10th June, what date do you return, 15th June, how many passengers do and which flight class, let us say I say first class.
You can see that it is providing all the information, your flight details is from Seattle to New York, leaving on the state, returning on the state, number of passengers and flight class. We can see already that the way you do slot filling, you can see that it looks little different in the sense that it is a little more sophisticated in Dialogflow CX.
[07:05] And over the next couple of videos, I will also show you why Dialogflow CX has a much more robust implementation of slot filling. This is how you build a basic slot filling bot in Dialogflow CX.
Lesson: 5 Confirm or update user input after slot filling
[00:00] So in this video, we are going to discuss how to confirm or update user input in Dialogflow CX once you collect all the pieces of information using slot filling. So I have done that in this Dialogflow ES bot in the quick start template series. And I’m going to do the same thing with the CX bot. And you remember that in the last video, we already collected these six pieces of information. We also have this condition route, which when it comes to this final, like once it’s finished collecting all the parameters, it just displays this message, right, it ends there.
So what we want to do instead is once we collect all the information, we are going to add one more like a question to the user, it’s going to ask like confirm yes or no, okay. So let’s just add that like a confirmation message that the user can provide. Okay, and here you have multiple options, you can actually on the confirmation box, you can just go to a different page.
[01:07] So let’s go click on this confirmation page and save it. Okay, so you can see that it’s created this confirmation page, I’m going to add a new intent route. So this is going to be just confirmation.yes. And the user says, yes, let’s add it.
Okay, so in the case of the user saying confirmation, when they confirm that they are okay with it, you just say, okay, thanks for the details, or something like that, okay. And that ends the conversation, okay. So we ended the conversation in case that their confirmation, they have confirmed yes for the during the confirmation message, but what if they say no, and more specifically, what they want to do is they want to change some value of individual parameters.
[02:07] So in this case, in the ES bot, I’m just going to show you what we are doing. So in the case of the user saying no, okay, we are going to ask them to ask them what they want to change. Okay, so here, I’m going to do the same thing, I’m going to add a new intent route. And it’s going to be confirmation.no. And the training phrase is just no, let’s just add that, save it.
And in this case, the agent is going to say, what would you like to change? Okay, so let’s add that. And let’s go ahead and save it. So we are still on the confirmation page. And the user can say something like change parameter x to value y, okay. And in this case, we allow them to change any of the parameters to a different value.
[03:02] Okay, so the way I’m going to do that is create a new intent route. Okay, change, let’s say, let’s just say change from city. Okay, that’s going to be the one I’m going to have here. I’m going to say change from city to something, you know, in this case, it doesn’t matter what you say, as long as you use the correct data type, and this has to be city.
But the most important thing is that the information you collect the parameter ID has to override, overwrite, sorry, it has to overwrite the existing value, which means that you have to make sure that you use the same variable name. Okay, so here, I’m going to make it from city, all right. So this has changed the from city option in this particular way, change from city. And what I’m going to do now is I’m going to go to this collect params page parameters and just going to copy this, okay.
[04:10] Okay. And let’s go here, confirmation page. Unfortunately, we seem to have lost the change from city, okay, that that’s the one, okay. I’m going to paste it. So let’s add it and do this one more time, confirm, yes, no, add that also and save it.
So they can say yes, or they can say no, or they can change the from city information. Now, if they say, if they change from city, we still want, because we are still prompting with another confirm message, we still want to stay on the same page, right? Because if they change something else, we want to be able to capture that information too.
[05:02] So this is what I’ve done, I’ve allowed them to change the from city. So let’s do the same for the to city, change to city and I’m going to change to city to Vegas, let’s say, okay. So here I’m going to change this to to city, save it and I still have it on my clipboard, I’m going to add that and so confirm, yes, no, okay.
So because we are making sure that we are using the same parameter name, we will overwrite this information and you will see that when it does this reprompt, it will use the new information, okay. So we don’t need to do any state change for this either. Let’s go ahead and test the agent flight from Seattle to New York, 10th June, 15th June to first class.
[06:23] So now you can see that it’s asking me to confirm the details, yes or no. If I say yes, it’s just going to say, okay, thanks for the details, okay.
So now let’s, let’s reset and start again, flight, Seattle, New York, 10th June, 15th June, first class, but this time I’m going to say no. So it says, what would you like to change? So if I say change to city to Las Vegas, okay.
[07:05] You can see that it’s changed that to city right there in the prompt, right? So here it said your flight details from to and all that, and here you can see that it’s changed the information to whatever you just changed right now. All right. So you saw that we tested the agent and things looked okay. I just wanted to add one more thing, I forgot to mention it. You want to do the same thing for the other parameters, that is you want to add like four more intent routes for changing the departure date, changing the return date, changing the number of passengers and changing the flight class.
And you’ll use the same approach of course, where you have the, inside the phrase will be something like change departure date to, you know, whatever date you want. And then you will just paste this information as the response. And then you ask for confirmation again. And notice that we don’t have to do anything in terms of a page transition because once the user confirms they are going to be in the same page until they say yes and exit it.
[08:07] And even then, you know, you still stay in the same page, but just that the conversation itself ends. So I just wanted to add that quick piece of information because that will complete the overall chatbot.
Lesson: 6 Advanced slot filling
[00:00] One of the big reasons why I do recommend people use slot filling in Dialogflow CX versus using it in Dialogflow ES is because they fixed a lot of the issues which ES slot filling was having. And this is a good example where if I were to migrate this bot I have built. Now this bot is actually using webhooks for doing slot filling in Dialogflow ES, ok. And if you scroll down you will find that what I do is I have this basic slot filling intent, ok.
And then I have these six parameters the same as the booking flight from which we saw before. But I also enable the webhook call for this intent and I also enable the webhook call for the slot filling. And then based on whatever input I have already collected I will try to collect the rest by calling other intents in the same agent and I do that by using a feature which is called follow up events.
[01:00] And you can go and look at the tutorial to get a good idea of what’s going on. But the basic concept here is that doing this in Dialogflow ES is really challenging and it’s a lot of work, ok. And it ends up also being a pretty complex bot which is in a sense because of all the back and forth between the bot and the webhook code it also becomes pretty hard to maintain. On the other hand in Dialogflow CX it’s actually very easy to build a bot like this one.
And I will also point out something which is very important in this particular case. The whole idea of why I don’t recommend slot filling is because in the case of ES if you can’t get the user input the slot filling will keep reprompting until the user either gives the input which the Dialogflow ES is able to recognize or they have to cancel the flow entirely which means that they lose all the stuff which has already been saved as part of the particular slot filling loop, ok.
[02:11] So these are both like obviously not very good outcomes. And also the this is sort of as I always point out that I like slot filling the concept but not slot filling the feature because the concept of slot filling is very really nice one and I actually encourage you to go and take a look at the concept on my website.
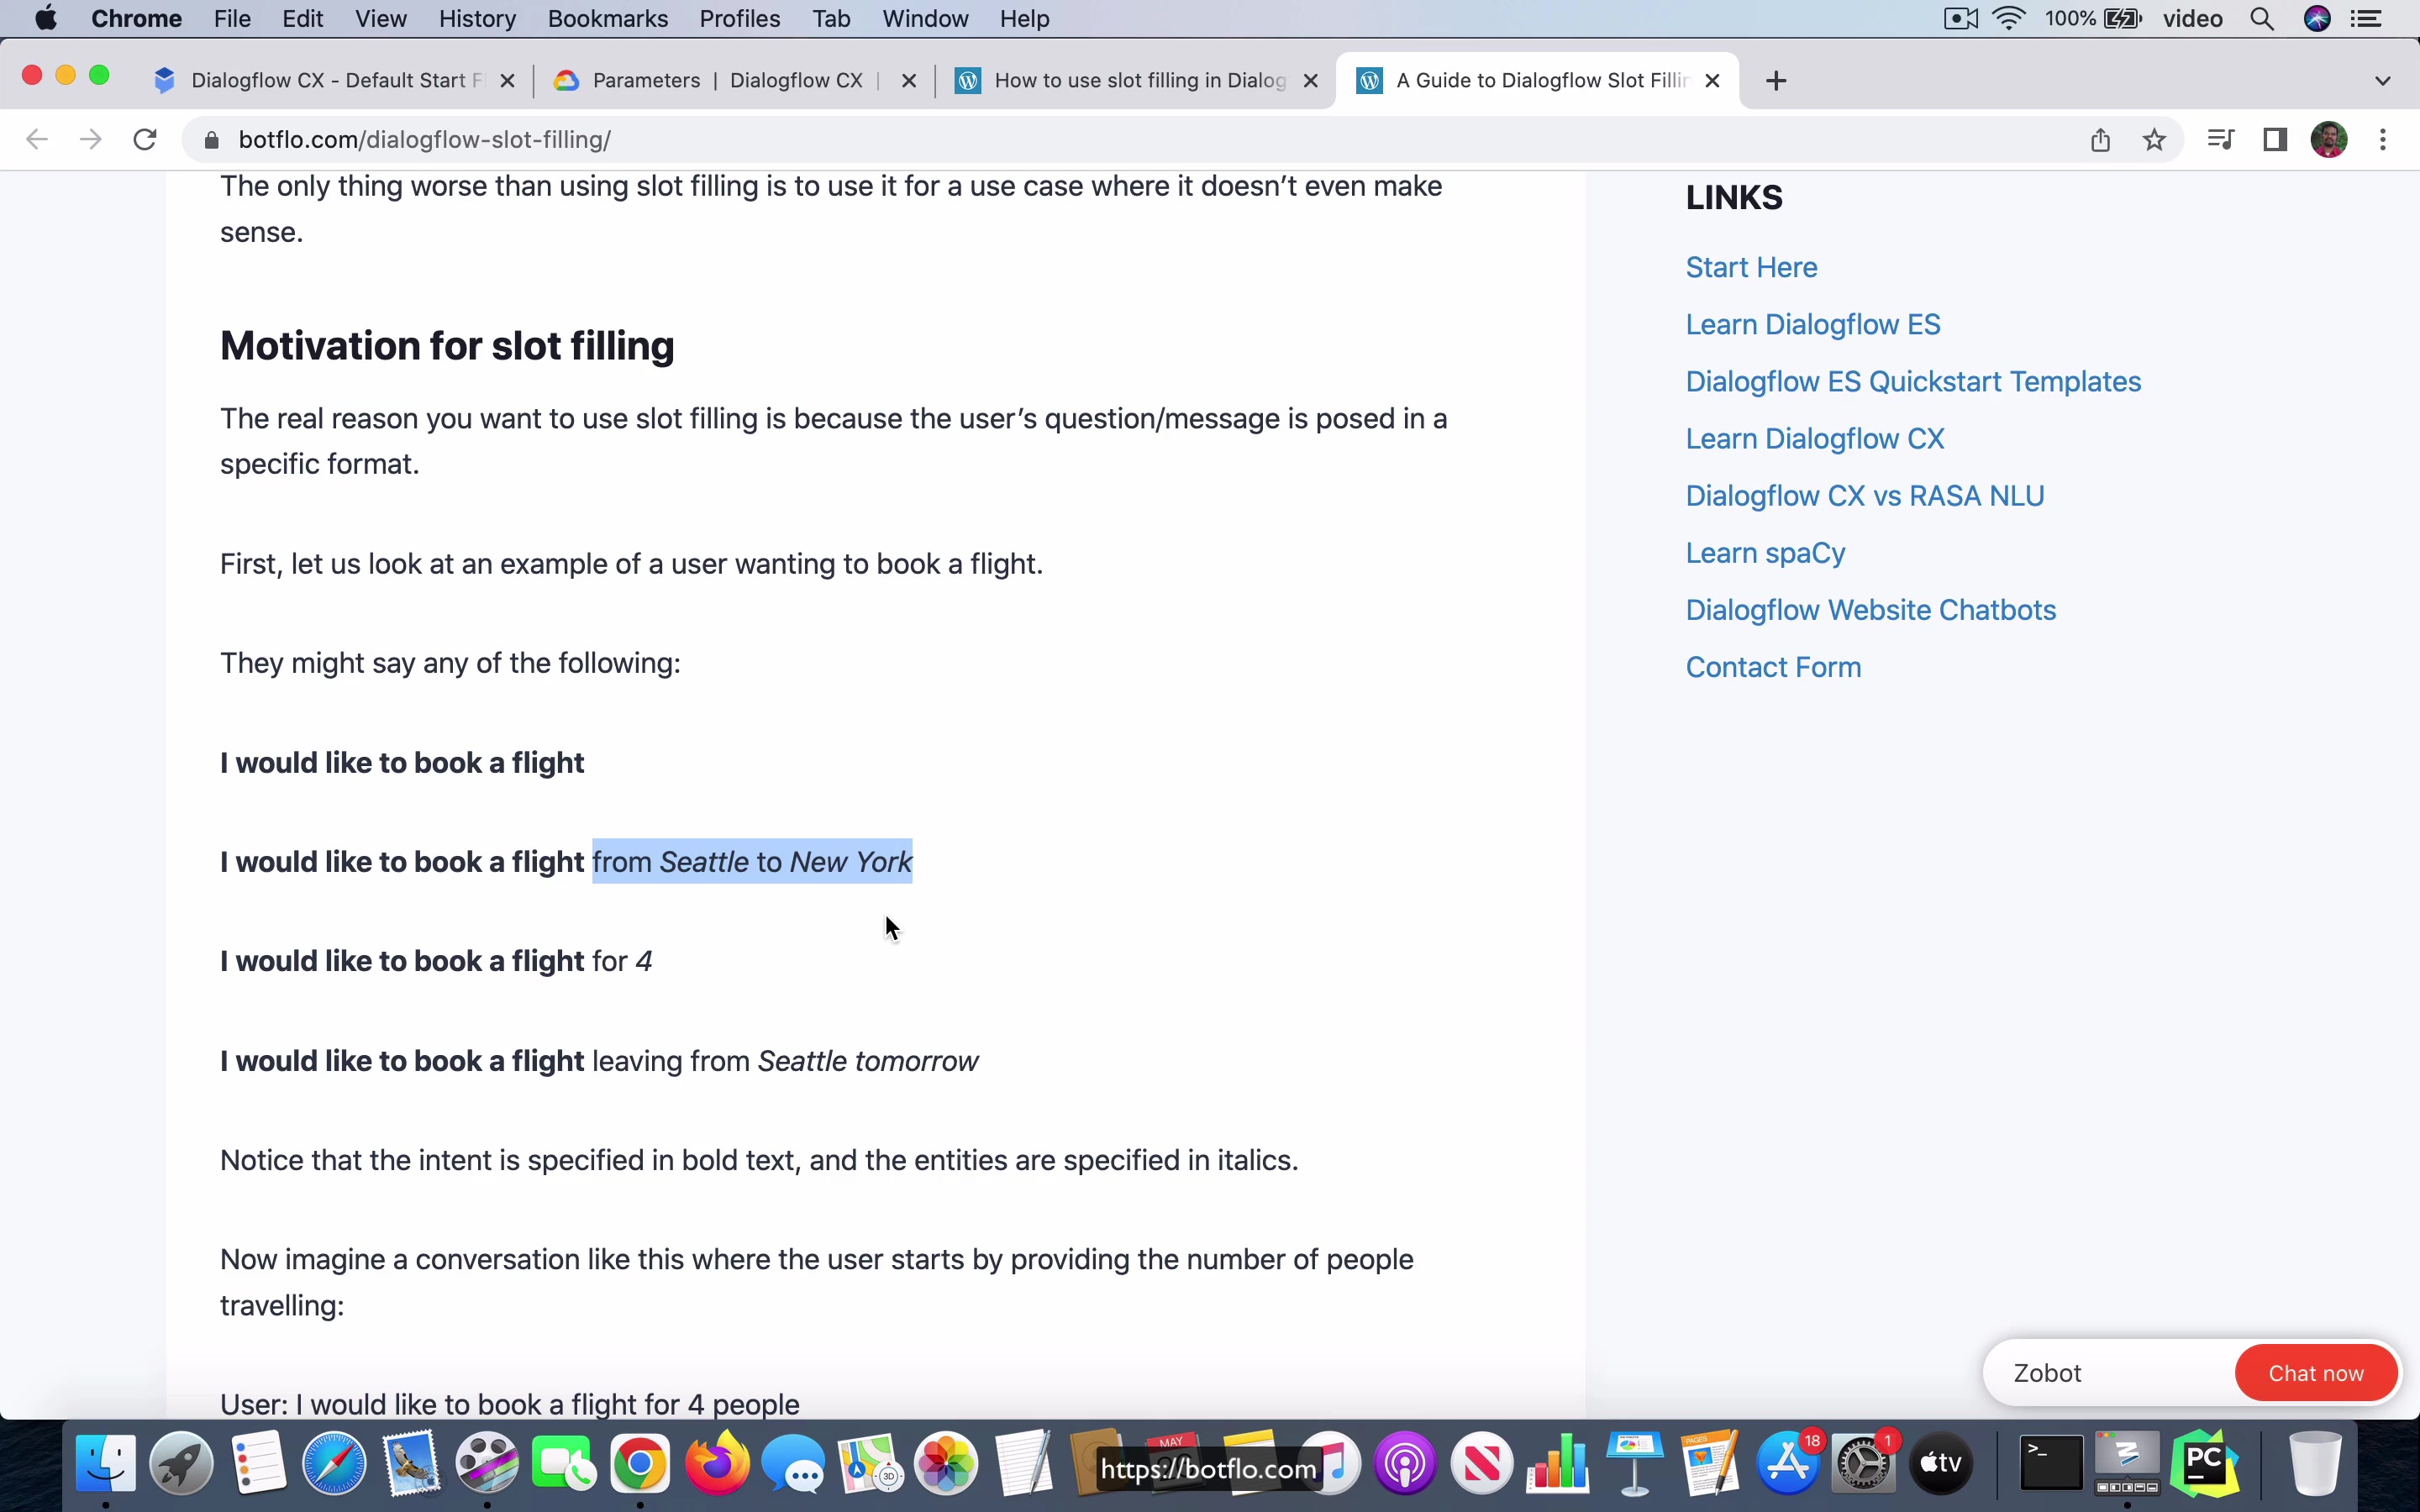
So just to I just want to give you an example of that. So if you go to the article about slot filling on the site I am going to scroll down and show you an example, ok. So here if you were to go down yeah so here is the thing right I ask like when is it a good idea to use slot filling and usually you will find that there is like a prefix of intent that is this chunk of the sentence is the intent and then it’s followed by a list of parameters and the important thing is that you do not really know which parameter the user is going to provide as part of the first sentence, the first time they interact with the bot.
[03:22] So they can say either of these four things all of them are valid and all of them are using different slots and also all of them are you know they the slots are coming in orders in an order that you cannot really expect, ok.
So what this means is if you want to be able to not only understand this intent and also get all the information the user has provided in one go slot filling is a great feature. But now you have to make sure that you get the rest of the information and remember because it’s all required parameters Dialogflow is not going to exit the loop until it gets all the information, right.
[04:01] So what is going on here is if there is a hitch in the way the slot filling flow is constructed then there is a good chance the user could get either they could get stuck in a loop and get frustrated with the bot and by the way this is often you will find that this becomes a joke on the internet where they keep talking about how a bot just gets stuck in the error loop and you know this is kind of common if you have a bot which is forcing the user to input something which it expects but the user really doesn’t understand what they should input at that point and that’s that’s the one one side, right.
And then the other thing is that you do want to ensure that you get all the information they did provide and not re-prompt for information they had provided in a previous sentence or a previous step. So maximize the information that you collect but minimize the errors and the re-prompts and things that could annoy the user.
[05:02] So turns out that it’s actually very difficult to accomplish that in Dialogflow ES. My tutorial here which talks about how to use webhook for slot filling in ES is one way to handle it but it’s not a very robust mechanism and also I personally think that even if you do this this is still not very easy to manage and maintain, you know. So now let’s take a look at how the same thing can be implemented in Dialogflow CX.
So you might remember what we had here is the this is I’m just starting off from where we left in the previous part it has already we already have this page which collects all the six parameters, right. So these are the six parameters that we want to collect and the start page has the book flight intent, okay. Now if you go into the book flight intent you will find that the only training phrase I have right now is just something which says book flight, okay.
[06:07] So what I am going to do now is I am going to improve this training phrases inside this book flight intent and you will find that the Dialogflow CX is going to be able to do pretty much all the code logic which this long tutorial was doing.
Lesson: 6 Advanced Slot Filling Part 2
[00:00] What I am going to do here is, I am going to say a book, a flight from Seattle to New York. Now, as soon as I do that, you see that it is added these two parameters, right, based on what I input. My goal is to make sure that I change this to the same slot names I have used in the next page that is the collect params page. Here, so let us go back and look at the intent.
Here what I have done is, if the user says book a flight from city 1 to city 2, then I make that these two cities which are annotated, I call them as from city and to city. If you go to the collect params, you will find that that is what we call these parameters, right. Let us go back to the start page, go to the book flight. The next thing that I want to do is book a flight leaving on 10th June and returning on 15th June, ok.
[01:08] Now that I add these two, you will see that it has added two more dates into this and I am going to change this to, first of all I am going to change this to date because it is not a date time and second I am going to change this to departure date and I am going to change this one to return date, again it is so that it is consistent with what we have in the next page.
Then I am going to also add another training phase, book a flight in first class for three passengers, let us say I do that. Now, it does look like it is not able to identify this first class over here. I am going to delete this and try with a different one, book a flight in economy class for three passengers.
[02:09] I think this is because it is not a system entity. Let us go ahead and go for flight class from this list and this three is, so here flight class is the same parameter we already have there, but number is going to be changed to num passengers, ok.
What I have done by doing this is I have effectively made sure that the book flight intent it can handle like multiple different starting phrases, just like I pointed out over here, you want to be able to handle all of these things, ok and I have done that. Now, because I have made sure that I have not only, not only I have added all these parameters into the start phrase, I have also made sure that you use the same set of phrases in this actual slot filling logic, so that if the user were to provide any of these parameters in the book flight when this intent fires, then Dialogflow CX is already smart enough to not ask for those specific parameters, it will just skip over them when it goes to the next page.
[03:27] Here we have this collect params, you know, it goes in this sequence as we saw, if you did not have any information provided in the first sentence, it will first ask for the from city, then the to city and then it keeps going down this list.
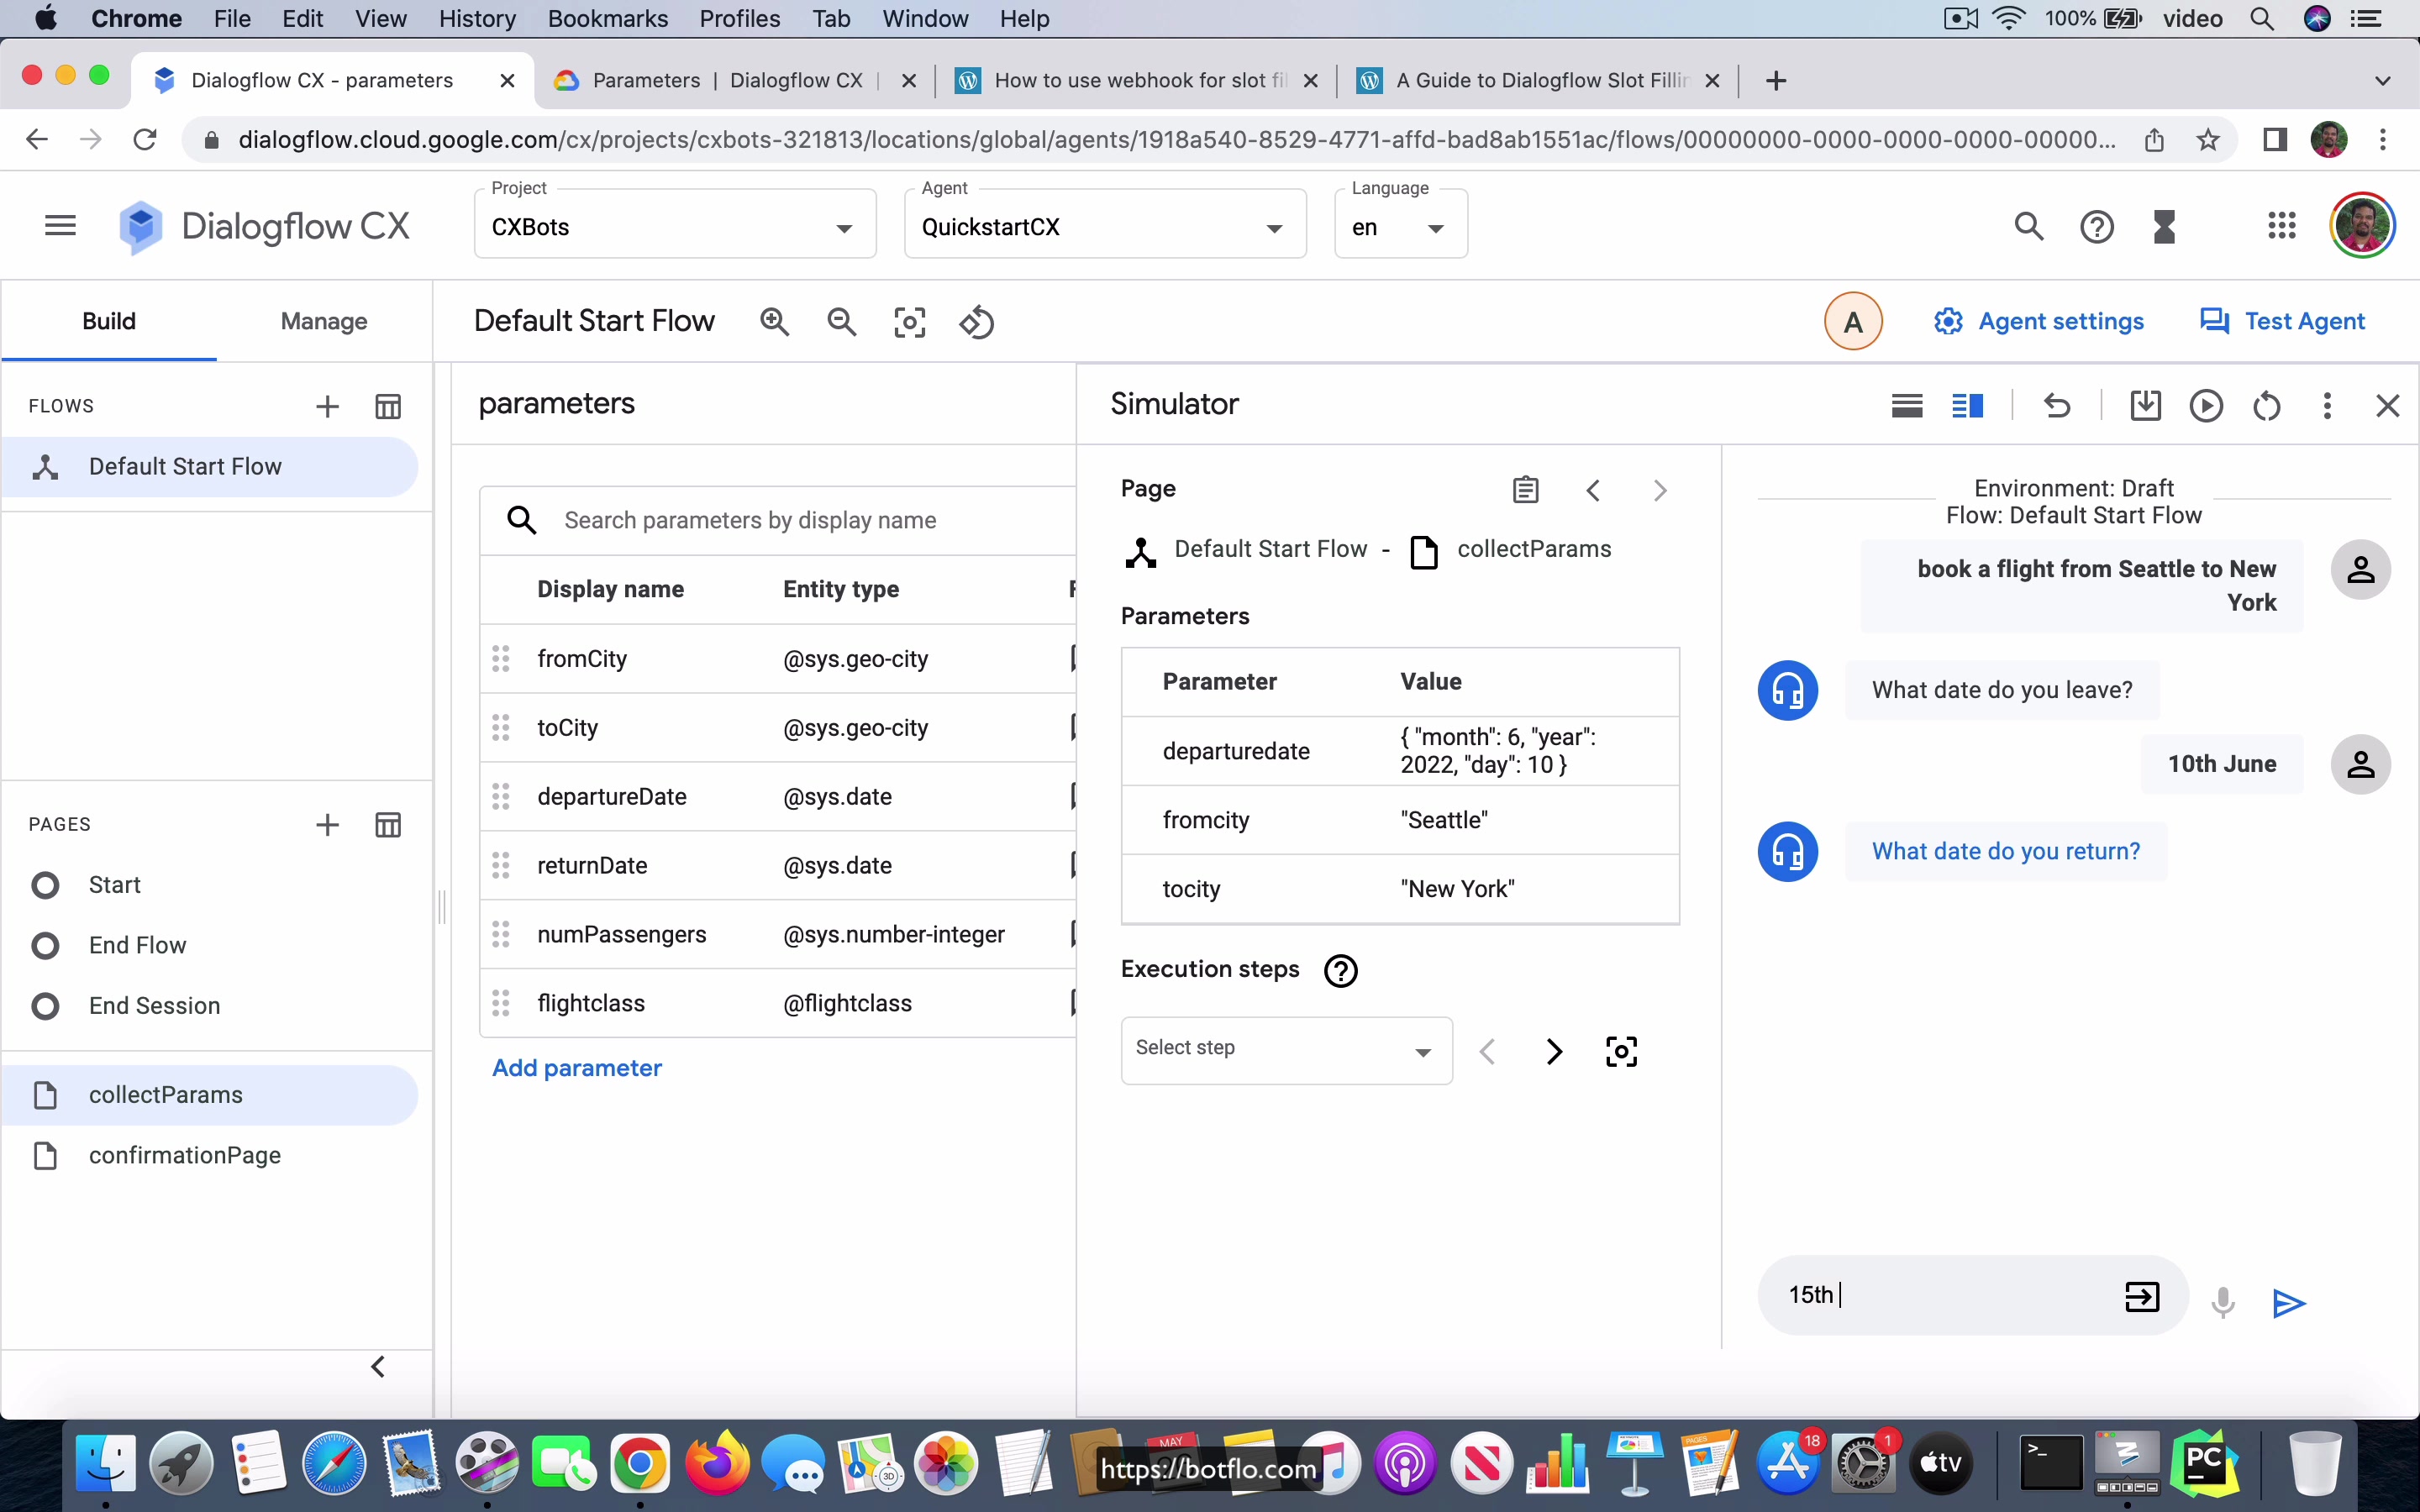
Let us take a look at what happens if we already provide the from and the to cities. I am going to say book a flight from Seattle to New York. You can see that it already got the from and to city parameters. These two are already filled these slots.
[04:00] It went directly to the departure date, ok. Now I am going to, so I can just continue with the usual flow after that point, right, 15th June and then how many passengers to and then economy class and then it is going to ask for this confirmation. I am not concerned about this confirmation step for this one, ok. Let us try with a different set of inputs, book flight leaving on 10th June and returning on 20th June, ok.
This time you see it is got departure date and return date, but it has not got the where are you flying from. Let us do that Seattle, where are you flying to, New York. As soon as I get input this, you expect that it will not prompt for the departure and the return dates. Instead it should go directly to asking how many passengers are flying.
[05:01] You can see that that is exactly what it did and then you can go ahead and finish this loop and you can see that it got to the confirmation message. Now let us do the other one, book a flight in economy class for 4 passengers. Where are you flying from, Seattle, I am flying to New York. What date do you leave, 10th June.
What date do you return, 15th June. That is it. You got all the information and it is going to echo that and then ask for the confirmation, ok. This is the basic idea of slot filling in Dialogflow CX and as you can see because of the way the CX itself handles all the stuff, you are able to implement a lot of logic and it is just a much more intuitive way of building the slot filling and I am very impressed with the way that the Dialogflow CX team has implemented this to be very honest.
[06:08] And in fact, this is not even the last of it. Let us say that now you can see that what I did was I provided the input in the way that the bot expected. It did not really run into any errors, right. Now in the case of ES slot filling, the issue is if the user provides perfect input, it will still work, but when the user does not provide perfect input, that is when it usually starts complaining or goes off track and it does not really know what to do, right.
In the case of CX, in the case of CX slot filling that is, you can go and look at each of these parameters, right. Let us say in the from city and you have these things called reprompt event handlers and I am just going to quickly show you something. If you click on this, you will find that you have all these no match one, no match default and all that. What you can do is based on what the user, which parameter the user was not able to provide the input correctly, you can give reprompts, you can make it a little more intelligent, sometimes you can just ignore it and move on to the next slot.
[07:13] And then you can, you know, somehow infer it from the code logic or do something in the back end to fix that issue later on instead of stuck, getting stuck in the loop or, you know, cancelling the whole input and like coming out of it. You do not want to do either of these extremes, right. That is exactly what CX allows you to do and it allows you to handle this in a very elegant way.
And if you want to learn more about this, you can go and take a look at the slot filling chapter in my, the dialogue, in the Learn Dialogflow CX course, where I talk about how to do this reprompt handling. So to summarize, the CX slot filling is far better than the ES slot filling and I will also say that where it makes sense. So that is also another thing which has to be added.
[08:01] You do not really need a slot filling for all the Dialogflow bots. You need the, you need it when you have inputs which are in this format, okay. And if your bot is actually a genuine slot filling bot, I think that you should go for Dialogflow CX and you should use the slot filling feature in Dialogflow CX.
Lesson: 7 List and composite entities
[00:00] So in this video, I am going to explain how you can use list and composite entities in Dialogflow CX. And you can see that I already have an article about this for Dialogflow ES. And in the case of CX is actually pretty similar and it is not, there is not much that is new except the way that you can invoke it and display it. So let us go to the, let us go to the manage view, go to entity types. I am going to create an entity called chocolate and I am going to have the same values, KitKat, Twix and Snickers.
I will save it. So this is just some transient bug. I am not sure what it is about, but you can see that the chocolate entity has been created. Then I am going to create an entity called item.
[01:01] And here we are going to just use entities only. And we will do this is dot number integer, colon quantity. And then another chocolate, colon name, okay. So that is just the quantity of the name of the chocolate and save it. That is the item entity which has also been created.
So inside the start page, I am just going to create a new intent. I will call it place dot order. It is as if the user is going to place an order for the item. And they will say something like I want two KitKats, three Twix and four Snickers, okay. So let us go ahead and add it. So you see that the thing what dialog plus CX does first is it is trying to parse it as if there are three different items.
[02:07] But what we want to do is we want to use it as if it is a list of composite entities. And you want to remember that, you know, the two KitKats itself is a composite entity. It is not a single entity, right. So what you can do is you can click on this and remove that, the annotation that is, select the whole thing, then search for item.
So let it get annotated as an item in its entirety. And then you click on this is list checkbox. That is pretty much all you need to do. And you can go ahead and save that. And the agent is going to reply with something very simple. Like it is going to say your order and then it is just going to say session dot params dot item, okay. So that is the name of the parameter that we saw inside the, when you, when it got annotated, right.
[03:07] So let us go ahead and test it. So you can say something like, I want two Twix, three Snickers and four KitKats. And you can see that it says your order is two Twix comma three Snickers comma four KitKats. So it is maintaining the order in which you put the input.
And then it is also, you can see that in the item, it is able to parse out the values as you can see from here, right. You see the quantity is two. The name is Twix. The quantity is three. The name is Snickers. The quantity is four. And the name is KitKat. You can change the order. It will still understand it. So you can say, I want two Snickers, two, three KitKats and four Twix.
[04:01] And you will find that it is able to find, identify that also, okay. And also notice that it is going to place this values as a list. It is just going to output all of them with separating them by a comma. So what that means is that you can, if you have some extra words in there, I want two KitKats and I want three Twix and I want four Snickers.
So you can see that it just removes all the extra words and it is just able to identify the exact quantities as well as the items, as well as the chocolates, right. So you can see that you can do it for just a single item. I want two Snickers. You can have two.
[05:00] I want five Snickers and two Twix and so on. I think you get the picture. So this, you can do this so that if you want to have in a single sentence, if you want the user to order multiple items, this is the way to do it. You use the composite entity and you create a list of the composite entity and then your Dialogflow CX bot is usually able to identify this full list and also the exact values of each, not only each item in that list, but also in each composite entity, it is able to parse out the corresponding individual values.
Lesson: 8 Get user date of birth
[00:00] So in this video I am going to talk about how you can get a user’s birth date in Dialogflow CX. Now even in Dialogflow ES this is actually a, there is a small problem which is that if the user, if you are asking for somebody’s birth date and I mean the date of birth not just the birthday which is like you do not need to provide a year for it but if you are asking for somebody’s date of birth explicitly that obviously includes the year of birth what happens if somebody just gives the month and the day is that Dialogflow will automatically assume that because it is trying to fill out a date.
So it is just going to get the closest year which is that is the closest year to today. So let us say that so today is actually 27th of May and let us suppose that your birthday is on 1st June okay. So what will happen is Dialogflow if you just say 1st June Dialogflow will take 1st June 2022 which is the nearest birthday from today right but if you let us say that your birthday was just a few days ago and let us just say it was in 25th of May right.
[01:15] So if you say 25th of May it will not take 25th of May 2022 because that is in the past instead it will go for 25th May 2023 because that is in the future. So it is always going to get the nearest future date that which is close to the date that you provide right.
So the problem there is that obviously that is not including the year of birth and you are making a mistake by assuming that that is the date the user provided right and the user may not know right when you when you are asking for that particular question. So in the case of Dialogflow ES what happens is you will have to use something called date.partial as the date type and if it did not get a year value it will automatically populated with these 4 digits U U U U and you can see you can check to see if that is what you got and then in the webhook code you can ask for the user again if they did not provide a year okay but so you actually you will find that I will have to I split it into 2 articles and in the 2nd article I talk about how you can take that value in the webhook code.
[02:29] So let me scroll down and show you the webhook code just a bit more.
So over here you can see that if strbirthday.starts with 4Us and then hyphen if you see this then you know that you did not get the year that is Dialogflow was not able to extract a year from whatever input the user provided. On the other hand if they do provide a year it will have the year instead of the 4Us and then you it will not update the context it will move on to asking the next question which is the last name.
[03:03] So it asks for their birth year the birth date first and then the last name okay. So in the case of Dialogflow CX this is actually much easier because you do not have to use webhook code at all because Dialogflow supports Dialogflow CX supports these functions inside of that you can write inside of Dialogflow CX in other words it is as if you are writing some code logic right instead of doing it in your webhook you do it inside of CX itself.
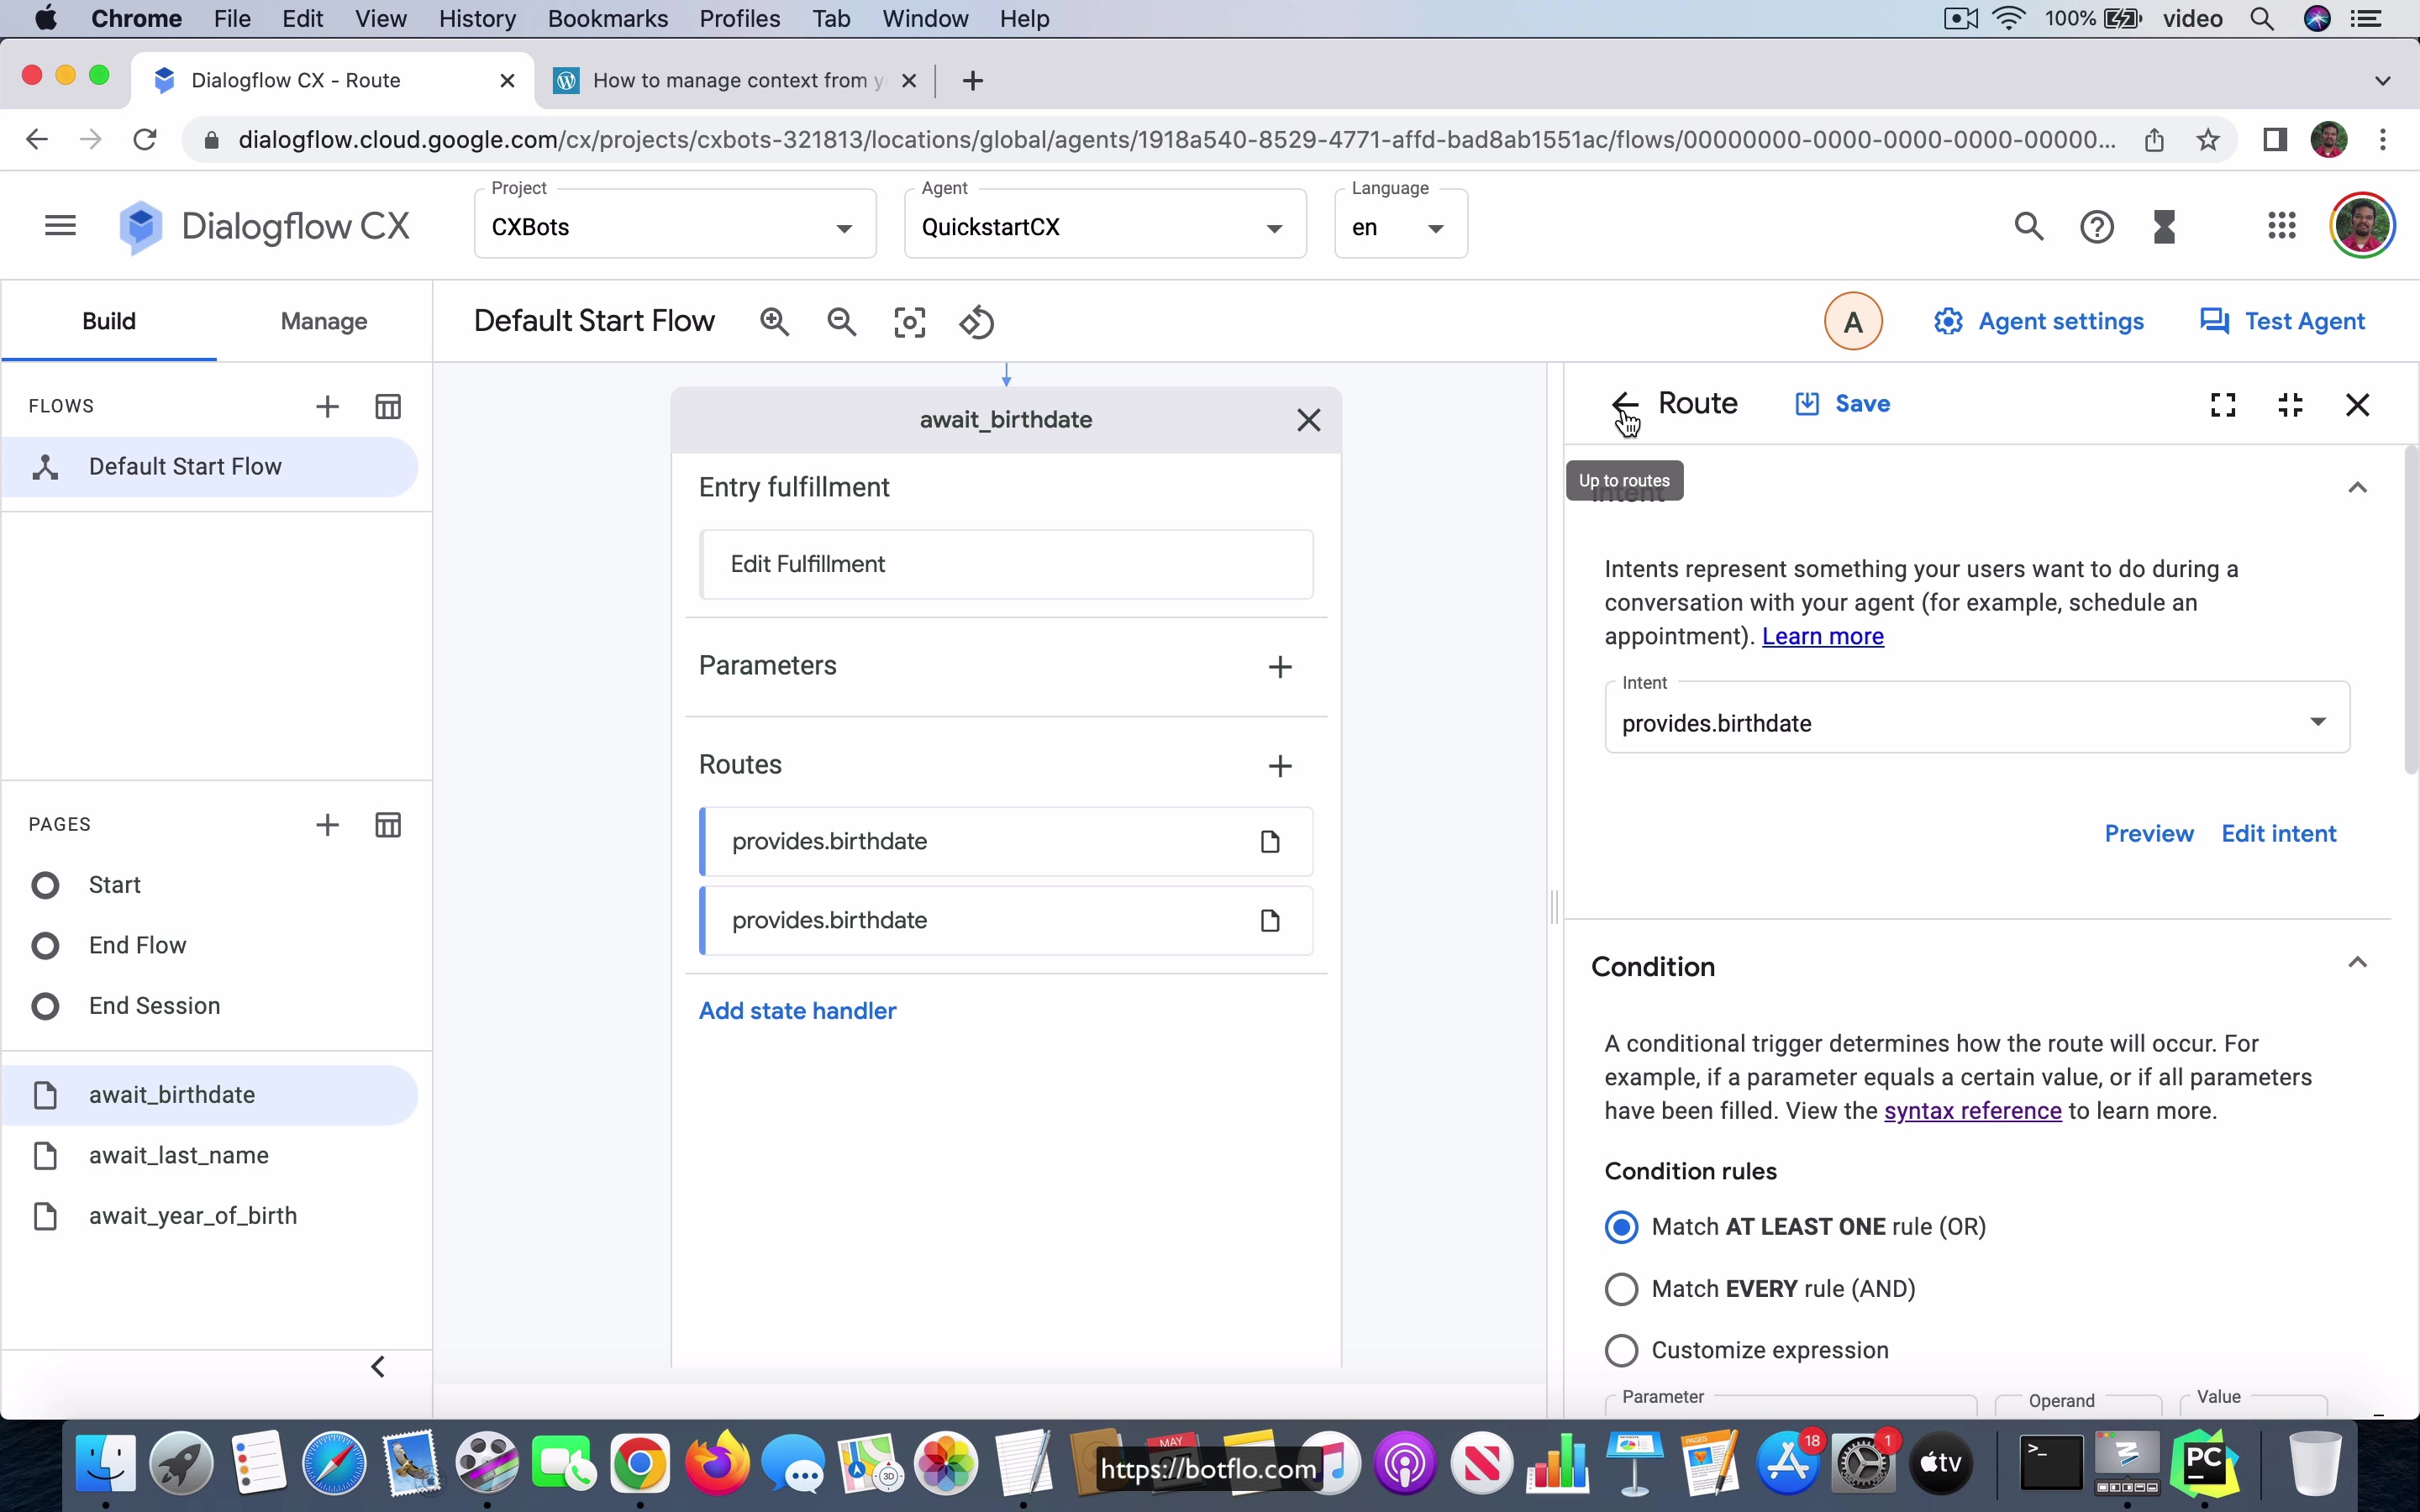
Now I am not going to go over that in a lot of detail here because I have another chapter which is called system functions you can go and take a look at it but here I am just going to show you how it works and then you can also take a look at the other chapter to understand how what is going on under the hood. So what happens is in the Default Welcome Intent as soon as the user says hi or hello or something a greeting I create a parameter called current date and then I just set the value to be the system function which is now right whatever the now time is and then I also transition it to a page called await underscore birth date and in await birth date what I do is if you see I have this provides dot birth date intent and here it just says you know that user provides some date and what I will do over here is it will extract the date and remember that if it if the user does not provide a year it will just automatically populate it with some value which is in the nearest year.
[04:33]
So what we can say based on this is if the current date which is whatever is extracted from the now and the year which you see inside that current date so if I click on this this is the expression if the session params current date year is greater than whatever the birth date resolved year is going to be that means that you got the year as part of the input right.
[05:02] So you go to the next page which is await last name and you ask them for the last name you can see that that is what the agent is prompting right. On the other hand let us say let us look at the other route the other intent route is the same thing provides birth date but here if you go and look at the expression you see that if the session params current date year is less than or equal to the resolved year from the birth date that the user just provided that means that this is the year that Dialogflow has automatically populated the year value that is when this condition will be true as you can imagine.
So what we do then is we ask them explicitly for their year but because we know that the user did not provide the year of birth okay. Now I am going to look at the await year of birth and here it is provides birth year and it is just going to be an integer okay system number integer and then it just goes to the last name it asks the user for the last name and moves to the last name page and in the await last name all you have is just the user providing that last name and you can just see that that ends the conversation it says thanks for the response.
[06:18] So let us go ahead and test it so I am going to say hi it is asking what is your birth date so I am just going to say it is 1st June okay so I have not provided any year.
So it says what is your year of birth let us say I say 1980 and now it is asking me for my last name and it says thanks for the response the conversation has ended. On the other hand if I say hi if I say it is 1st June 1980 this time you can see that it was able to infer that I provided a proper year of birth in that and then it just moved on to the next question automatically okay thanks for the response.
[07:01] So what you notice from all this is that by having this possibility of writing all these functions and expressions and things like that Dialogflow CX allows you to do a lot more inside the console that is the conversation layer you do not have to go to the webhook layer to do all these things and as you can imagine obviously this makes Dialogflow CX a much more powerful tool for people who are conversation designers but not necessarily full-fledged programmers.
Now to be able to write these expressions you still have to understand the basic logic and things like that but that is quite that is kind of similar to what you might do let us say if you were to use excel formulas or something right you still need to know the basic level of math and all that stuff to logic and stuff to be able to do that but at the same time you do not have to write actual code. Now this does not mean that you can do everything that you want in CX just by using these expressions there will be still some scenarios where you have to rely on writing code but what happens is that there will be less of it you will there will be less need for you to write code if you use Dialogflow CX so in that way for someone who is somewhat technical but not a programmer Dialogflow CX is a lot more powerful and it allows them to do a lot more things by themselves without having to ask a programmer and that is one way that Dialogflow CX is a pretty big improvement what compared to what you had in Dialogflow ES.
[08:36]
So this is how you will create a bot which gets the users birth date in Dialogflow CX.
Lesson: 9 Decision Tree Bot
[00:00] One of the things that has really been surprising for me as I watch people build these chatbots is how many of them are decision tree type chatbots. Now, I’m not going to say that’s good or bad, I can see why that’s still an improvement over whatever other way they were doing it. But it’s still instructive that a lot of these bots are just they are bots which can be built with codeless tools. I don’t want to say codeless tools, I should say, bot building tools like Zoho SalesIQ has a codeless bot builder, which is allowing you to just develop these scripted bots where people just keep picking on buttons.
And it just progresses to the next step in the conversation based on the button click without asking the user to provide any text input. Now, I agree that there are some scenarios where this is necessary. But you might want to question whether if that’s the only thing that the bot does, you might want to ask whether you really need Dialogflow to do that.
[01:03] Or you can just use some other off the shelf tool, which doesn’t need the NLU, that is natural language understanding. But in any case, this is a very common requirement from what I have seen. So I’m just going to show you how you can build such a bot with Dialogflow CX. Now, I just point out that this is the kind of bot which can be built pretty easily in Dialogflow ES itself. And Dialogflow ES is also free. So I mean, it’s free in the sense that unless you use up a lot of calls, API calls, it’s usually you’ll never need anything more than the free tier.
So and Dialogflow CX is not free in that sense, you have a free trial. But once you cross the free trial, you have to start paying up. But in case you want to use Dialogflow CX for this purpose, this is how you will go about doing it. So the bot I’m going to build is the bot I use for the ES example, which is it is going to help you identify a vertebrate.
[02:00] It’s called a dichotomous key because it asks the user to answer yes or no. And then based on their answers, it is going to classify a vertebrate into one of these mammal, bird, reptile, fish or amphibia. It has all these questions. And I drew the Mindomo flowchart for this particular bot. And you can see that it’s the user starts by saying identify vertebrate. The bot asks does it have fur. If the user says yes, it’s a mammal.
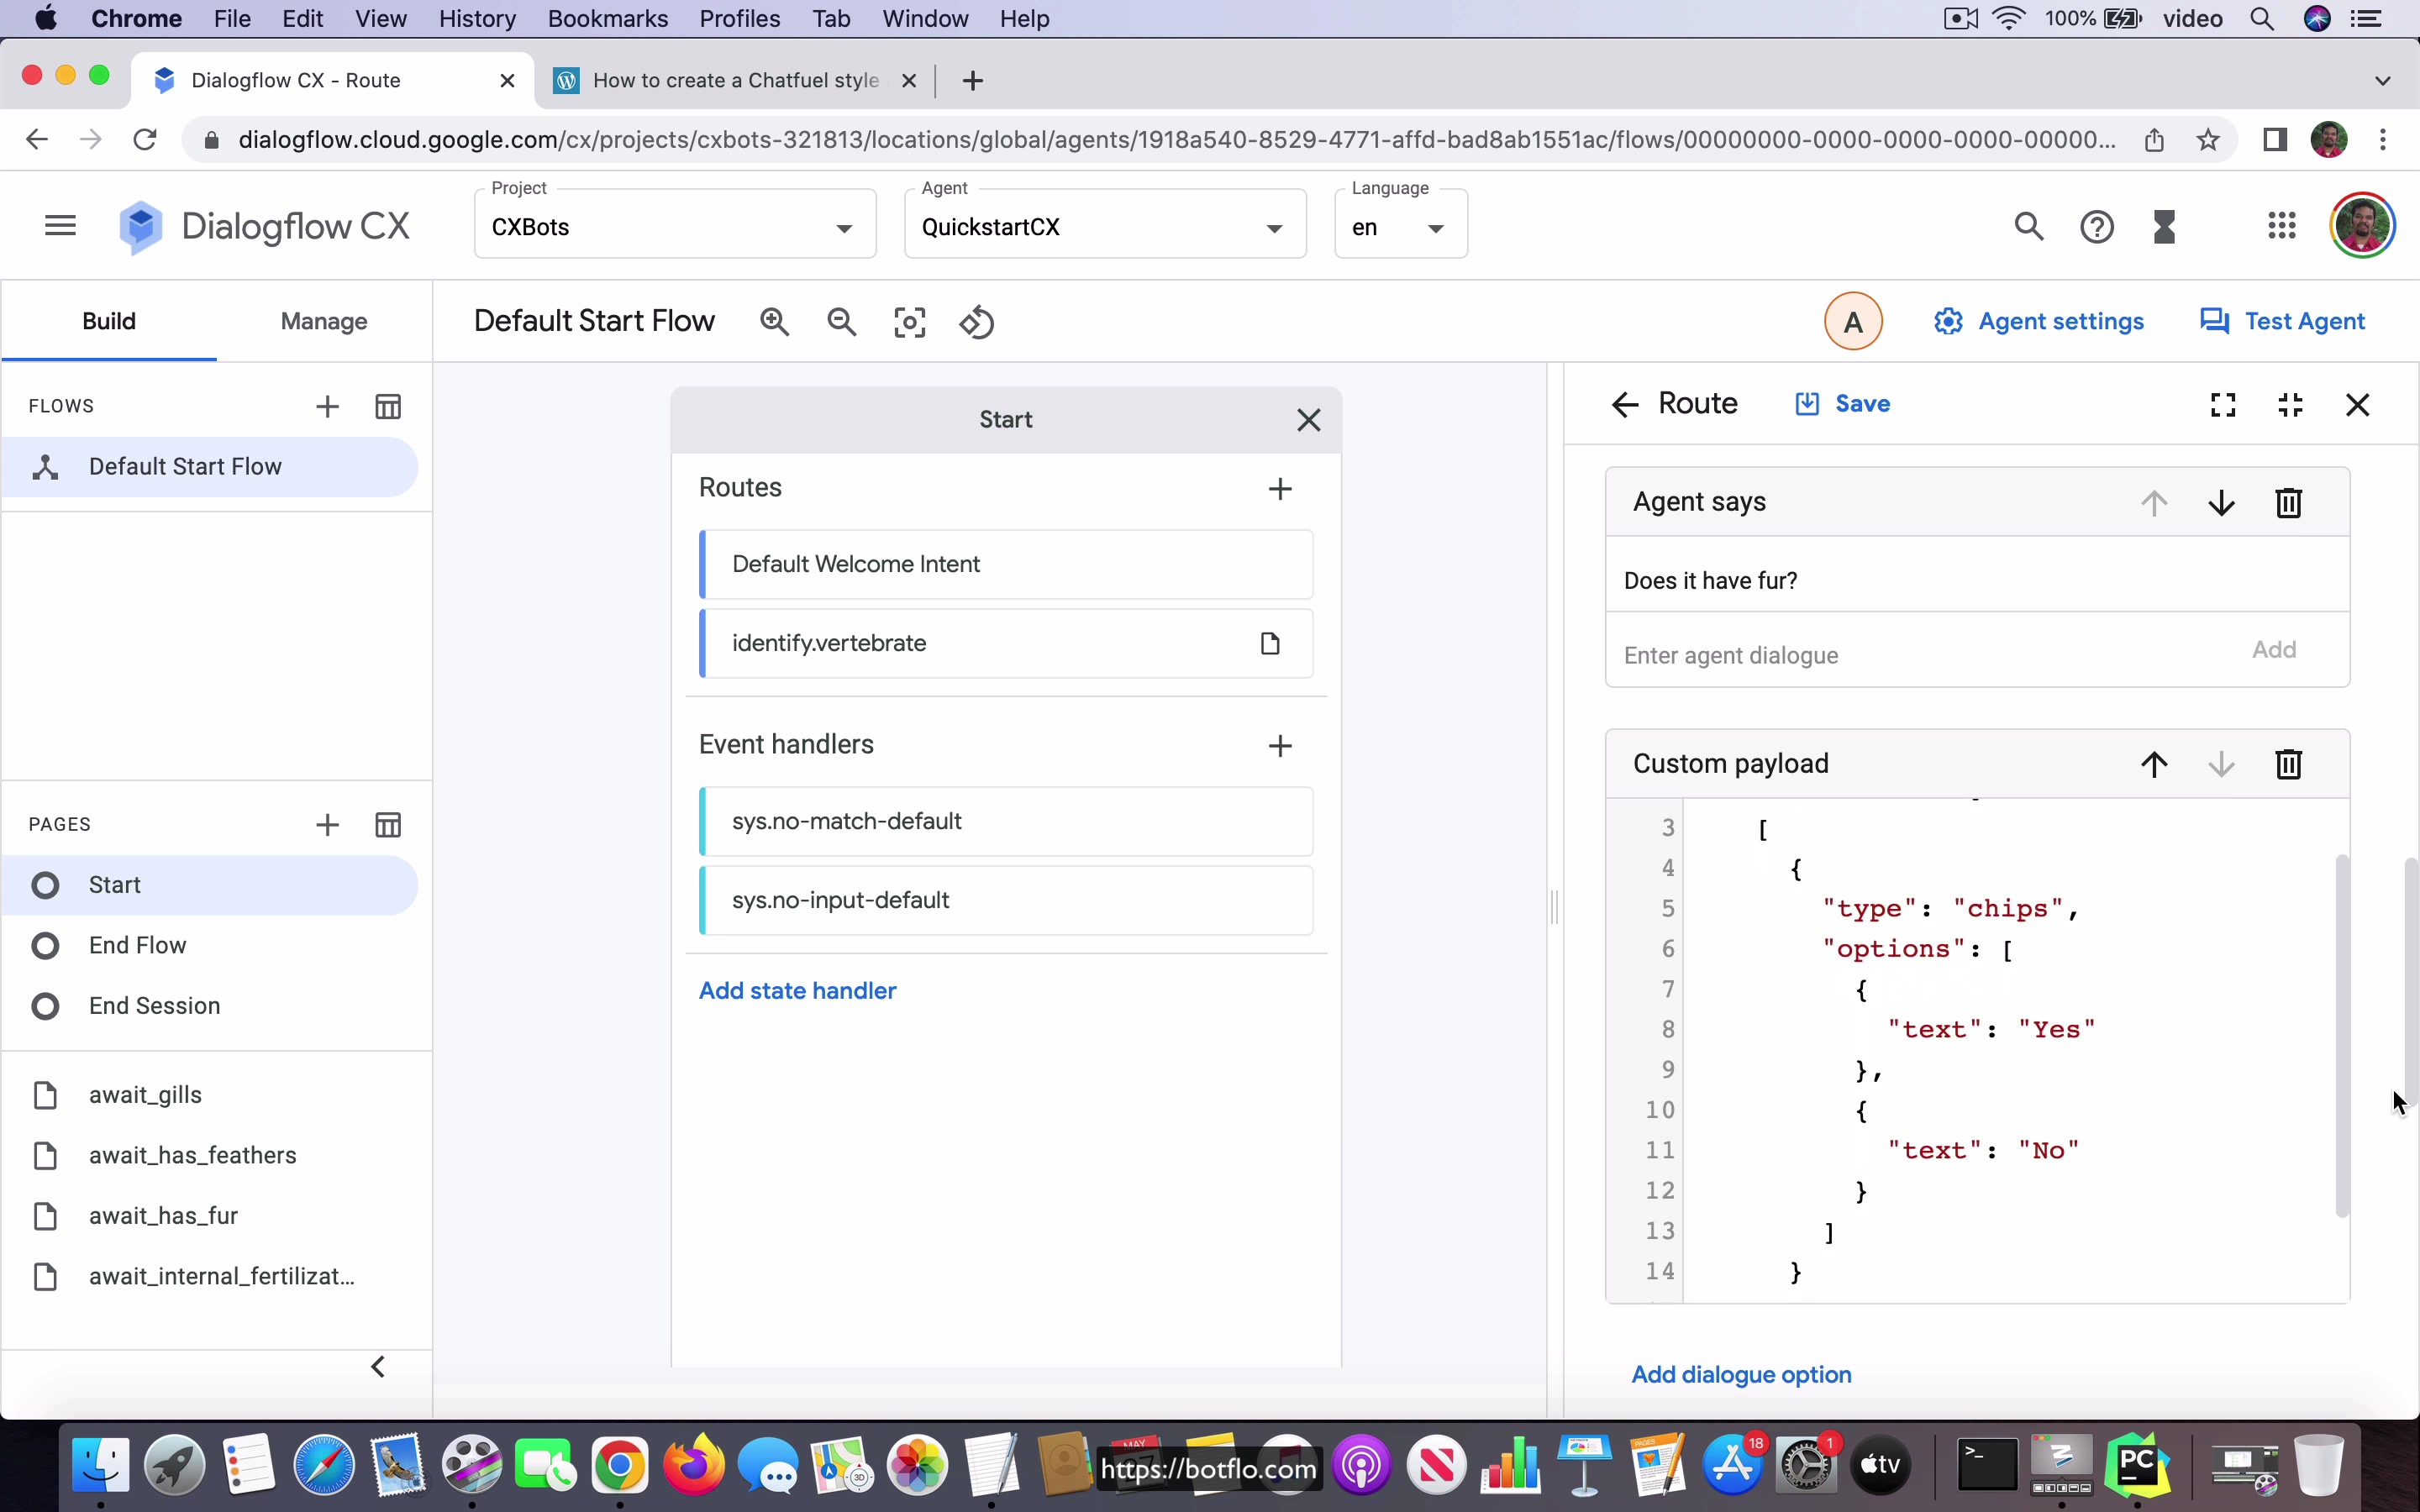
If they say no, it’s going to ask the next question. Again, yes or no answer. And then it keeps going all the way down the flowchart tree. So a dichotomous key bot is fairly easy to build in Dialogflow CX. So you go to the start page. And what you have is this identify vertebrate intent. And you can see that the user could say one of these, identify the vertebrate, identify vertebrate and start over, which is used when they want to start over the choices again.
[03:01] And the bot is going to come back with does it have fur. And I have this custom payload. This is going to be a Dialogflow messenger bot. And you can see that it has two suggestions. It’s asking them to provide yes or no. And it just transitions to this page called await has fur. That’s the question. Does it have fur? It’s going to transition to await has fur. And in the await has fur page, I have this yes answer where the user says yes.
And if they say that, it’s going to say it is a mammal. And then it’s going to provide an option to start the conversation by using this one suggestion chip says start over. There’s no need to transition to any new page. But if they say no, then it’s going to ask them does it have feathers and asks them to click on one of these choices yes or no. And it is also going to transition to a page called await underscore has underscore feathers.
[04:00] In the await has feathers, as you can see, I am reusing the intent that is answer dot yes intent. And if the user says yes, it’s a bird, then it stops the conversation and you are allowed to start over. If the user says no, then it’s asking a different question. The question is, does it have internal fertilization? And again, you have two choices. And it’s going to go to this page called await internal fertilization.
Await internal fertilization has similarly yes, and it has a no. And then it is going to transition to await gills, which is asking if it has adult gills. And if the answer is yes, it’s going to classify it as a fish. And if the answer is no, it’s going to be an amphibian. Okay, so let’s look at this inside of Dialogflow Messenger, which is much easier, of course. So let’s go ahead and do that.
[05:00] And I’m going to say identify vertebrate. So it’s going to first ask does it have fur? If I say yes, it’s going to say it’s a mammal. Let’s start over. Does it have fur? I say no. Does it have feathers? I’d say yes for this. It’s a bird. Start over. No. No. Yes. So it’s a reptile. Then I say no. No. No.
And yes. So it says it’s a fish. And we just have one more final option. No. No. No. So it’s an amphibian. Okay. So that’s the, you can see that we got all the choices, right? So that’s the way the bot will work. And as you can see, the bot, a bot like this is really trivial to build in Dialogflow CX. You can also have more suggestion chips. And based on that, you can have other, you know, transitions and all that. But this is a kind of bot, which I say that, you know, I’d say Dialogflow CX is probably overkill for this.
[06:08] Even Dialogflow ES is sometimes not necessary. You can just build it with other like off the shelf tools. But if you want to use one of the Dialogflow editions, ES is perfectly fine for a bot like this one. And this is how you build decision tree bot in Dialogflow CX.
Lesson: 10 Quiz Bot
[00:00] So in this video, I’m going to show you how you can build a quiz bot in Dialogflow CX. This is going to be again based on the quiz bot which I built for Dialogflow ES over here. And this is what the flowchart will look like. The bot will, once a user says start the quiz, the bot will ask a multiple choice question. And the user, when they click on one of these, it’s either going to be a correct answer or an incorrect answer. If the answer is correct, the bot will immediately tell them that they got it right and move to the next question.
If the answer is incorrect, the bot will give the correct answer. Then it will ask the other question, the second question too. So you can see that after that point, it has to merge back to the same place. This is the split and the merge pattern that you see in Dialogflow ES. And because Dialogflow CX is built with the state machine as the foundation, obviously you can use states to do this in Dialogflow CX and you’ll also find that it’s a little bit easier to manage this.
[01:03] But most importantly, once you finish all this stuff in Dialogflow ES bot, you will have to call the webhook to be able to calculate the score. So if the user, there are five questions and you have to tell them how many of the five they got right. And I explain how to do that in the case of Dialogflow ES, you have to maintain these parameters called score1, score2, score3, score4 and score5.
And then you can sum them up in the webhook and then send the result back from the webhook telling them the score. And in the case of CX, because we already have access to the inbuilt functions and you can do all this logic that you can build inside of CX, you don’t need to do that. And you can create a bot which does the same thing, has the same functionality without having to call the webhook code.
[02:00] So how do you do that? In the start page, I have the start quiz intent and you see that the user can say start the quiz or start over. And here what I do is, it’s going to ask the first question as soon as they say start over and you can see that it’s going to ask these three different choices. But most important thing is that as soon as the quiz starts, I have this parameter called score and I assign it a value of 0, okay.
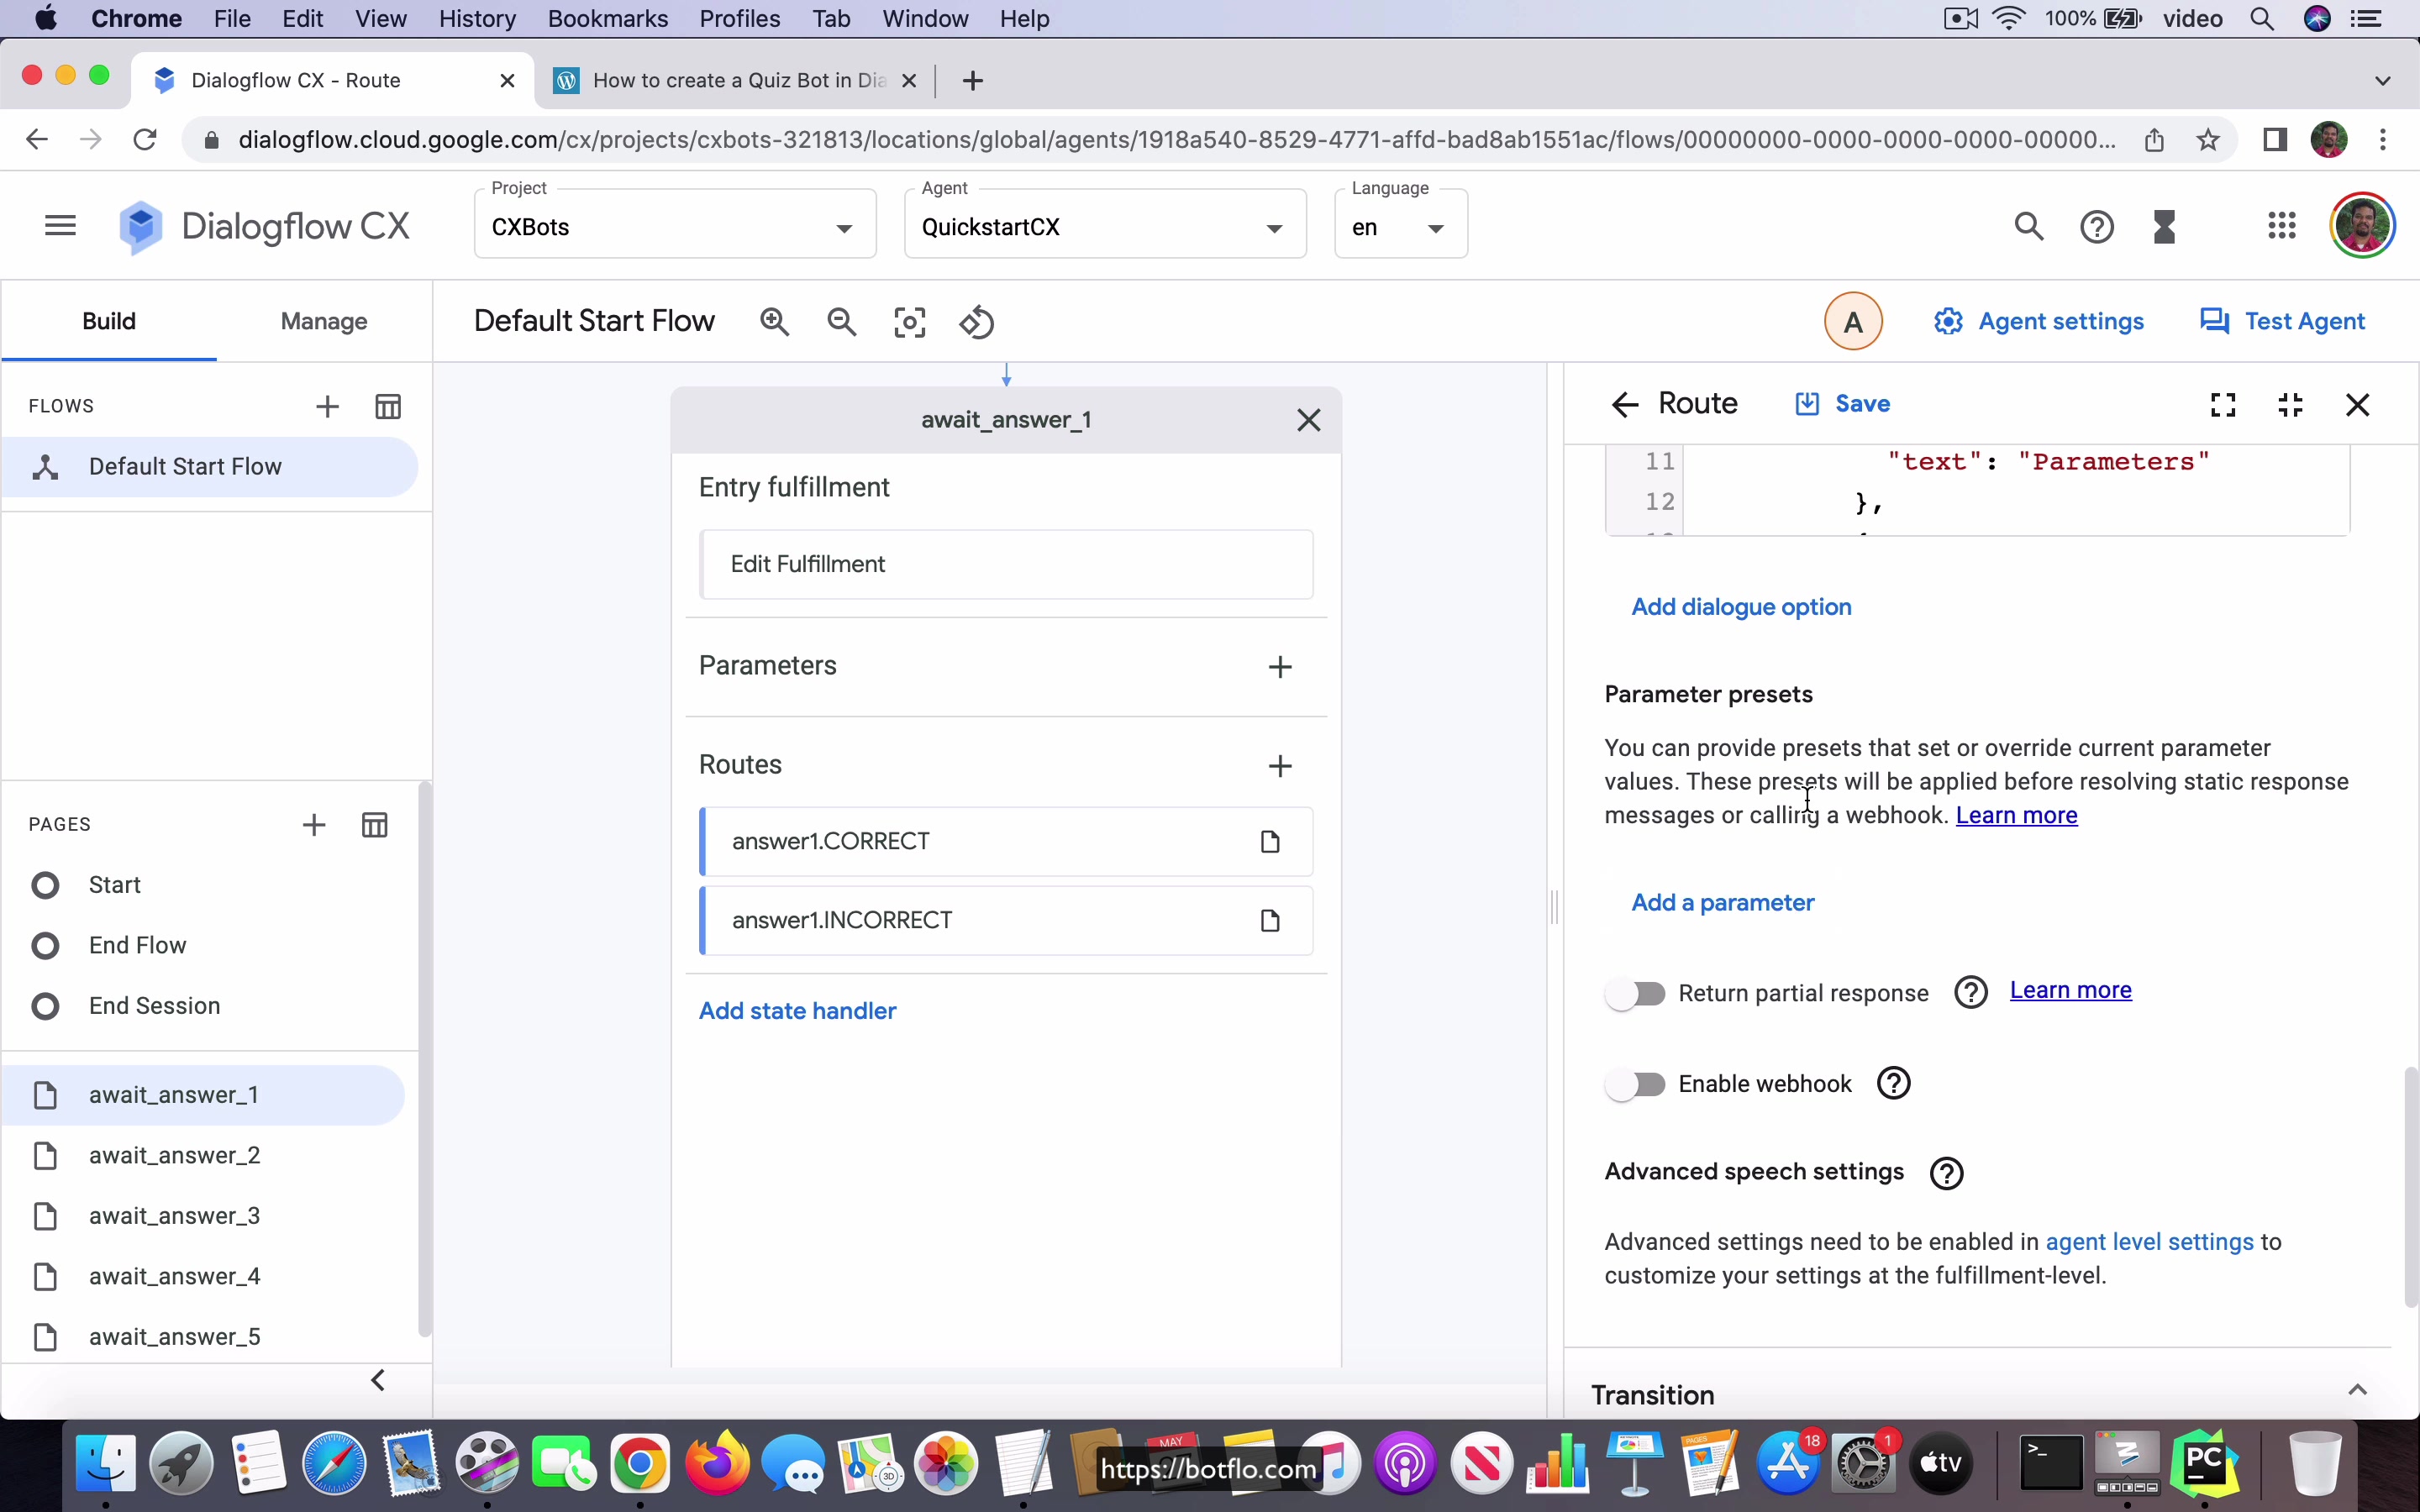
So what we will do is, okay, I forgot to mention this, but in the start quiz transition route at the end of it, we are going to transition it over to this page called await answer 1, okay. Now in the await answer 1 page, you can either give the correct answer and if I preview it, you will see that the answer is context here or you can give the wrong answer. So in the case of the correct answer, the user, the agent is going to reply with the, it says that it acknowledges that it’s correct.
[03:01] And then it goes to the second question, again it shows this custom payload to give the user some choices. But notice that in the case of the score, I am going to add a formula where I say the score is going to be sys. So let’s just copy this and paste it into this text so that I can show you what it is. So it’s going to be system.function.add, it’s an add and session.parameters.score, it takes the current value of the score from the session parameters, it adds 1 to the score because they got it right, isn’t it?
So it adds 1 to the score and then that means the score is incremented by 1, okay. Then it transition to await answer 2. On the other hand, in the case of answer being incorrect, if you go and look at the preview, I just have this other and it’s actually a sys.any, a wildcard entity which can capture all the other possibilities, then it’s going to show them the correct answer, then it’s going to move to the second question and have the suggestion chips and then it transitions over to await underscore answer underscore 2.
[04:11] Now you don’t need to do anything with the parameter here because it’s effectively the same as incrementing the score by 0 which is basically a no operation, right. You don’t have to do an increment by 0 because you know that the value is remaining the same, okay. So that’s await answer 1 and await answer 2 is the same thing, answer 2 if it’s correct then you are going to tell that it’s correct, go to the third, ask the third question, again the parameter is going to be incremented by 1 over here, I use the same formula.
If the user gives an incorrect response, it’s going to tell them it’s incorrect and not do any additions to the score, retain the value as it is and then it’s going to move to the third question, the page representing the third question. And you will see that it’s the same for await answer 3, await answer 4 and await answer 5 except that when you are here in await answer 5, okay, you have this, you got computed all the values till now, so you are going to display the final score.
[05:13] So the way you do that here is that you still have to increment the current correct answer by 1 to get the full value, right, for the score and then notice what I am doing, I have the sys.func.add session.params.score 1 but I have to make sure that I convert it to text so that I can display it inside this text response, okay, if I do not do this, it will not work.
So it’s going to say you scored whatever the score is out of 5 and then it gives the user the option to start over, okay and there is no need to transition to another page. In the case of the incorrect answer, it’s just going to say you scored this and there is no need to add increment 1 because it’s the incorrect answer, once again it gives them the option to start over, no page transition necessary.
[06:00] Let’s go ahead and look at the bot inside the Dialogflow messenger, right now, go over here, start quiz, so it’s going to give the, so I am going to give all the correct answers this time first, okay, so you can see it says correct, which of these is used to tune the accuracy, ML threshold, which of these, what is with the first choice, fallback intent, result in multiple answers, knowledge connector, which of these is likely to be a rejects entity, so you can see that it says correct, you scored 5 out of 5.
So let’s start over and this time I am intentionally going to give all wrong answers, okay, incorrect, incorrect, incorrect, incorrect and you can see that, so this is the wrong value, so I see that I made a small mistake in the code but you can see that it got it correct and then you got scored 1 out of 5, so I have to go back and change the code but I can, but looking at this I think you understand that the code is working as expected, I wanted to get a 0 by giving all wrong answers but when I gave the final answer, you can see that all the others are incorrect but it got the final answer correct, I am sure that that was because I made some mistake in the way I annotated the whole thing, so it got it as if it is a correct answer, so it marked it as 1 out of 5, which is technically right but I think that
[07:35]
the intent itself has been defined incorrectly. In any case, I think you get the picture over here, I will fix this before I release this lesson but the, that is I release the bot, the blob file for this agent but you still get the overall picture what is happening over here, in the case of Dialogflow CX when you are building a quiz bot which has this multiple question like multiple choice questions, you can use a single parameter and then you can increment it right inside of CX without having to call any webhook code at all, so that is the big benefit of using CX over ES for bots like these, where the conversation designer is able to build more of the logic by themselves right inside the CX console without having to ask the programmer, so this is how you build a quiz bot using Dialogflow CX.
Lesson: 11 Use Google Sheets as a database
[00:00] So in this video, we are going to look at how to use Google Sheets with your Dialogflow CX bot. Now I am just taking this tutorial I already have for the ES bot and translating it to CX. The important thing when you are using Google Sheets as your database is that it makes a lot of sense to use a tool which converts your Google Sheet into a REST API. So the tool that I use is called Sheet.best and if you have very minimal use, you will be able to use the free tier.
On the other hand, if your usage is a little heavier, then you will have to go for the paid feature. Now one thing that I will point out here is, in my opinion, if you are going to go for the paid feature in Google Sheets, that is the Sheet.best, you are probably better off just taking that amount and instead getting a subscription to Airtable.
[01:03] And I have a link in this tutorial where I explain why that is the case. The point is, you can see that at the bottom, the important point is that Airtable is designed to be used as an actual database. Google Sheets is designed to be used as a spreadsheet. Now the major difference between the two things is that Google Sheets, because of the way it is built from the ground up, it is going to allow you to access random spreadsheet content and the content can be in any format, you can merge two cells together to create a single cell.
You probably know about all the features that you have in Google Sheets. Now what happens is that, that means the Google Sheet, just the way it is designed, it is not a relational database. And Airtable is the opposite because it is actually designed to be used like a relational database. And it is also very friendly for non-programmers, which is why I recommend Airtable.
[02:03] So you can take a look at this article and decide for yourself. But if you are stuck with Google Sheets for some reason, and maybe it is an internal process or something and you cannot really migrate out, I think that the next best option is to use the REST API generator tool like sheet.best and turn this into a REST API and use it from there. What I would not recommend is for you to use the REST API provided by Google Sheets directly unless you have a fairly experienced programmer who is actually experienced with using Google Sheets because they will have to do a lot of the legwork to be able to set this up so you can use it in your bot.
So as far as the bot design is concerned, it is actually very trivial. I have this intent called getPlanetAttribute. And it is going to just say what is the attribute of planet name. And this is based on the two entity types I already have.
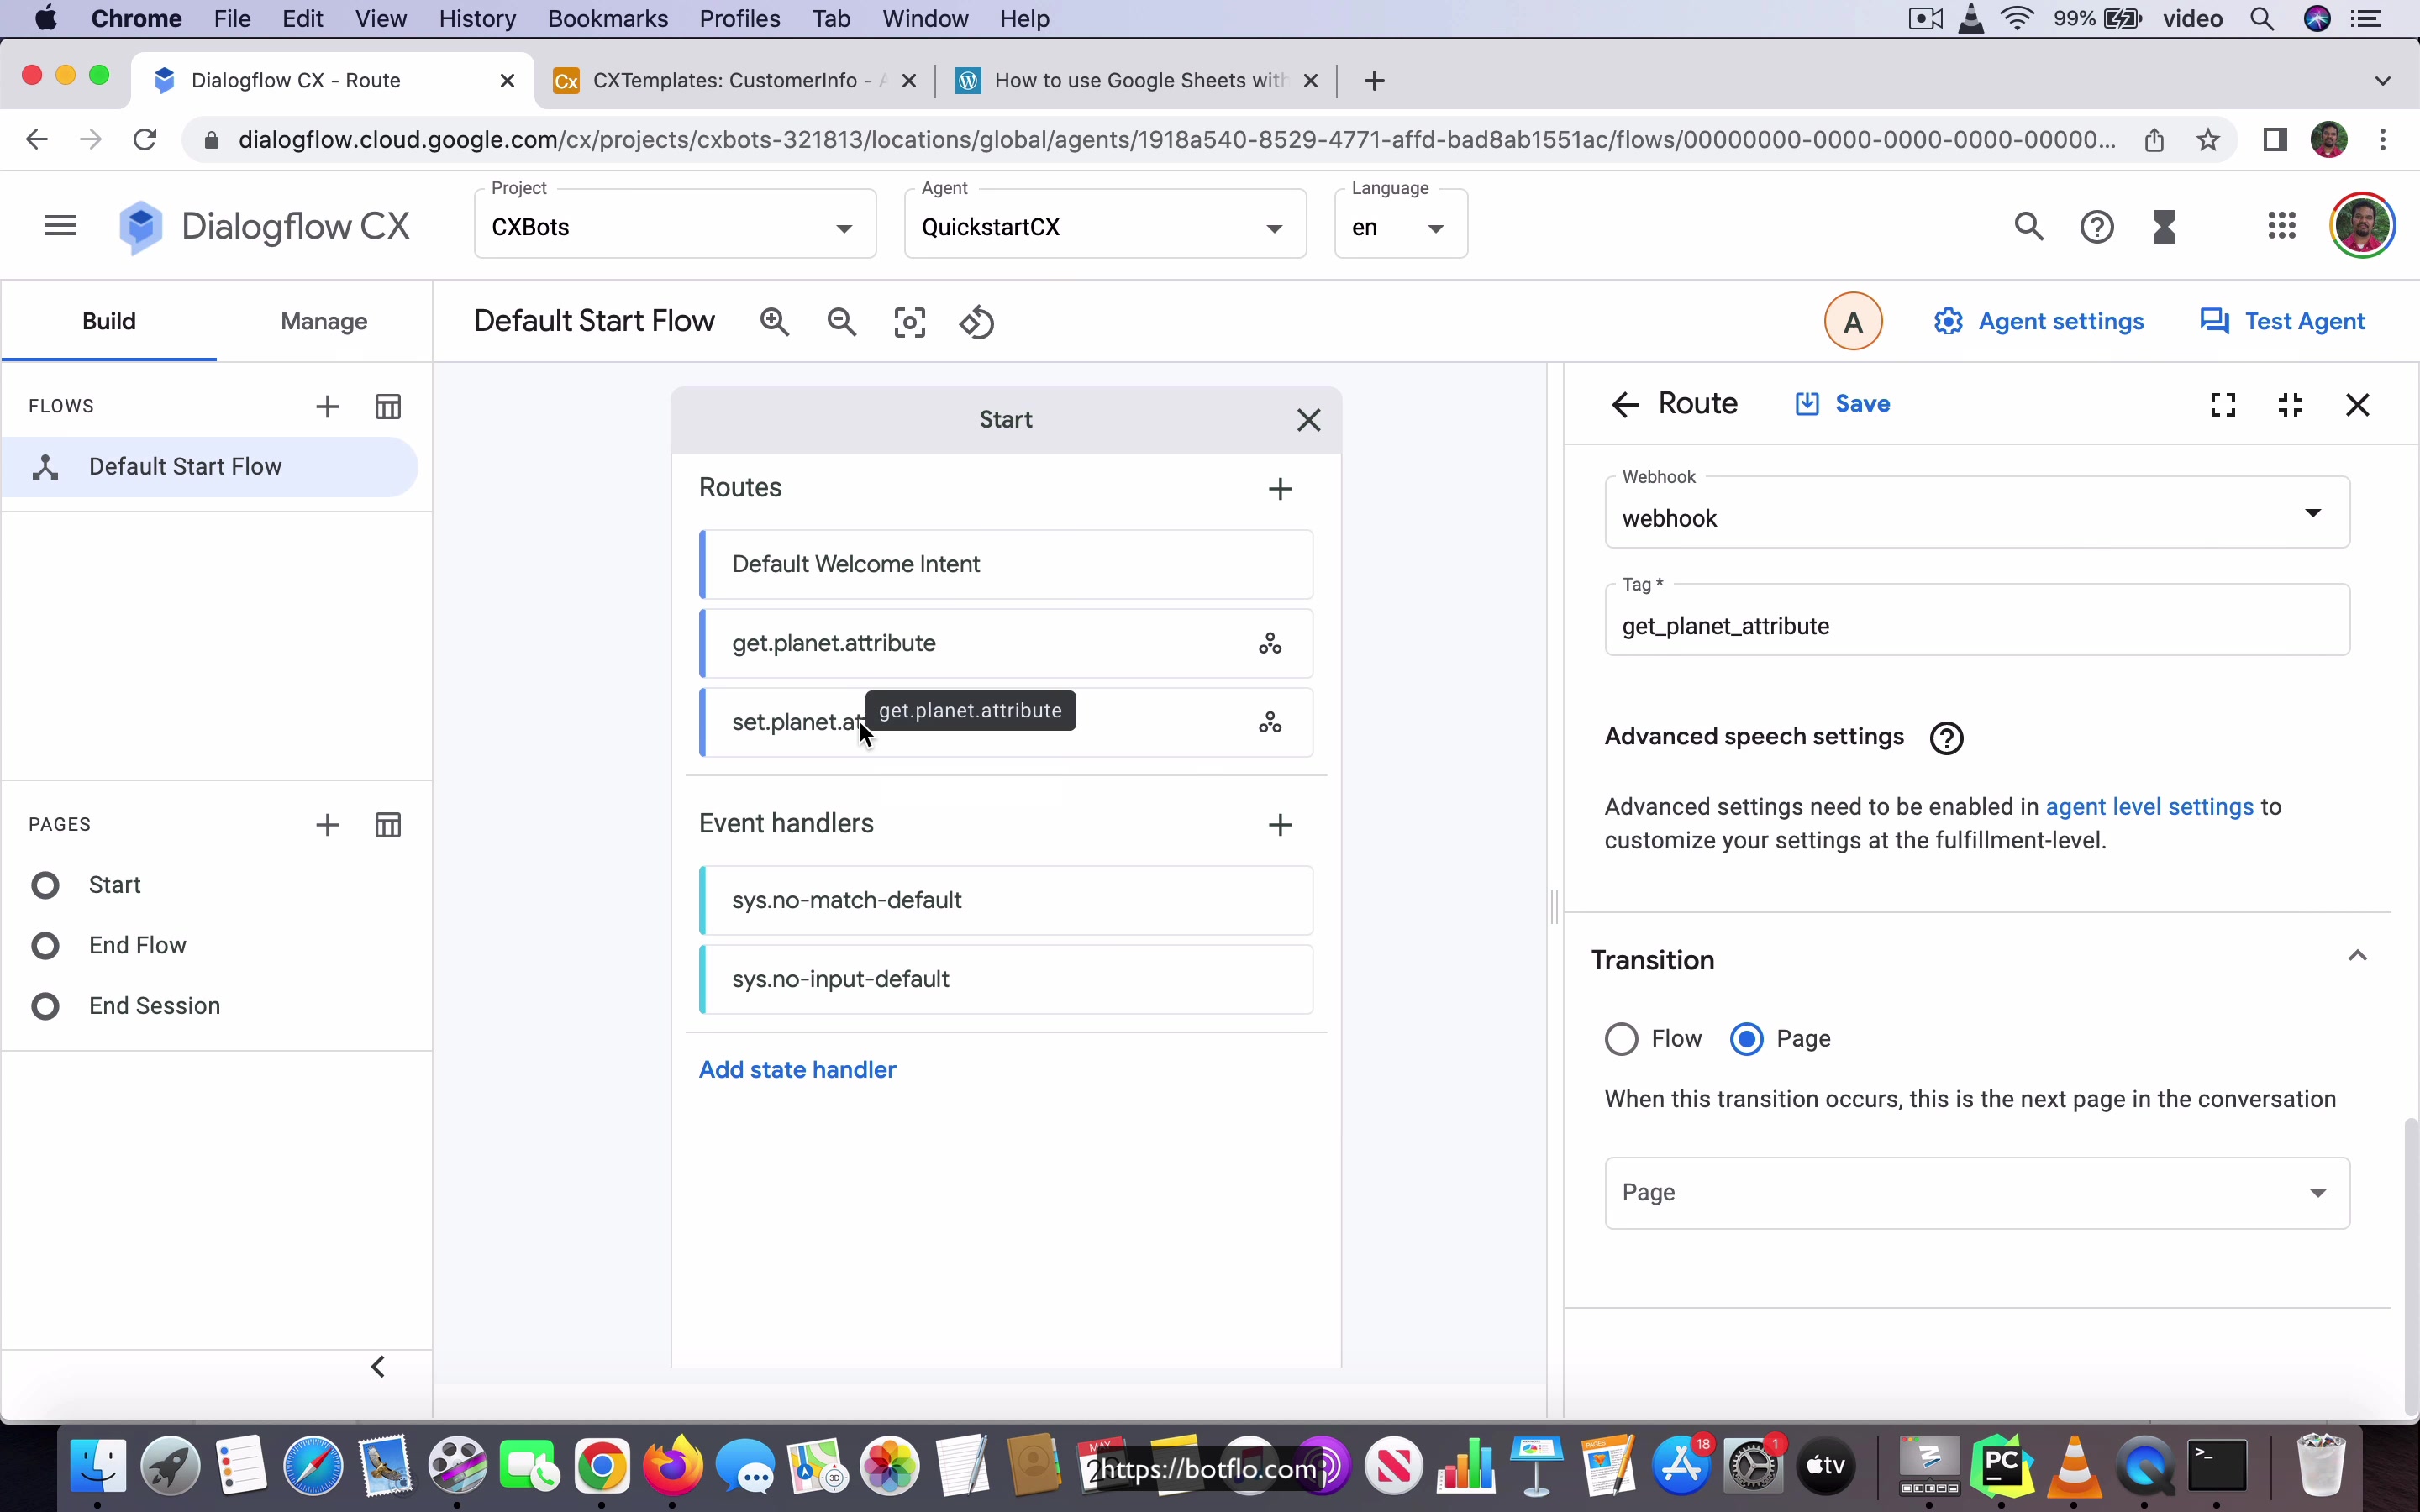
[03:02] One of them is the attribute entity, which has mass, volume, and color. And the other is the planet entity, which is just a list of all the planets. And if you go to the build view, you can see that the getPlanetAttribute transition route is going to say what is the attribute of planet name. And then it’s going to call the webhook, which returns some value. And the setPlanetAttribute in the same way is going to say set attribute of planet to some value.
And it’s going to set that into the Google Sheet. So as you execute this, you will find that the code in the Google Sheet gets updated. So I’m going to run this. I already have the code set up in my PyCharm editor. It’s a Python program. And I also have this. This is the Google Sheet I’m going to be referring here. And you can see that it has all these values. So what we will do is we will first look at the mass of Mercury, or maybe I’ll use the volume of Mercury.
[04:06] The color being a number doesn’t make sense, but this is just for illustration purposes. I just filled out everything as a number. So let’s look at the volume of Mercury. It’s right now 13. So let’s go here and say what is the volume of Mercury. And you can see that it comes back with the volume of Mercury is 13.
So I’m going to set it, set volume of Mercury to 113. And it’s going to say the volume of Mercury has been updated to 113. And if you were to go to the sheet, you will see that the value has been updated. Okay. You can come back to the bot and ask this question, what is the volume of Mercury? And you’ll find that it’s changed to 113 in the answer.
[05:01] So I’m just going to set it back to the old value and you can see that it’s changed to 13. And here you can see the value has changed again. And now I can query it and confirm that it’s been updated. So this is how you do this in the case of Dialogflow CX. Everything is the same except that you design the intent a little bit differently.
And in the case of CX, of course, the information that you see in the JSON, that is the JSON object which is sent to the webhook has other fields. So based on the fields that you have in the CX specific, that is the CX bot, you will be parsing that information out. And again, I’ll be providing the sample code along with this lesson in the course. You can just take a look at it and use it to build your own integration with Google Sheets.
[06:03] The important thing, just to recap, is that if you’re going to use Google Sheets with your Dialogflow CX bot, I think that it’s better that you use a tool which converts Google Sheet into a REST API. The one I use is called Sheet.best. There are other tools out there which do the same thing. You can use the one which is most comfortable for you. As I said, it’s better to use AddTable as your database.
The next best option is to use Google Sheets with a REST API middleman like Sheet.best. And I will say that the last option, the lowest priority, should be to use Google Sheet and use the REST API provided by Google directly. So this is how you will integrate Google Sheets into your Dialogflow CX bot.