08 Dialogflow CX Custom Integration
Lesson: 4 Layers of a Dialogflow Bot
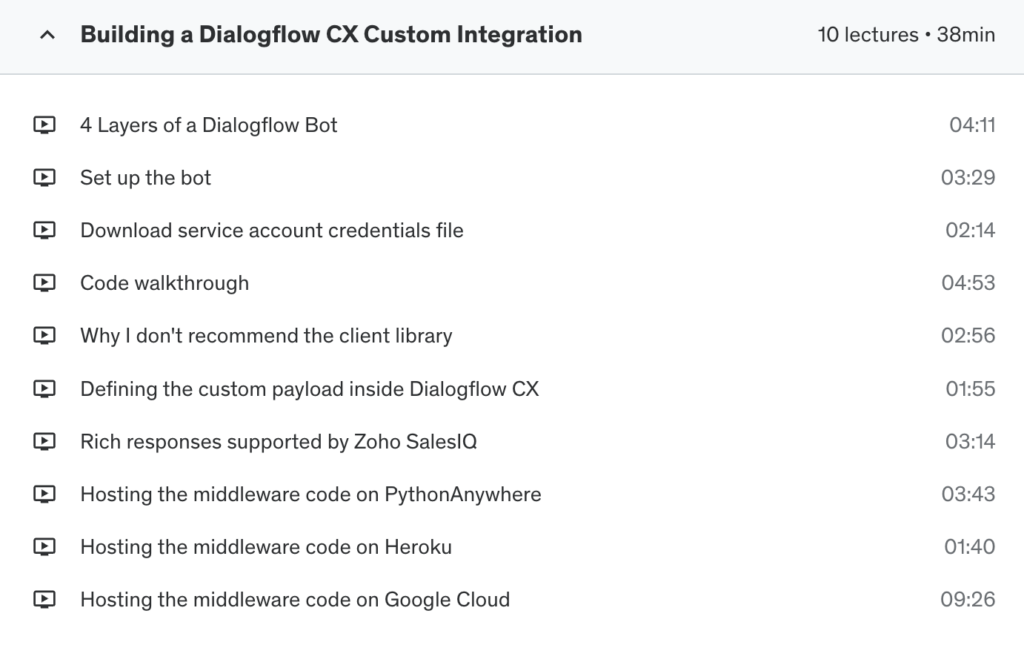
[00:00] So as we talk about Dialogflow CX integrations and Dialogflow integrations in general, the first thing that I would like to talk about is this concept of four layers of Dialogflow bots, that is every Dialogflow bot in my view has four layers and these are the four. The first one which is closest to the end user is the user interface and then you have a middleware or an integration layer which connects the user interface layer with the conversation layer and in this case I refer to everything which you do inside of the Dialogflow web application as the conversation layer and then you also have the fulfillment layer which is your webhook code and fulfillment layer is a terminology that Dialogflow team itself uses.
So you stack these four things together and you get the Dialogflow bot, there may be a bot which may not have this you know maybe sometimes you do not have the user interface layer or something but in general most bots follow this you know this four layer scheme right and why does it matter like the fact that you have these four layers, why does it matter?
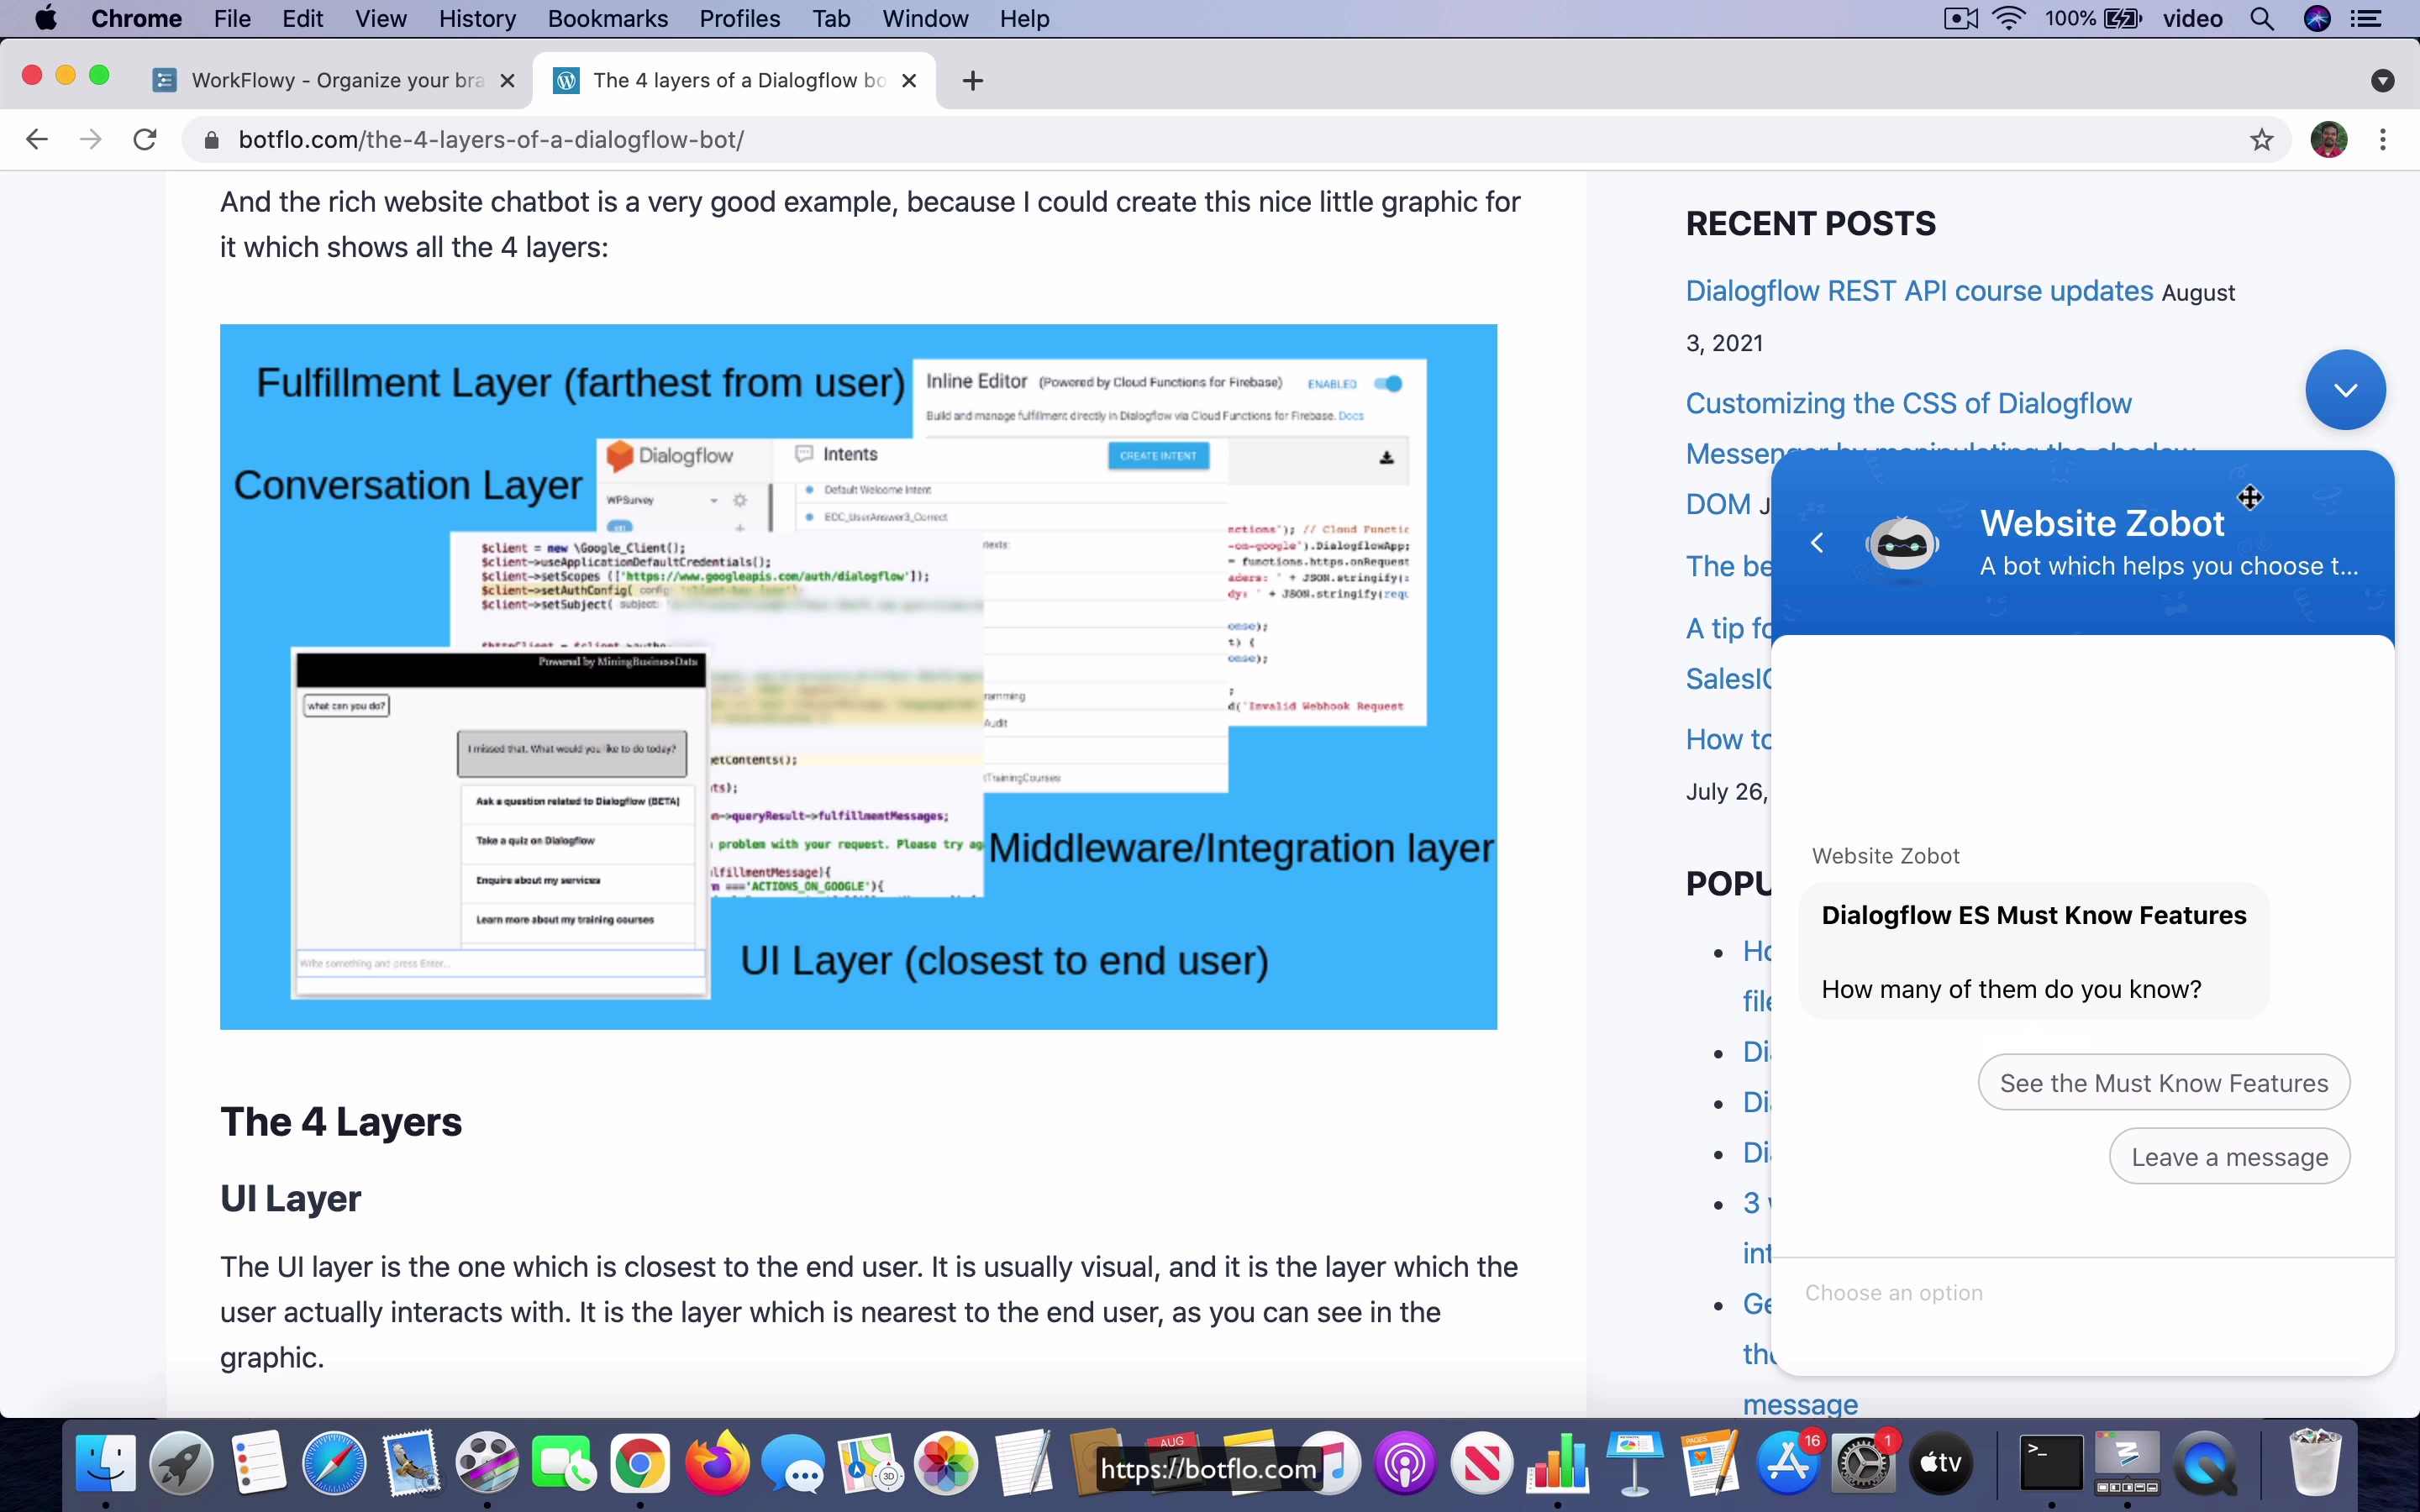
[01:15] It is because the integration code that you write which is of course this middleware slash integration layer over here, the code that you write it depends on the user interface layer that you are going to use. Now the conversation layer, fulfillment layer they are not really important as far as we are concerned when it comes to Dialogflow CX integrations but the user interface layer actually plays a big role and the reason for that is the UI layer is either predefined or it may have to be defined by you and in the case of let us take an example you have this thing on the right of the screen, this is a chat widget which I created using Zoho sales IQ, now this bot actually is not integrated with Dialogflow, it does not have any NLU but it is possible to create a bot which does have NLU and if you are going to do that you have two options, you can either use the built-in Zoho Dialogflow integration which is just a single click or you can build your own custom integration by using a webhook approach which they allow and in fact since there is no Dialogflow CX plus Zoho sales
[02:29]
IQ integration as of now you will have to use the webhook approach to be able to integrate Zoho sales IQ with Dialogflow CX, you can do it without using your own webhook code in the case of ES because they provide this one click integration but you cannot do that in the case of CX, so the point I am making is you have to based on what the user interface layer provides you in terms of the user controls and whether they can input information, whether they can submit information and things like that, your code that you write for the integration layer could be that much more you might say complicated.
[03:11]
In the case of the user interface layer which is defined by you, let us say you build a completely custom website integration with Dialogflow, you are also responsible for creating the UI layer controls like buttons and if you want to create a list view or something like that, in that case you are going to be also responsible for rendering the response which comes back from Dialogflow into the appropriate user interface control, right, so that obviously it adds a lot more code to the integration that you are building.
So taking this approach of looking at it from this four layer viewpoint will be very helpful for you as you are building out the Dialogflow CX integration. So in the next few lessons what I am going to do is I am going to show you how you can integrate Zoho SalesIQ with Dialogflow CX and you will be able to get a much better picture of what is in the integration layer and what is in the UI layer.
Lesson: Set up the bot
[00:00] I’m going to show you how you can integrate Zoho SalesIQ with Dialogflow CX. Now, I wanted to show this as a code demo, but I’ve not been able to set it up properly on my computer. Even though the code works separately and all that, the screen recording software is set up on a different user profile and I’m not able to get the code and the screen recording going at the same time. Unfortunately, this is going to be more of a pictures-based setup, but I think that you will still be able to understand what is going on and follow how I’m doing this.
What you’re seeing here is an image of my, this is my setup inside the Zoho SalesIQ. You can create a new bot and then you have to choose webhook as the method by which you’re going to do the integration. Once you do that, you have to select the brand and this is like a website that you’re selecting. This is not very important as far as the integration is concerned, but this part is quite important.
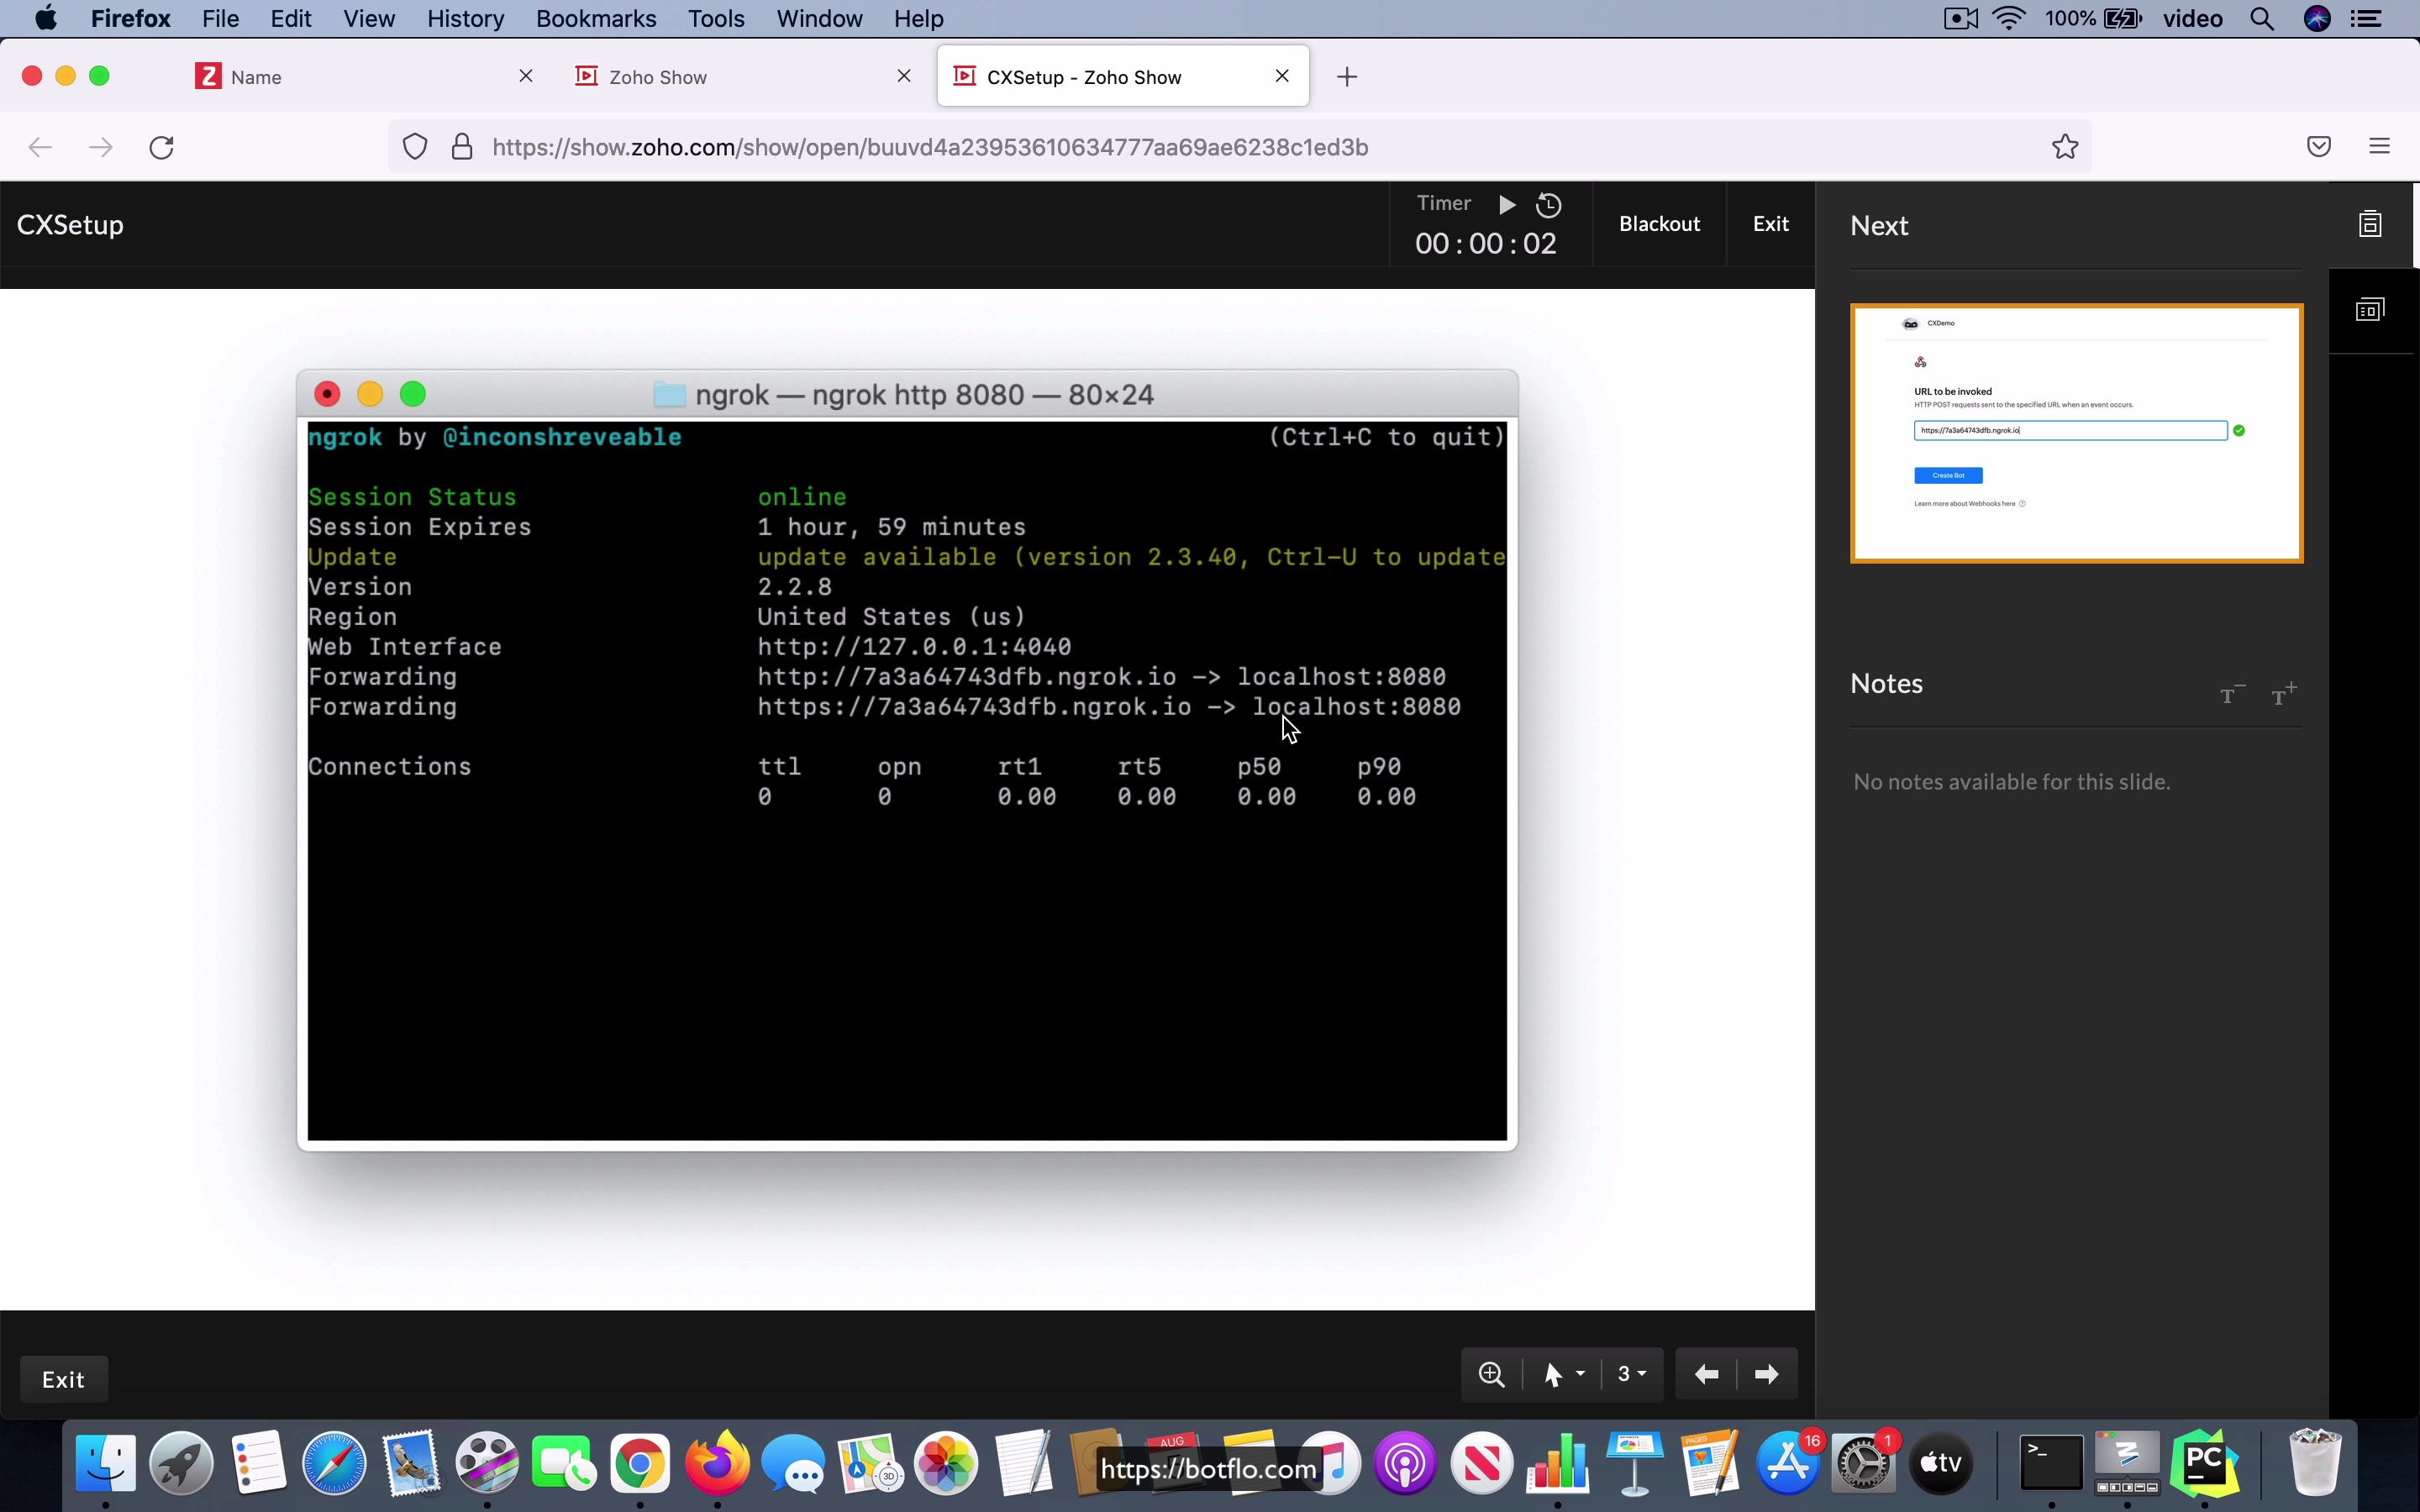
[01:04] What I’m doing is I’m creating an ngrok-based webhook, which is, it’s effectively turning my laptop computer into, it’s like a web server where you can serve these requests to the webhook. This allows me to write code on my local machine and when Zoho sends a request, it actually comes to my computer and I’m able to debug the code and do things like that.
What ngrok does is it generates this sort of HTTPS URL and you can see it’s in this format where it has this alphanumeric.ngrok.io and it actually maps it to the localhost 8080, which is to say that it maps it to my local machine at port 8080 and then because the PyCharm software uses this port where sort of it’s like the default port number for it, it’s going to forward the request coming to this URL, to this port and that’s going to call the code which is running on my computer.
[02:12] This is the ngrok setup is how I can do the local development and then I take the URL which is provided in this tab that you can see over here and I have to paste it into the URL to be invoked, which will be the next step in the Zoho SalesIQ console and then you click on the create bot and what I have here is actually sort of the final output where I have interacted with the bot and I got a response back when I said hello, it’s actually calling my Dialogflow CX agent and it comes back with control asking me to enter my name and I am going to show you how you can do this in the next few lessons, but the important thing that you notice is that this is inside the live chat widget.
Actually, this is inside the preview you have in Zoho SalesIQ, but this is what it looked like inside the live chat widget and when the user says, let’s say they say hello, I have to send a response from my Dialogflow CX bot in such a way that it is going to ask the user for their name.
[03:14] That’s exactly what is happening here. The fact that this showed up inside the SalesIQ widget shows that the code itself has been integrated and it works as expected and I will go through all that stuff in the next few lessons.
Lesson: Download service account credentials file
[00:00] When you are setting up your integration with your Dialogflow CX agent, what you have to do in your Python code or whichever programming language you are using is you have to first download something called a service account credentials file, it’s a JSON file and you have to store it in the same folder where the code is running. Of course, sometimes some people prefer to put it outside that folder for security reasons and then call that from the code, but no matter what it has to be residing in the same file system as your code for the integration to be able to work.
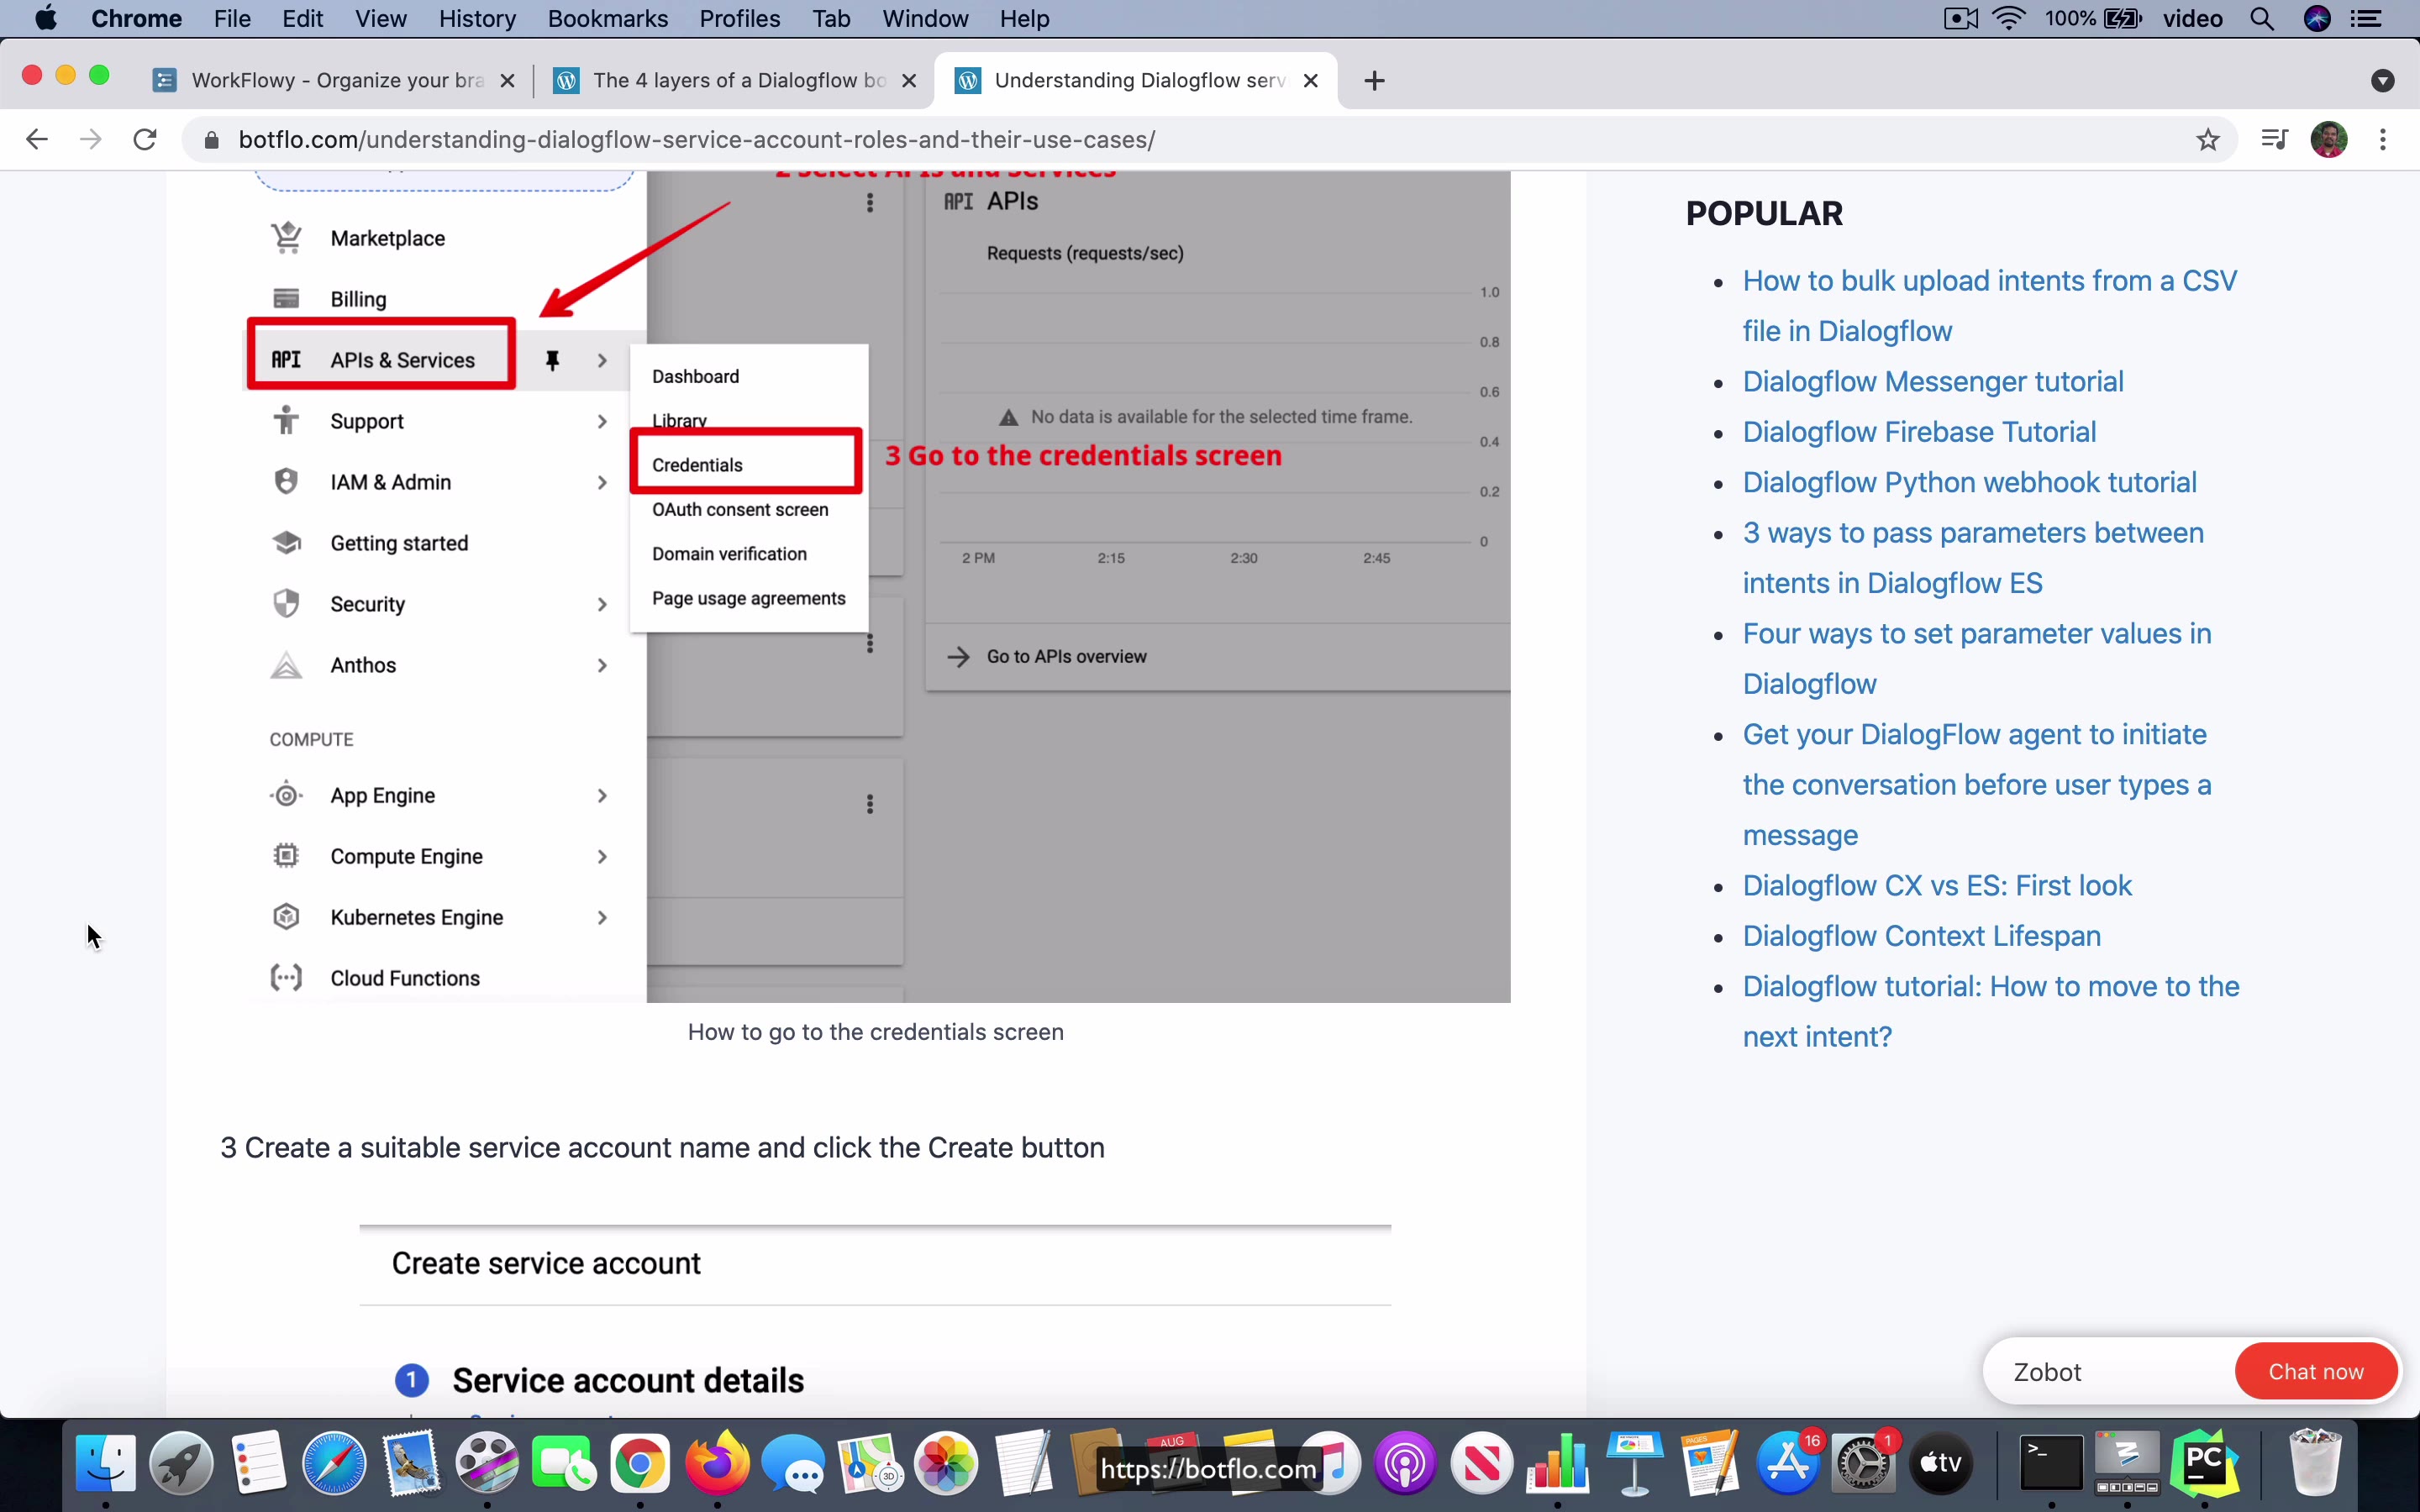
So what I want you to do is take a look at this particular article I have on my site which is understanding Dialogflow service account roles and their use cases, I’ll leave a link for that under the video. And I want you to go and take a look at how you download the service account JSON file from your Dialogflow, it’s the Google Cloud console is where you download it from and you have to do it for the project which is associated with your CX bot and the credentials that you are looking for is you have to actually create a role and the role that we want to use is this one called Dialogflow service agent, that’s the role that you need.
[01:21] And this is sort of the minimal role which doesn’t have a lot of permissions, it just has the permission to do a detect intent which is the API call you use to be able to get the intent mapping for whatever the user is saying.
And generally that’s good practice, you don’t want to give it too much permissions, you want to do an integration where you only do what’s the, you know, give the permission which is the maximum that it needs, don’t do anything more than what is required, okay. And then I’ll tell you how to like get the service account key file and all that and you can take a look at this article, the end result of that is that you should have a JSON file and save it to your local computer because that is going to be used in the code sample that I am going to show in the next step.
Lesson: Code walkthrough
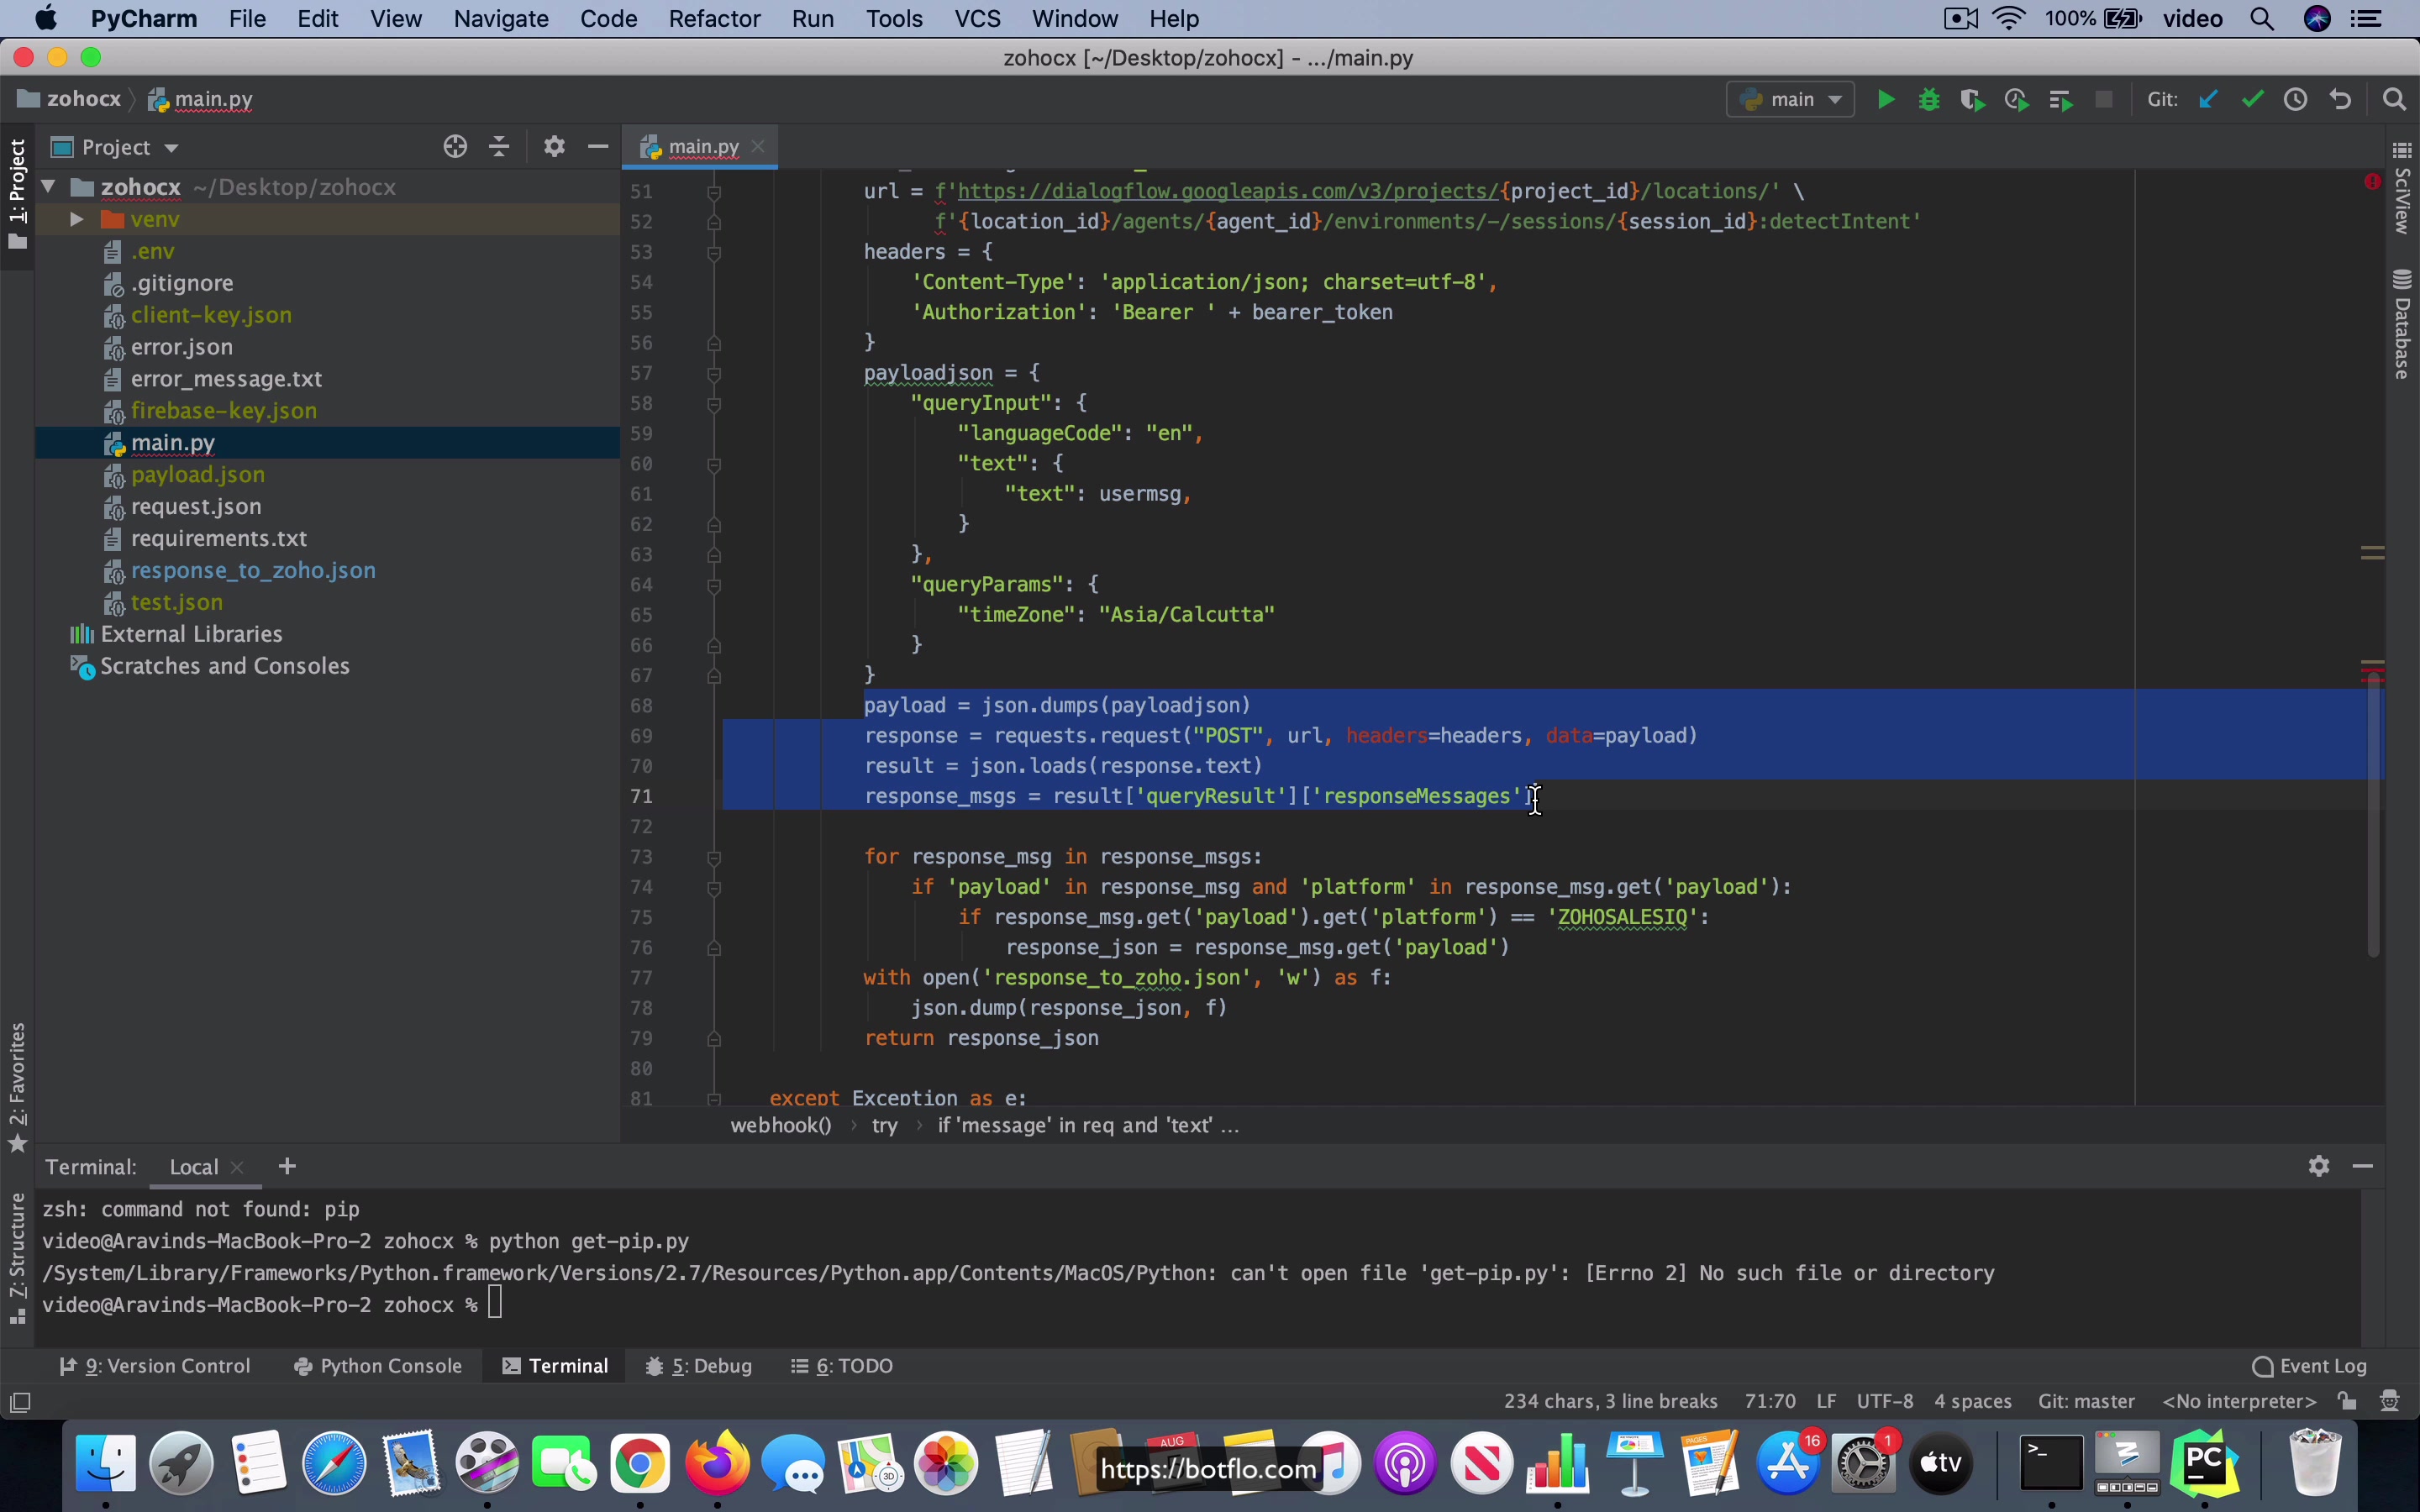
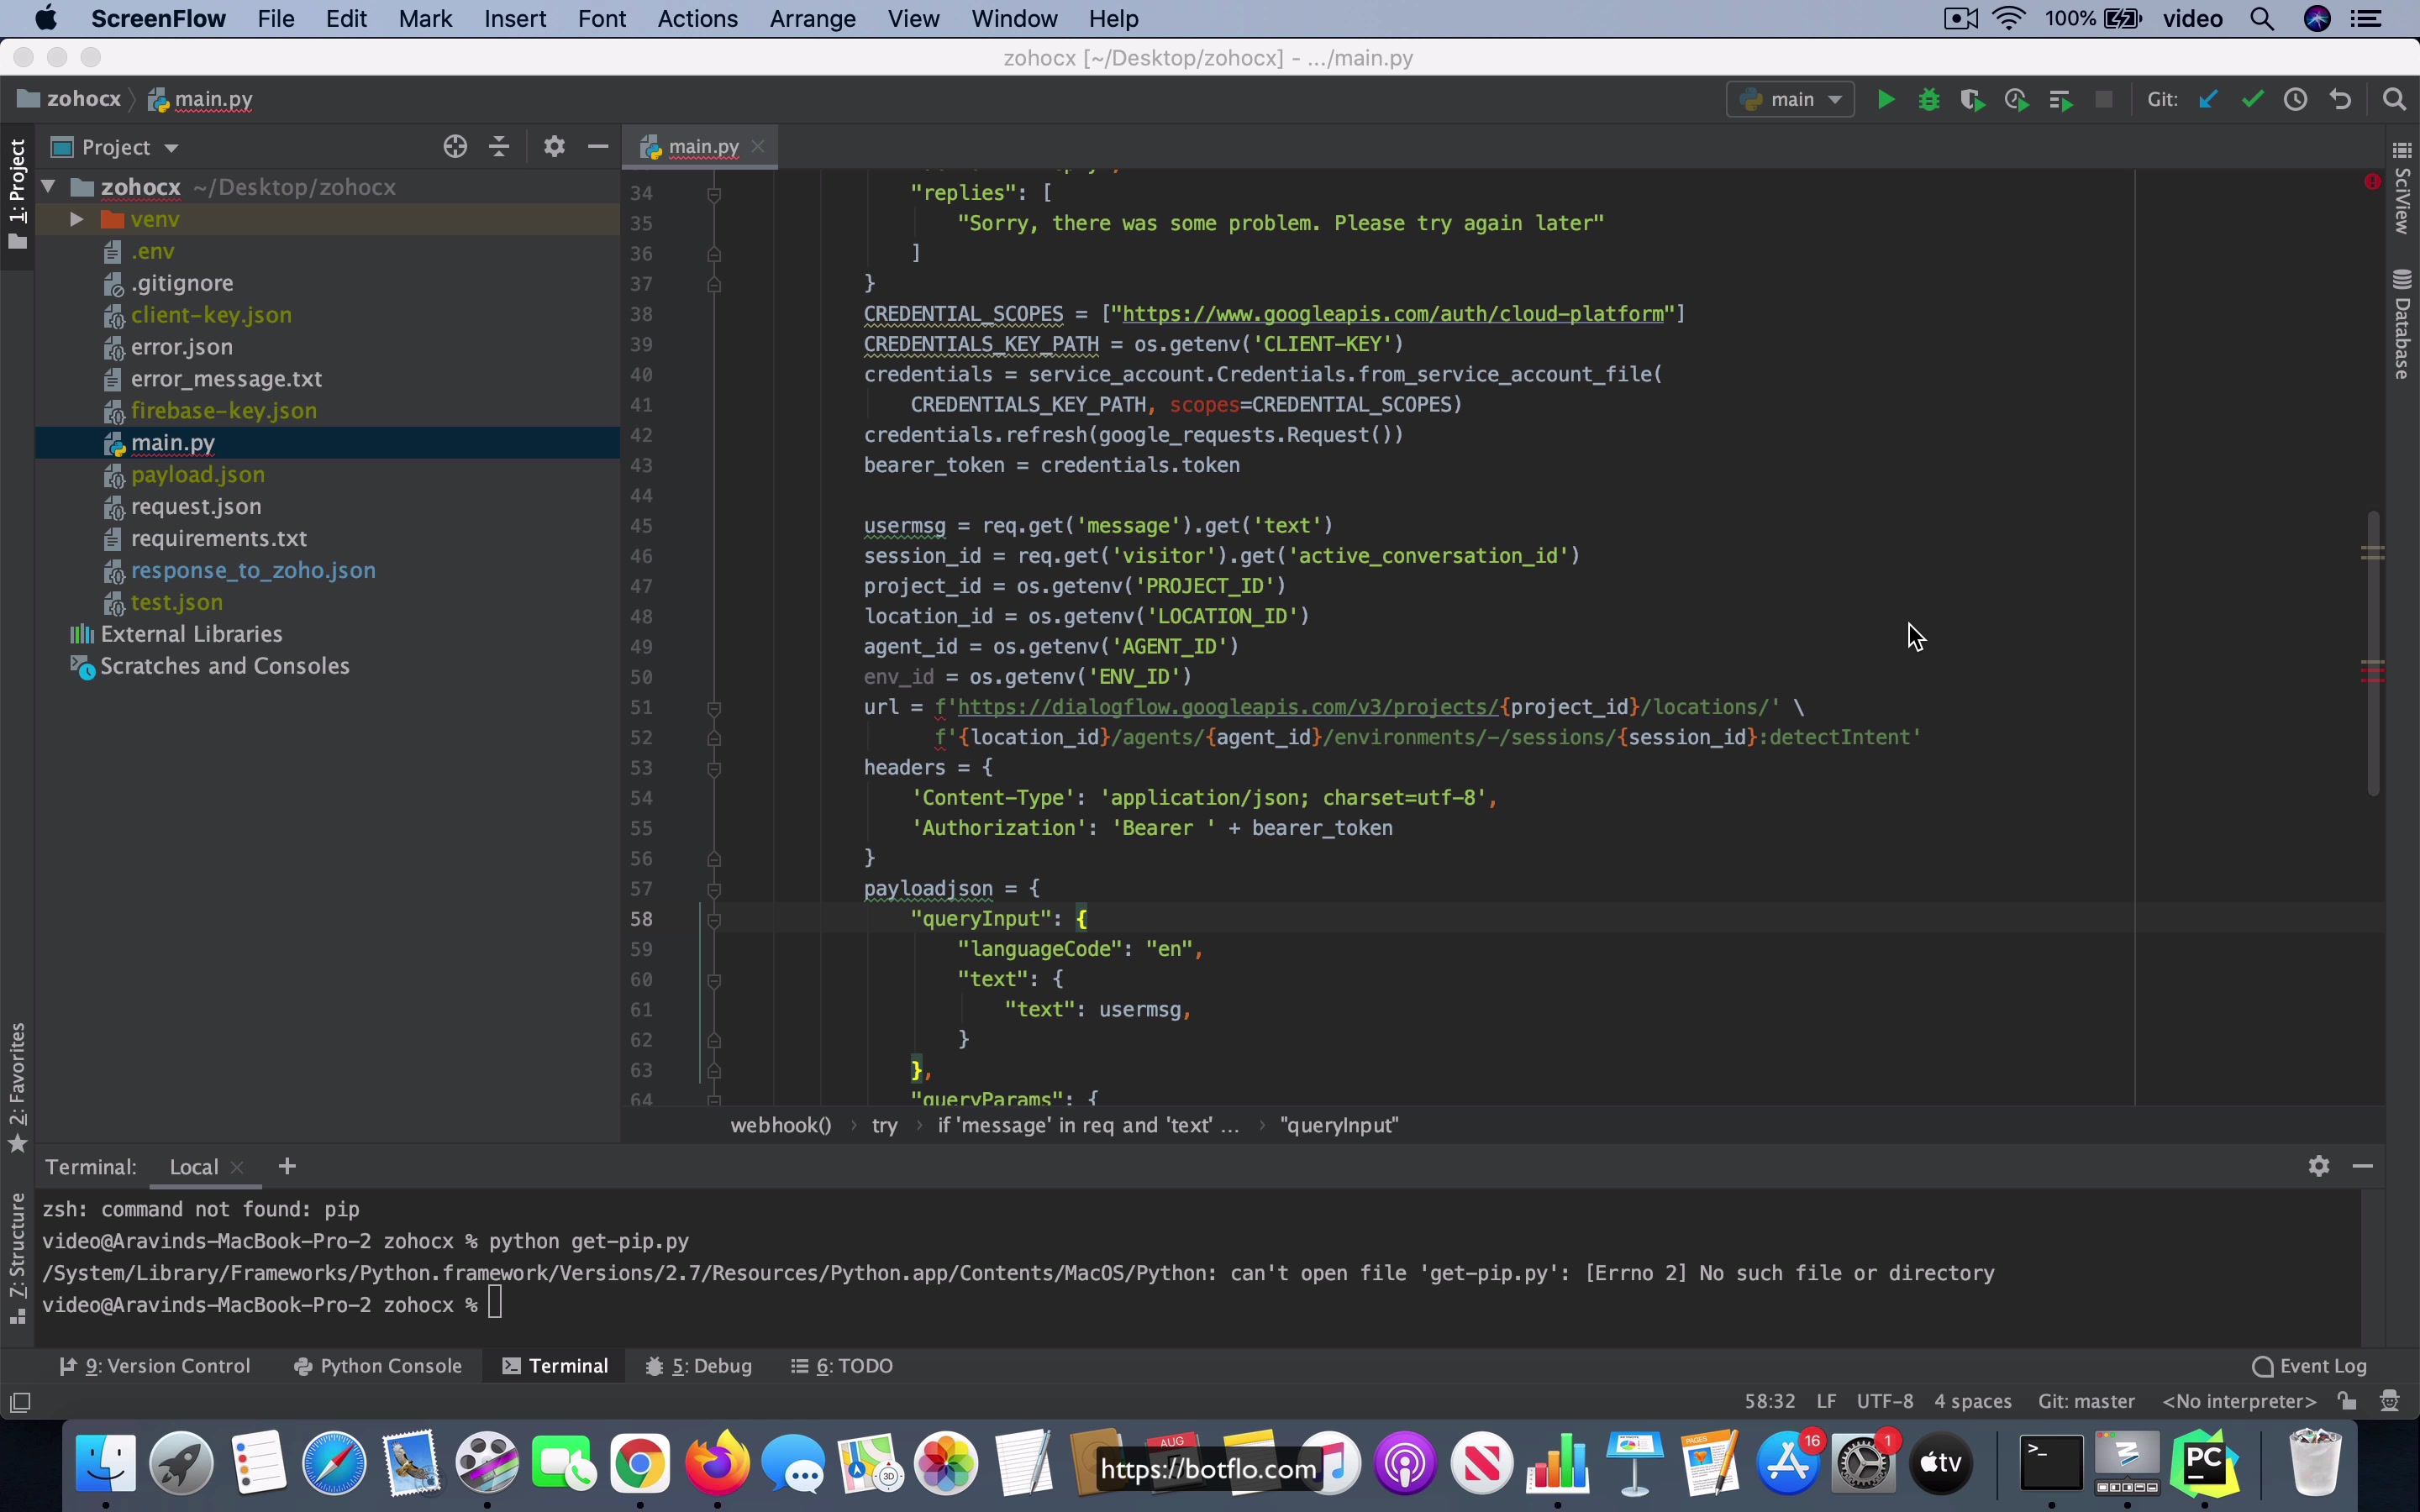
[00:00] Now that you have the service account JSON file downloaded to your computer, so this is what the file is going to be, I am going to call it client-key.json. The Python code that I use is going to use the code, I am sorry it is going to use the file and it is going to generate credentials. So this piece of code what it is really doing is, it is going to go and get, so this line of code here from service account file is going to use the credentials key path and of course this is environment variable that I have set and it is going to get the file name and then it is going to use it in this code and it is going to generate something called a bearer token.
So this token is, this stuff is what you have to do to be able to get permission to call the API, this is what allows you to give, get access to make the API call. And then this chunk of code that you see here is going to construct the URL that is going to be used for making the detect intent call and detect intent API call is what you are going to use as you have seen in the course before, it is the same for both ES and CX, is what you are going to use to be able to actually call the intent or it is going to be the one which is going to allow you to make the API call which corresponds to getting the right intent for whatever the user type at that point in the conversation.
[01:33]
So this stuff is going to construct the URL till this line of code and then these two blocks, they are going to construct the headers, the header as you can see is using the bearer token and then this is going to be the payload which is sent to the API call and you can notice that this user message is something which is coming from the request object itself and this is the request which is sent from Zoho sales IQ and notice that it is going to send in this request object the text of the user’s message as well as it is going to send something called an active conversation ID and this is the ID that I am going to use as a session ID.
[02:14] So we are going to just take advantage of the session ID that Zoho is sending us which it is calling it the active conversation ID as you can see. Now once that is done, you will send this payload to this particular URL and then you get a response in your result object and then you will be able to parse it out and finally this section of code is going to look for a custom payload which has the platform as Zoho sales IQ and it is going to take that particular JSON and then it is going to return that back to Zoho sales IQ.
So this sort of you know back and forth is what allows us to get the message from Zoho sales IQ right and that is the step and then we also do a step to get the credentials for the API call just right before that and then we make a call to the we construct the URL and then we make the call we get the response then we extract the information relevant to the channel that we are looking at right now and then we send that response back to the channel.
[03:27] So this sequence of code is how you get the integration to work with the particular channel that you are interested in.
So in your case if you are let us say using I do not know maybe slack or something like that slack will in a similar way send it is the payload which is the whatever the user typed it is going to be sending it to the webhook URL and in the same way you are going to extract the users text from that send that make API call to Dialogflow get the response back and then in the custom payload you will probably have a channel corresponding to slack and then you should be able to take that and send it back to the slack channel which will be able to in turn render it inside its user interface as the appropriate response from the bot.
[04:14] So this piece of code I will of course I will add this code into the course this piece of code is what allows you to do this CX integration okay now what I have here is sort of like very basic you may have to improve it to suit up to make it suitable for the integration that you are developing as well as any other thing that you might want to do but the point is that this skeleton of code will help you with the integration and if you get everything set up this should be able to do the job to build the integration from end to end.
Lesson: Why I don’t recommend the client library
[00:00] Now that you have seen the code in action, this is a good time for me to explain why I am calling the API URL, I am constructing this URL in the code instead of using the client library which is provided by Google or by the dialog protein. So the reason I do that is when you use the client library which is provided by Google, what happens is that the client library will allow you to construct these rich responses corresponding to whatever channel that you are using by using certain specific library methods.
And I found that first of all those library methods are not very intuitive, number one. And number two, if your channel evolves and adds a new rich response, you will find that the fulfillment or the client library in this case is not up to date and it goes out of date very easily because this is some people in Google who are trying to maintain all these integrations.
[01:03] And of course, it’s going to be a lot of work if you have a lot of channels, right? And then a third reason is that you might say, well, that’s fine because it’s all open source. Let me just go and modify the source and make the client library do whatever I want it to do. And then you’ll notice that the message object passing code that they have is sort of like something that Google has been building over many years. And it’s a pretty complex thing to really understand.
Of course, I think that once you understand it, the real benefit is that it’s sort of like once you get it, you can do it automatically in the future. It’s something like that. That’s the way they define that protocol. It’s called protobuf, by the way. So that’s an issue because, of course, it’s until you really understand how that works, you know, you can’t build your integration or extend it and all the other things. What I found is going with this method where you just construct the API URL in your code, and then it’s going to add a little more code.
[02:10] But the real advantage you have is that once you get the setup, you can make it do pretty much whatever you want. And you’ll find that in contrast, the client library is really, really restrictive. So this is why I recommend people not use the client library and just use their own.
They just construct the code in this way, construct the URL, the API call and all that in their code and avoid the client library and just do it pretty much. It’s a bit like doing it from scratch, but it’s not a lot of code on the one hand and on the other hand, it is very flexible and it allows you to do what you want after that. So this initial setup, I would say is well worth the effort.
Lesson: Defining the custom payload inside Dialogflow CX

[00:00] In a video which I showed you before, I showed you how when the user typed the message hello there, it came back with a rich response which is shown inside the SalesIQ widget. And you notice that it was already able to show like a input box where the user was able to type in their name, right. The way that works is now I am inside my Dialogflow agent and this is the Default Welcome Intent. Notice that this is a very simple agent, it just has the start page which has a single Default Welcome Intent. And I am going to click on this edit intent to see the training phases.
These are all the usual ones, hi and hello and hi there and all that. And if this intent fires, this is the transition route that we have declared. And what I have created is a custom payload, this is the only response which is sent back. And notice that the platform is going to be Zoho SalesIQ, the input is going to be with the value of Aravind and placeholder, enter your name, there is an error message in case they did not put anything inside and then the type is going to be name, action is like.
[01:04] This is all the specific format which is expected inside of Zoho SalesIQ so that it can render a particular type of rich response. What happens is when this intent fires, that is in this case this transition route fires, the Dialogflow CX is going to send back this custom payload as the response to the Python code that I just showed you.
And the code if you remember, it will actually look for this Zoho SalesIQ platform, right. It’s going to look at the JSON and look at this platform and then it’s going to take that and send that as the response JSON to Zoho SalesIQ. And that is how it is able to render this control into the Zoho chat widget.
Lesson: Rich responses supported by Zoho SalesIQ
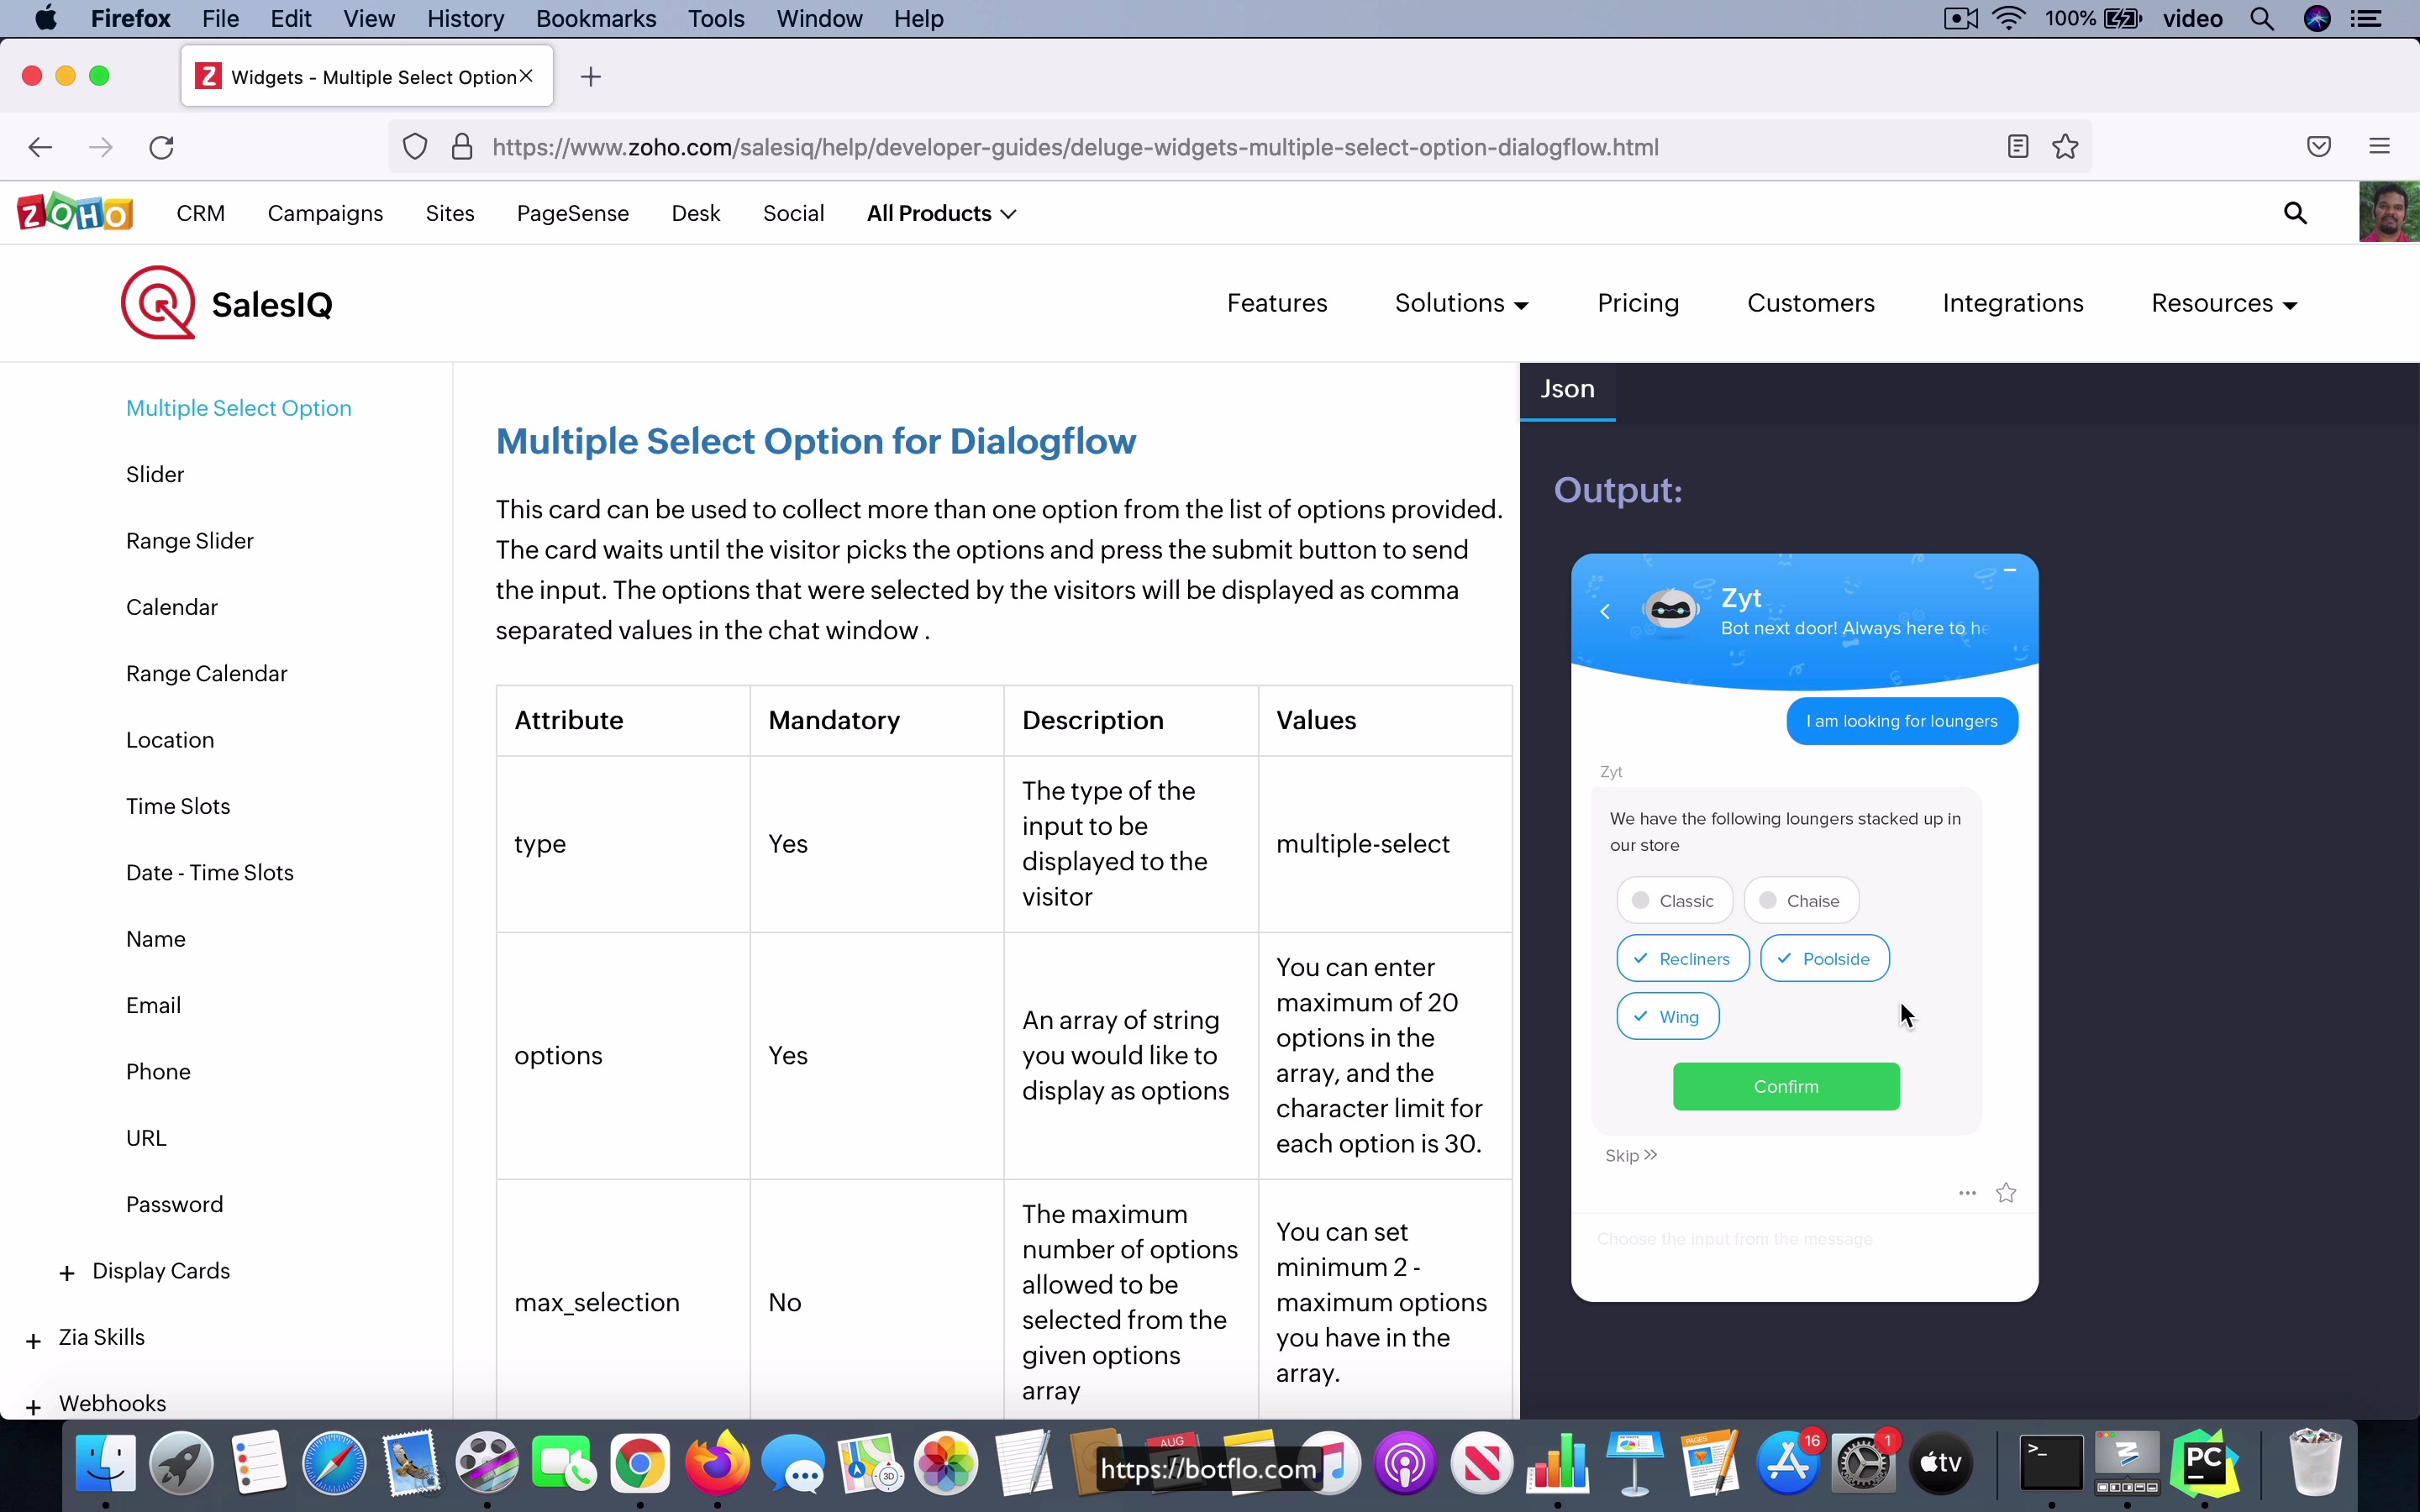
[00:00] What you saw in the previous video is that the custom payload that I created inside CX is sent back to the Zoho sales IQ chat window and it’s able to render it in a format which looks like this where they have this, you know, this control which allows the user to input their name. This is a specific type of response but if you look at Zoho, the ZoBot responses which are supported, there are actually quite a few. So you have this input cards where the user is actually going to provide an input based on whatever is showing up on their screen.
You have a single select option, so single select option is like a button, you can choose one of these buttons and you have the multiple select option where you have to, it’s like multiple selections and then you have to do a confirmation and notice that the response object looks a little different in this case. You have platform is the same, replies is just what shows up on top of that but then you see that in the input section you have the type as multiple select and then you have all these options and then you can also have a max selection.
[01:10] This is the maximum number of buttons which can be selected. So as long as you send the payload in this format, as long as you construct the payload in this format and send it back to your Zoho sales IQ bot, you can see that Zoho sales IQ is going to take care of rendering it for you inside the chat window and you don’t have to do the additional work of rendering the user interface.
So this is the advantage of using a predefined user interface layer for your integration and I found that sales IQ has a lot of rich responses. You have all these things range slider and email and URL and password and all that and they also have a set of display cards where these type of responses don’t get user input, it just shows information and then the user will type their next message as a text message.
[02:04] So this sort of completes the loop. So what you have here is you have these custom rich response types that is supported by sales IQ and you have on the other hand in your CX bot, you will have to construct the custom payload and put it in as a response in the transition route and then in the middle, you have the code which is going to take care of number one, getting the input message from the user and number two, it will relay that to Dialogflow as an API call.
Number three, it will get the response back from Dialogflow and number four, and you might say that this is the third step, I mean it is probably not two steps but just one. Anyway, that step is it is going to take the response coming back from Dialogflow and parsing out the channel specific object, the JSON object and then it will send that back to the specific channel that you are using for the integration.
[03:07] So that is how you do this. In general, this is how you do the Dialogflow CX integrations.
Lesson: Hosting the middleware code on PythonAnywhere
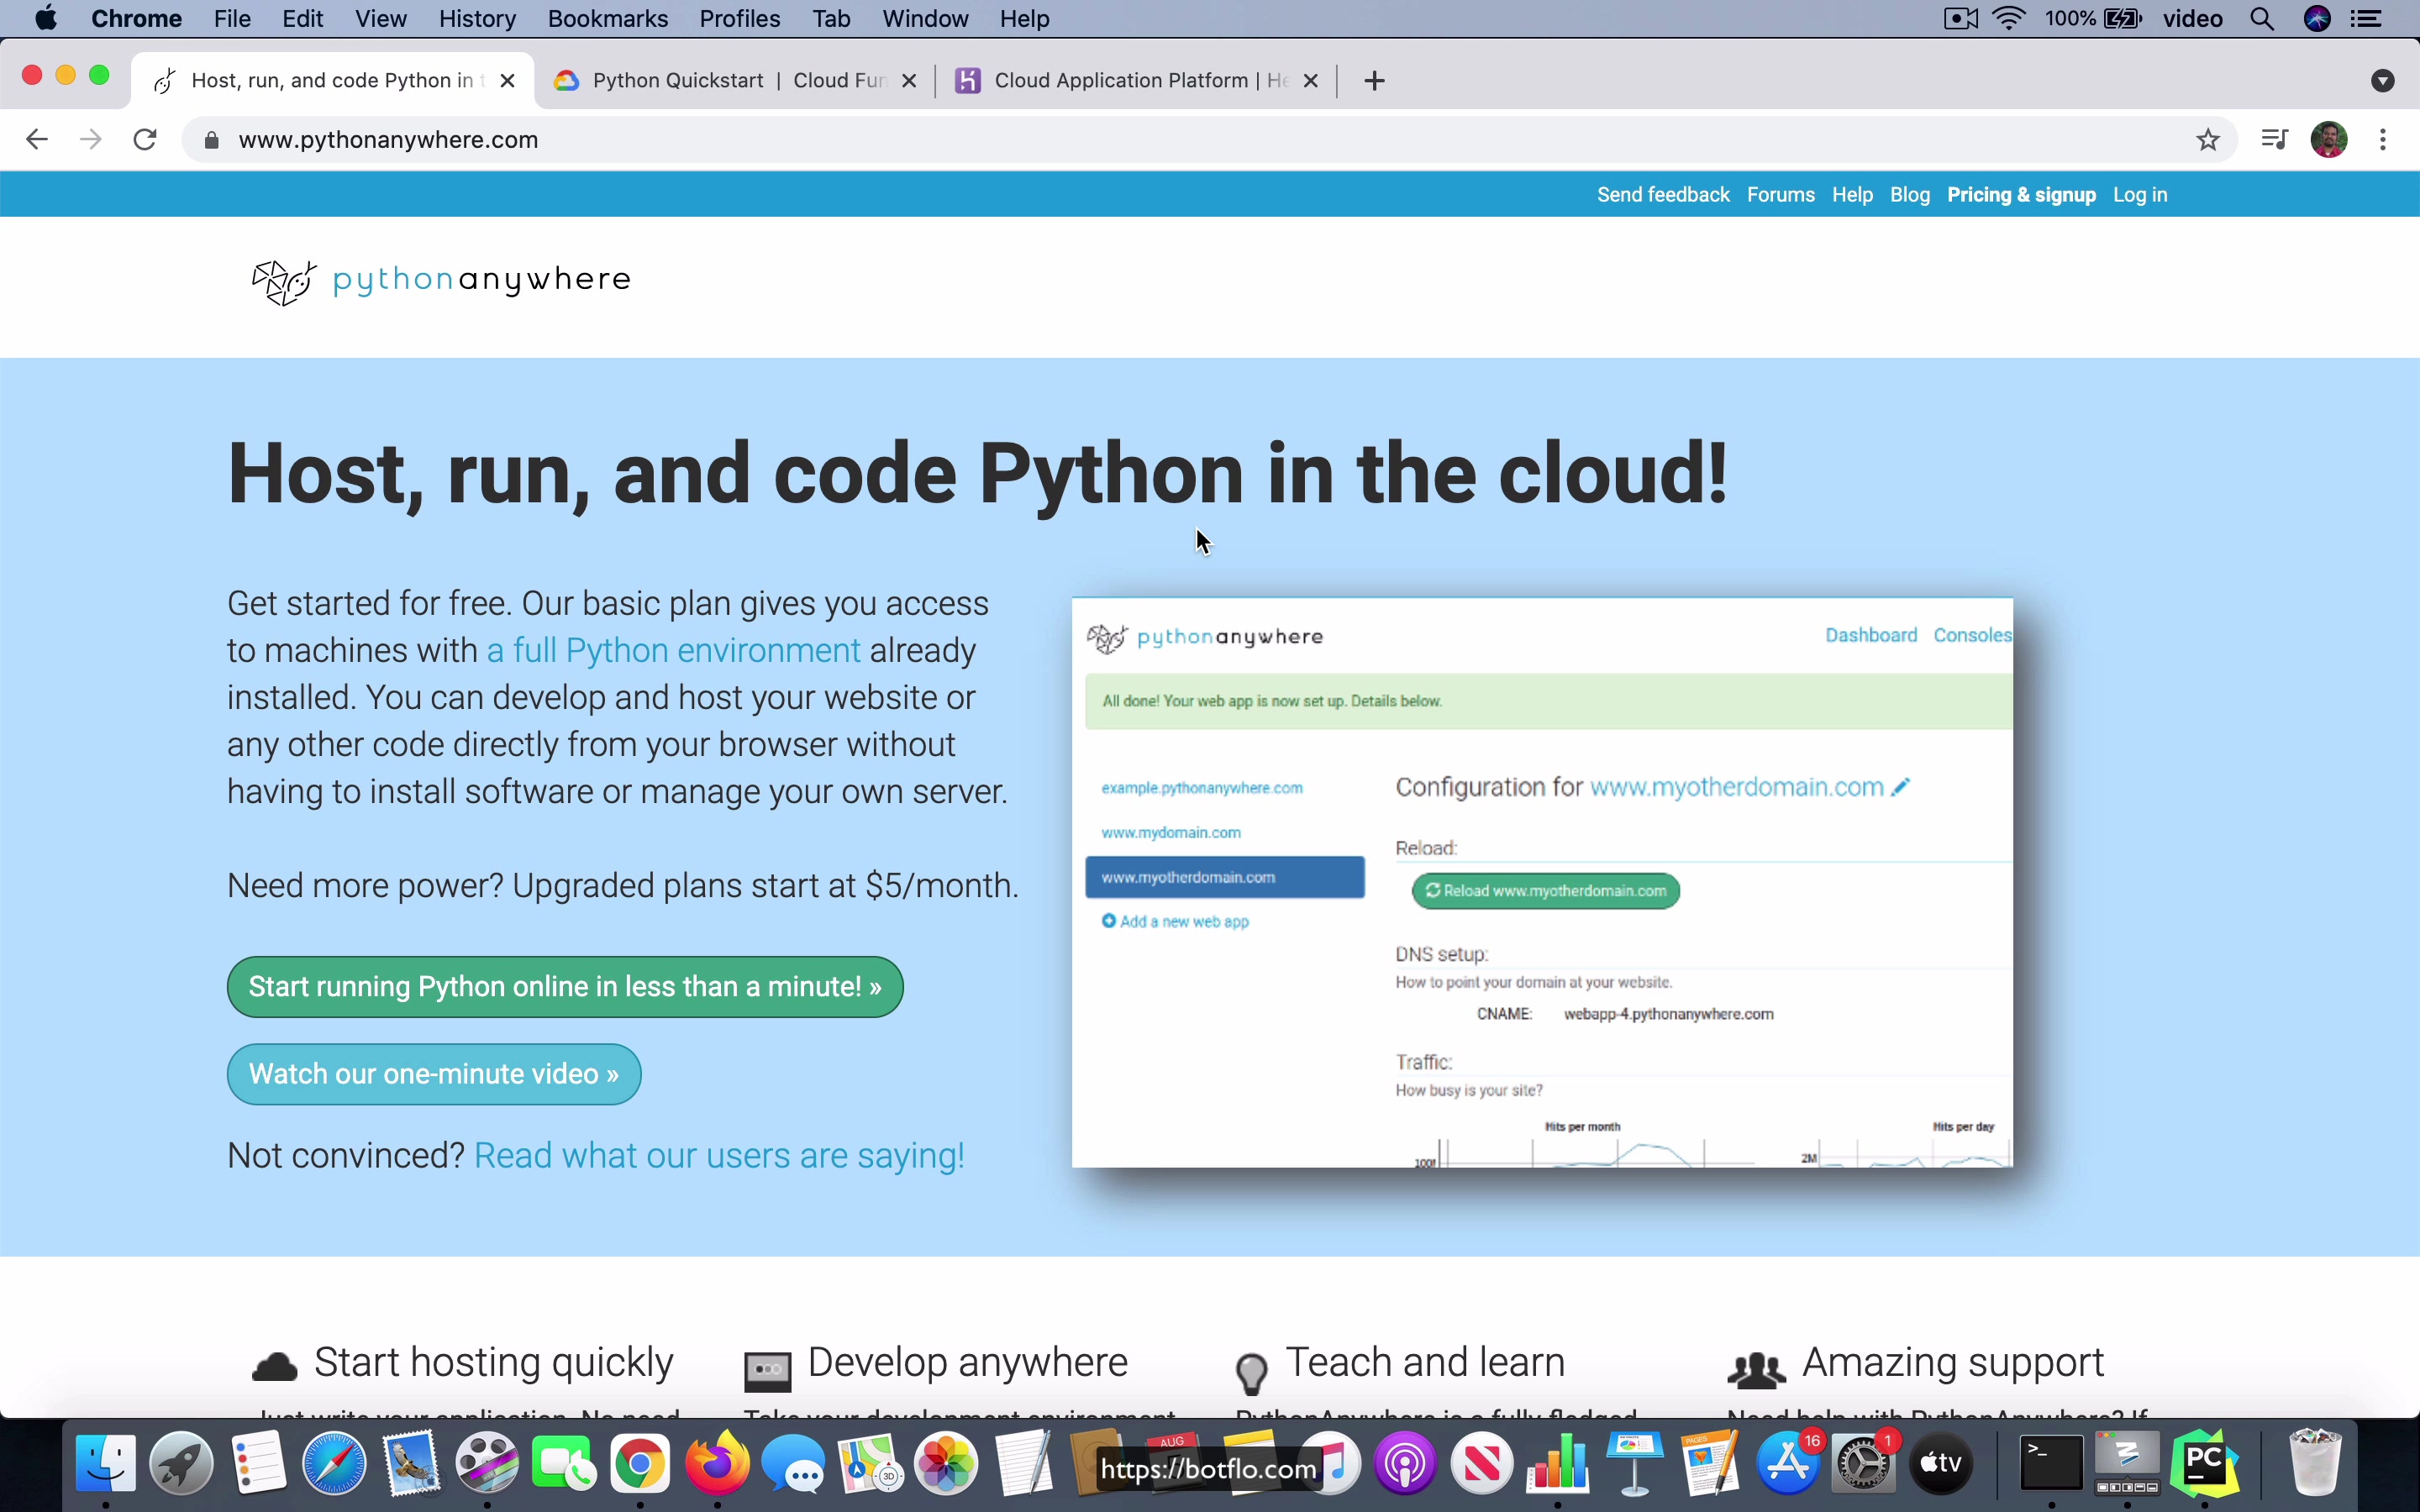
[00:00] I am going to talk a little bit about where you would want to host this middleware code. Now if you already made up your mind and you already have something that you are very comfortable with and you use all the time, then you should just go with that, always familiarity is better than trying to find the optimal solution. But in case you are not very sure where to host it, I am just going to give you a few ideas and I will also point out the pluses and minuses of using these different systems. So the first option that I would suggest is this website called Pythonanywhere.com.
And of course, I am assuming here that you are building the middleware in Python. I am not going to make recommendations for the other languages because I am not that familiar with the other languages. So in the case of Python, the reason that I like Python Anywhere is because number one, you have a way to upload the service account JSON file using the file explorer, which is a visual file explorer inside the Python Anywhere web application, which is to say that you can just drop that file in with the code and then you will not have to worry about checking in the actual service account JSON file by accident into like a public repo.
[01:19] Because remember that the credentials file has to be kept safely. If somebody is able to access that file, they will be able to use your Dialogflow API on your behalf and then they will be able to run up a bill, which is on your credit card effectively.
So you want to be very careful to not accidentally leak your credentials JSON file, the secret, the service account JSON file that I talked about before. You want to make sure that you do not accidentally end up leaking it to the public. So this Python Anywhere is very good in that sense. And the other thing I like about it is that they do have a free plan, a free tier, which is always on and always available.
[02:02] They do not shut it down after inactivity or anything like that. It is sort of restricted, but for this use case, you will actually find that it is pretty good. They have like, you can only run like one thread at a time. So you cannot have multi-threaded code and if you have multiple concurrent requests and all that, in other words, if you have a high volume chatbot, then Python Anywhere is not going to be a good solution for that particular use case. But for the most part, especially if you are just starting out with building your bot, that is not going to be the case.
And I think that you will find that Python Anywhere works pretty well for the use case where you are having a bot that you are just building out and you think that it is going to be a somewhat low volume bot when it comes to handling requests. And by the way, when I say low volume, if you handle like one request every few seconds or every minute or something, that is actually still a lot of requests coming in. But the important thing is that they are not concurrent.
[03:01] There is not going to be too many people working on like interacting with your bot all at the same time. That is when a solution like Python Anywhere, by the way, I mean the free solution. So if you go for the paid version, you do get the thread, web workers, and you can have concurrency in that case. But I am talking about the free version. And in the free version, you have only, it is a more limited, its ability to handle concurrent requests is much more limited. So my vote would be to start with Python Anywhere.
And in case you find that it is not sufficient, then you may want to move on to some other hosting for your Python middleware integration.
Lesson: Hosting the middleware code on Heroku
[00:00] The other option that you have for deploying your middleware code is the very famous Heroku and Heroku allows you to do this for free. The only limitation that you have is that in Heroku the free tier it gets shut down periodically. It is not like it is some most of the time it would not affect things like chatbots but it is still something to keep in mind and the other issue with Heroku is that it is not really a file system they do not use a file system they have like a simulated file system in their cloud which means that uploading a file using their file explorer is not really a possibility in Heroku like it is a possibility in Python anywhere it is not in Heroku which means that there are some kind of an interesting workarounds to get it to work.
You may have to store the service account JSON information inside an environment variable. It is not too hard you just have to get the you know hang of it and then it will be able to do that also but the other issue with Heroku is that after some period of inactivity they shut down the they call it a dyno it is a server they shut down the server of your account and then it takes a few seconds for it to reboot and come back online so if it goes to sleep then you will find that if a message is sent right at that time it is possible that the bot will not come back with any response to the user.
[01:27] So Heroku is also a very good choice like I said you have to understand how the credentials work and once you get that setup I think that it is a it is just as good a choice as using Python anywhere.
Lesson: Hosting the middleware code on Google Cloud
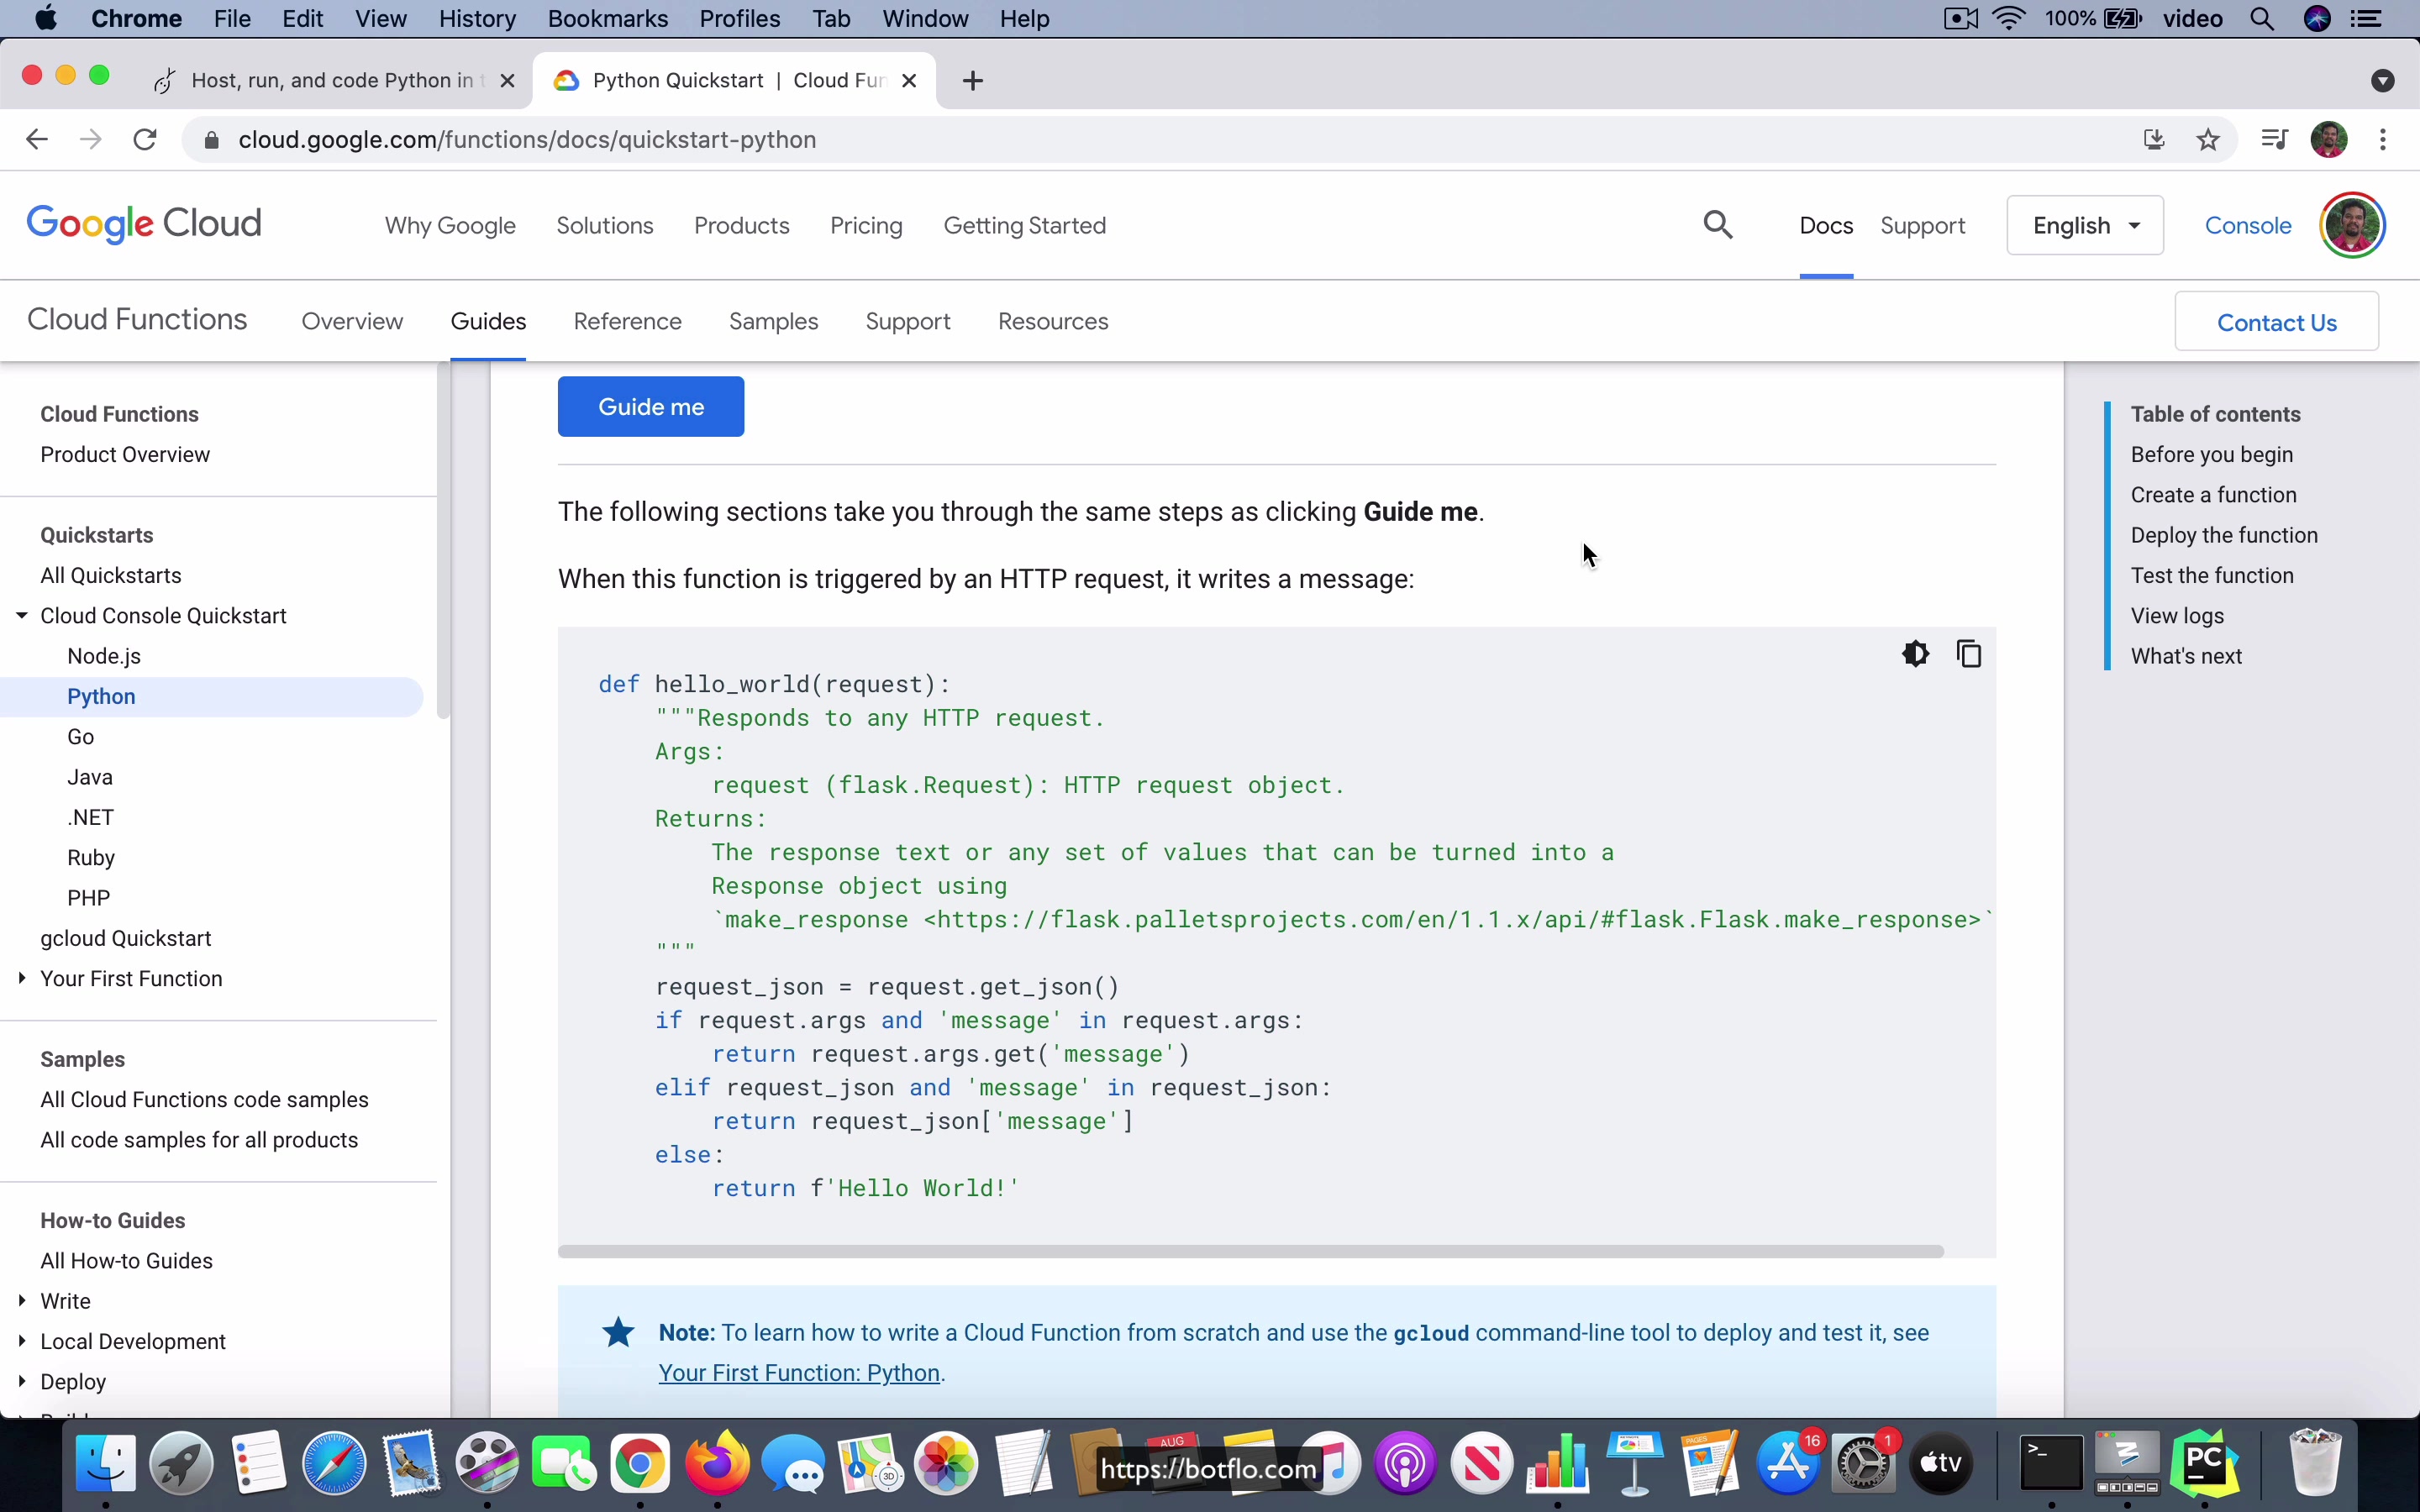
[00:00] So now we come to the third option and I think this is sort of the most, I would say most people want to learn it and most people prefer it, but it’s also in my view not the best choice. So I’m talking about using Python Cloud Functions on Google Cloud. So Google allows you to use these things called Cloud Functions and it actually supports a lot of languages right now. You can see that all these languages are available now. It used to be only, I think, NodeJS and Python or something in the beginning, but now they support many languages for this Cloud Functions.
So the problem that I have, I actually have a few issues with the Google Cloud Functions. So let me talk about that. The first one is that the setting up the credentials is actually more complicated, ironically, it’s more complicated than for other systems where you use the service account key.
[01:06] So the reason is in the case of Google Cloud, what you will do is you will associate the entire Cloud Function with a service account. You have a way to map your Cloud Function to an existing service account. So theoretically, this means that your Cloud Function is running with the permissions it needs to access the Dialogflow API already, right? It’s already having the permission to do that. And you might say, hey, if that is the case, then shouldn’t it actually be much simpler?
Shouldn’t it be much easier? So here’s the catch. The issue is simulating that when you’re doing your local development is actually a real pain. For some reason, they didn’t do it well, or maybe I just don’t understand how to get it set up properly. I’ve seen so many different versions of this code, which has sprung up in just the last couple of years on different forums and Stack Overflow and all that, that by now, it’s actually very hard to keep track of what is the latest version of the way you do it, which is sort of the Google approved way of providing credentials.
[02:11] So what I’m talking about is not the credentials when the server is running the code. That is, if you upload the Cloud Function, at that point, it’s all running on Google servers, it is running on a service account, and it’s able to access the API, that works just fine. What I’m talking about is the local development portion, where the code on your computer needs to have access to the Google credentials in the proper way, it has to be set up in the right way.
And what I found is that this can be very tricky. And not only that, it’s multiplied, I guess the complexity is multiplied by the fact that there are three or four different Google supported products. One of them is this Cloud Functions that we are looking at right now. And then you have the Google App Engine, you have Google Cloud Run.
[03:02] And there is one more that I forget. So the point is, all these have different ways of accessing credentials. And I think that also causes more confusion. Because there’s a lot of stuff which happens in your code where the Google code tries to automatically infer the credentials based on what the file system where it runs and the location where the files are and things like that. It tries to get it from the shell, the variables in the environment.
And the point I’m making is, on the whole, the local development for Cloud Functions can be pretty challenging. So that’s the first downside. There’s also another sort of associated downside, which is what you saw on the code I showed you was a Flask application. It’s a full-fledged Flask app, the code that I have here. It’s a full-fledged app, which means that it is able to do a lot of things here, which sometimes you will find that the Cloud Functions are more limited.
[04:06] They’re expected to run quickly and return fast and all that. You don’t have the same kind of limitations when you’re using a Flask application and an endpoint inside of your Flask app as the integration code. So that’s the other issue that I have with the Google Cloud Functions. Now, the interesting thing about using Google Cloud Functions is that you get a very big benefit.
And I have to mention that, because if you do get it set up properly and it works well, and to be very honest, I’ve not been able to do that. So I think that this is more of a theoretical discussion, but well worth considering. If you get the stuff set up properly, there is a big advantage of using it in Google Cloud Functions, which is you can actually set up an admin interface for your bot interactions, where you can have somebody go and look at how the bot, the messages that it’s sending back and forth, and how many people interacted with it, sort of like an admin user interface.
[05:15] But because it’s all running on Google Cloud, what you can do is you can protect that little admin UI behind approved Google accounts, which is to say that the admin UI, which is directly tied to this, wherever you’re running this Cloud Function, and has access to whatever database you’re using, you don’t have to provision special logins just to have people access that administrative interface.
You can just use Google’s built-in authentication system, you may have somebody, a team member or someone who has a Gmail account or a Google account, and you can just tell them, you can just tell Google, like in this case, you just go and add the permissions, and you say that that particular Gmail account or that particular Google account will also have access to this Cloud Function.
[06:10] So they are able to go and look at it, and nobody else will be able to do that. So you have this sort of like extra advantage of having the built-in ability to provide an admin user interface for your bots, whatever you want to do in terms of the bots analytics. If you are going to do that, the Google Cloud is going to be a good platform to deploy your Cloud Function, just like a big bonus that you get.
The only thing is that you have to get all the other things set up properly before you can get to that step. So there are obviously many plus points. And I’ll also mention that even though you will be charged for using Google Cloud Functions, there’s a very generous free tier. And if you set it up properly, it’s probably the least expensive way to have a very robust or you can say like, because it’s running on Google’s own infrastructure, right?
[07:07] It’s almost certainly going to have better uptime than Python Anywhere or Heroku or any other cloud that you’re going to go for. And you will find that the cost for that is going to be pennies on the dollar compared to like Python Anywhere, if you go for the paid tier, it’s going to be starting at $5 a month. It’s not a lot. That comes to $60 a year, right?
But if you were to run a low volume bot on Google Cloud, you’ll probably be paying like a few cents for the whole year, because that’s how cheap that in fact, you might even be able to get away with just using the free tier in many cases. So all these things can be considered as you’re deciding where to deploy. For me, the convenience that I get from deploying it on Python Anywhere is better when I compare with all the other things that I have to do to get it deployed on Google Cloud.
[08:06] So I will usually go with that. But you can see that you also have some big advantages if you were to use the Google Cloud. Let me just quickly add one more thing, because this was somebody talked about this. They asked me this question. Let’s say that in addition to providing this integration, the code is also going to call some other custom API or some other database that you have, right?
So in those kinds of situations, a cloud function is actually more of a problem. It actually becomes even more problematic, because it has to return within a certain amount of time, okay. And then you will also find that the additional overhead of debugging the code will be in a way it’s going to be even more challenging. So if you have a middleware code, which is doing a lot of things, you might want to avoid putting it in a cloud function.
[09:04] You might want to just create an entirely, you know, a flask application, which is like an entire web application for the purpose, because you can get a lot more done inside a framework, like a flask or something like that, compared to using the Python cloud functions on Google.