05 Dialogflow CX Webhooks using Python
Lesson: Before you start: Ngrok Tutorial
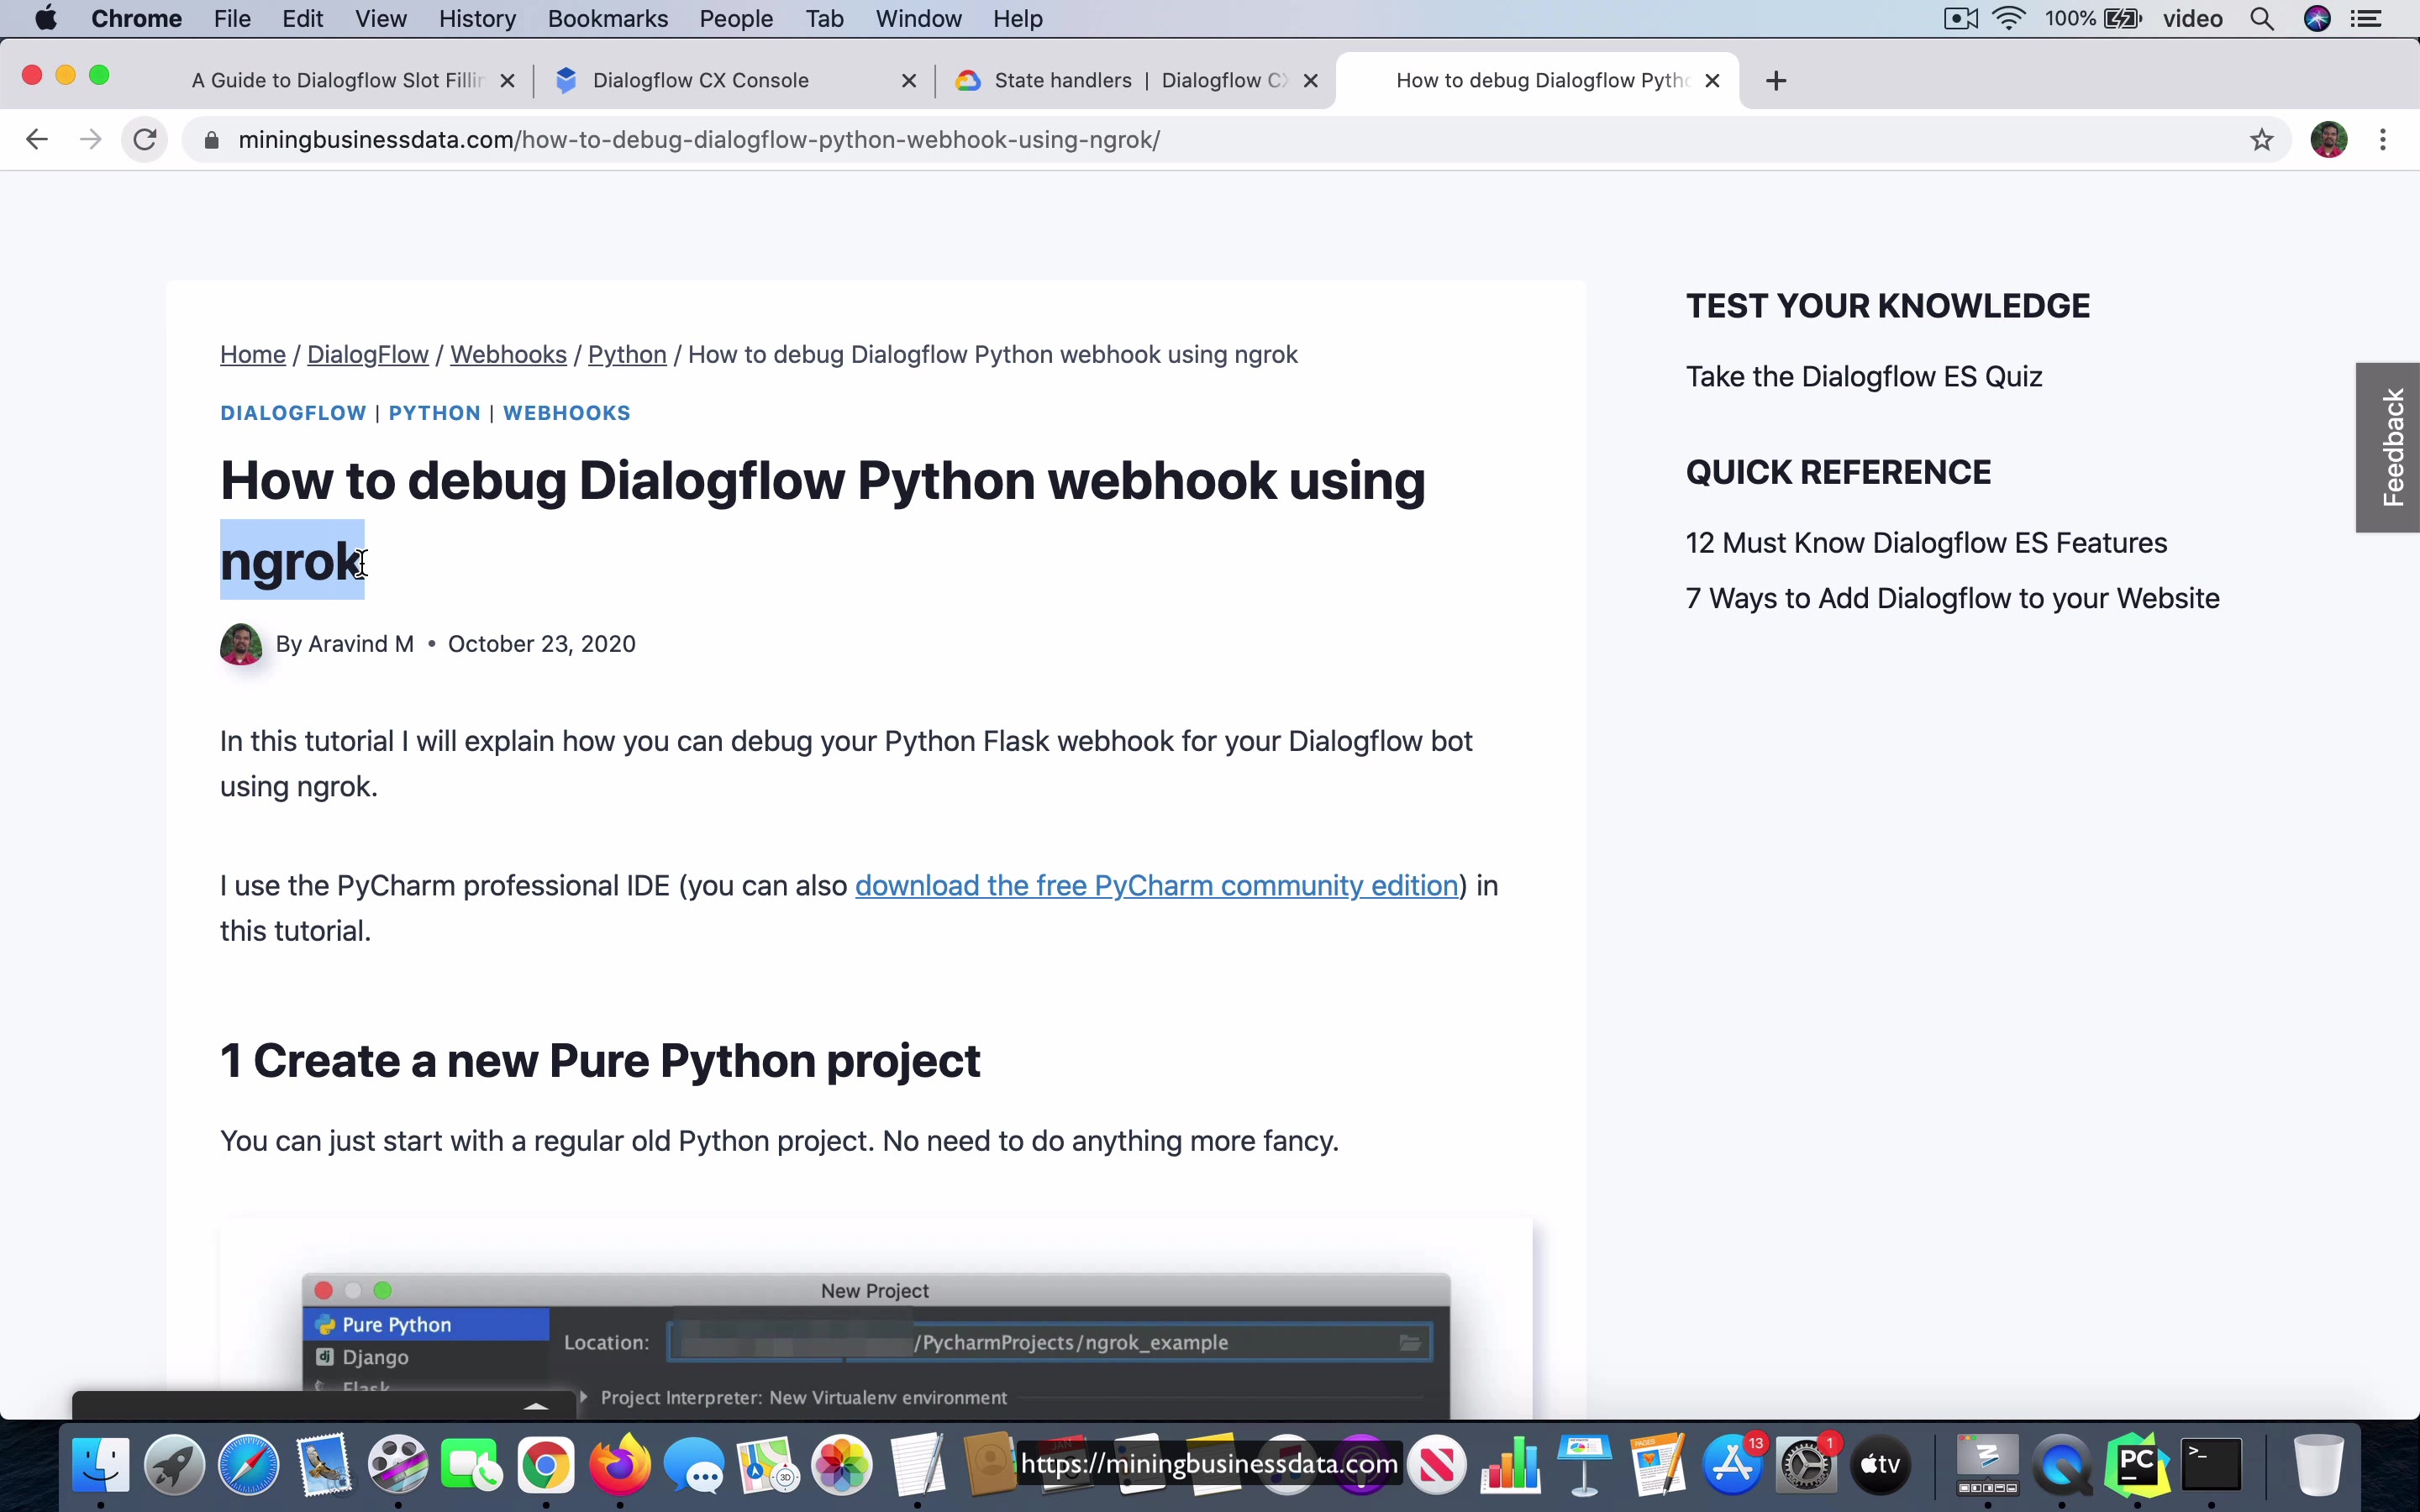
[00:00] So as we go into the webhooks section of the planet spot, I would like to point out that I actually have a tutorial on how to debug the Dialogflow Python webhook using ngrok and I would like you to first go through this tutorial. Now I am actually going to go ahead and update a few things in this tutorial. So maybe by the time you take a look at it, it might look a little different. But in any case, you have to take a look at this because it will be much easier for you to follow the lessons which are going to come after this.
And while I am on this page, I will also mention that I am going to be using the Python Flask web framework because it is actually, it is probably the best tool for teaching webhooks and even though some people think that Python is a little slow when the speed at which it runs and the other thing is that I will be using this software tool called ngrok and what this allows you to do, ngrok, what it allows you to do is it allows you to create, turn your, the way to think about it is it is as if your, the computer where you are running your code, it is as if that is turned into a server which you can access from the internet.
[01:20] Generally, that is not true. There is not any way you can type something like http://www.whatever.com and get access to the development machine that you are working on.
But ngrok can simulate that, it does it by creating something called a tunnel to your, it turns your, the way to think about it is it turns your computer into something like a web server. So in any case, this is not a discussion about ngrok either. The point is that if you set up your environment to do this debugging using ngrok and you can do that by following the tutorial I have here, it will actually be much easier for you to follow all the other lessons which are going to come after this.
Lesson: Handling multiple intents in ES Webhooks
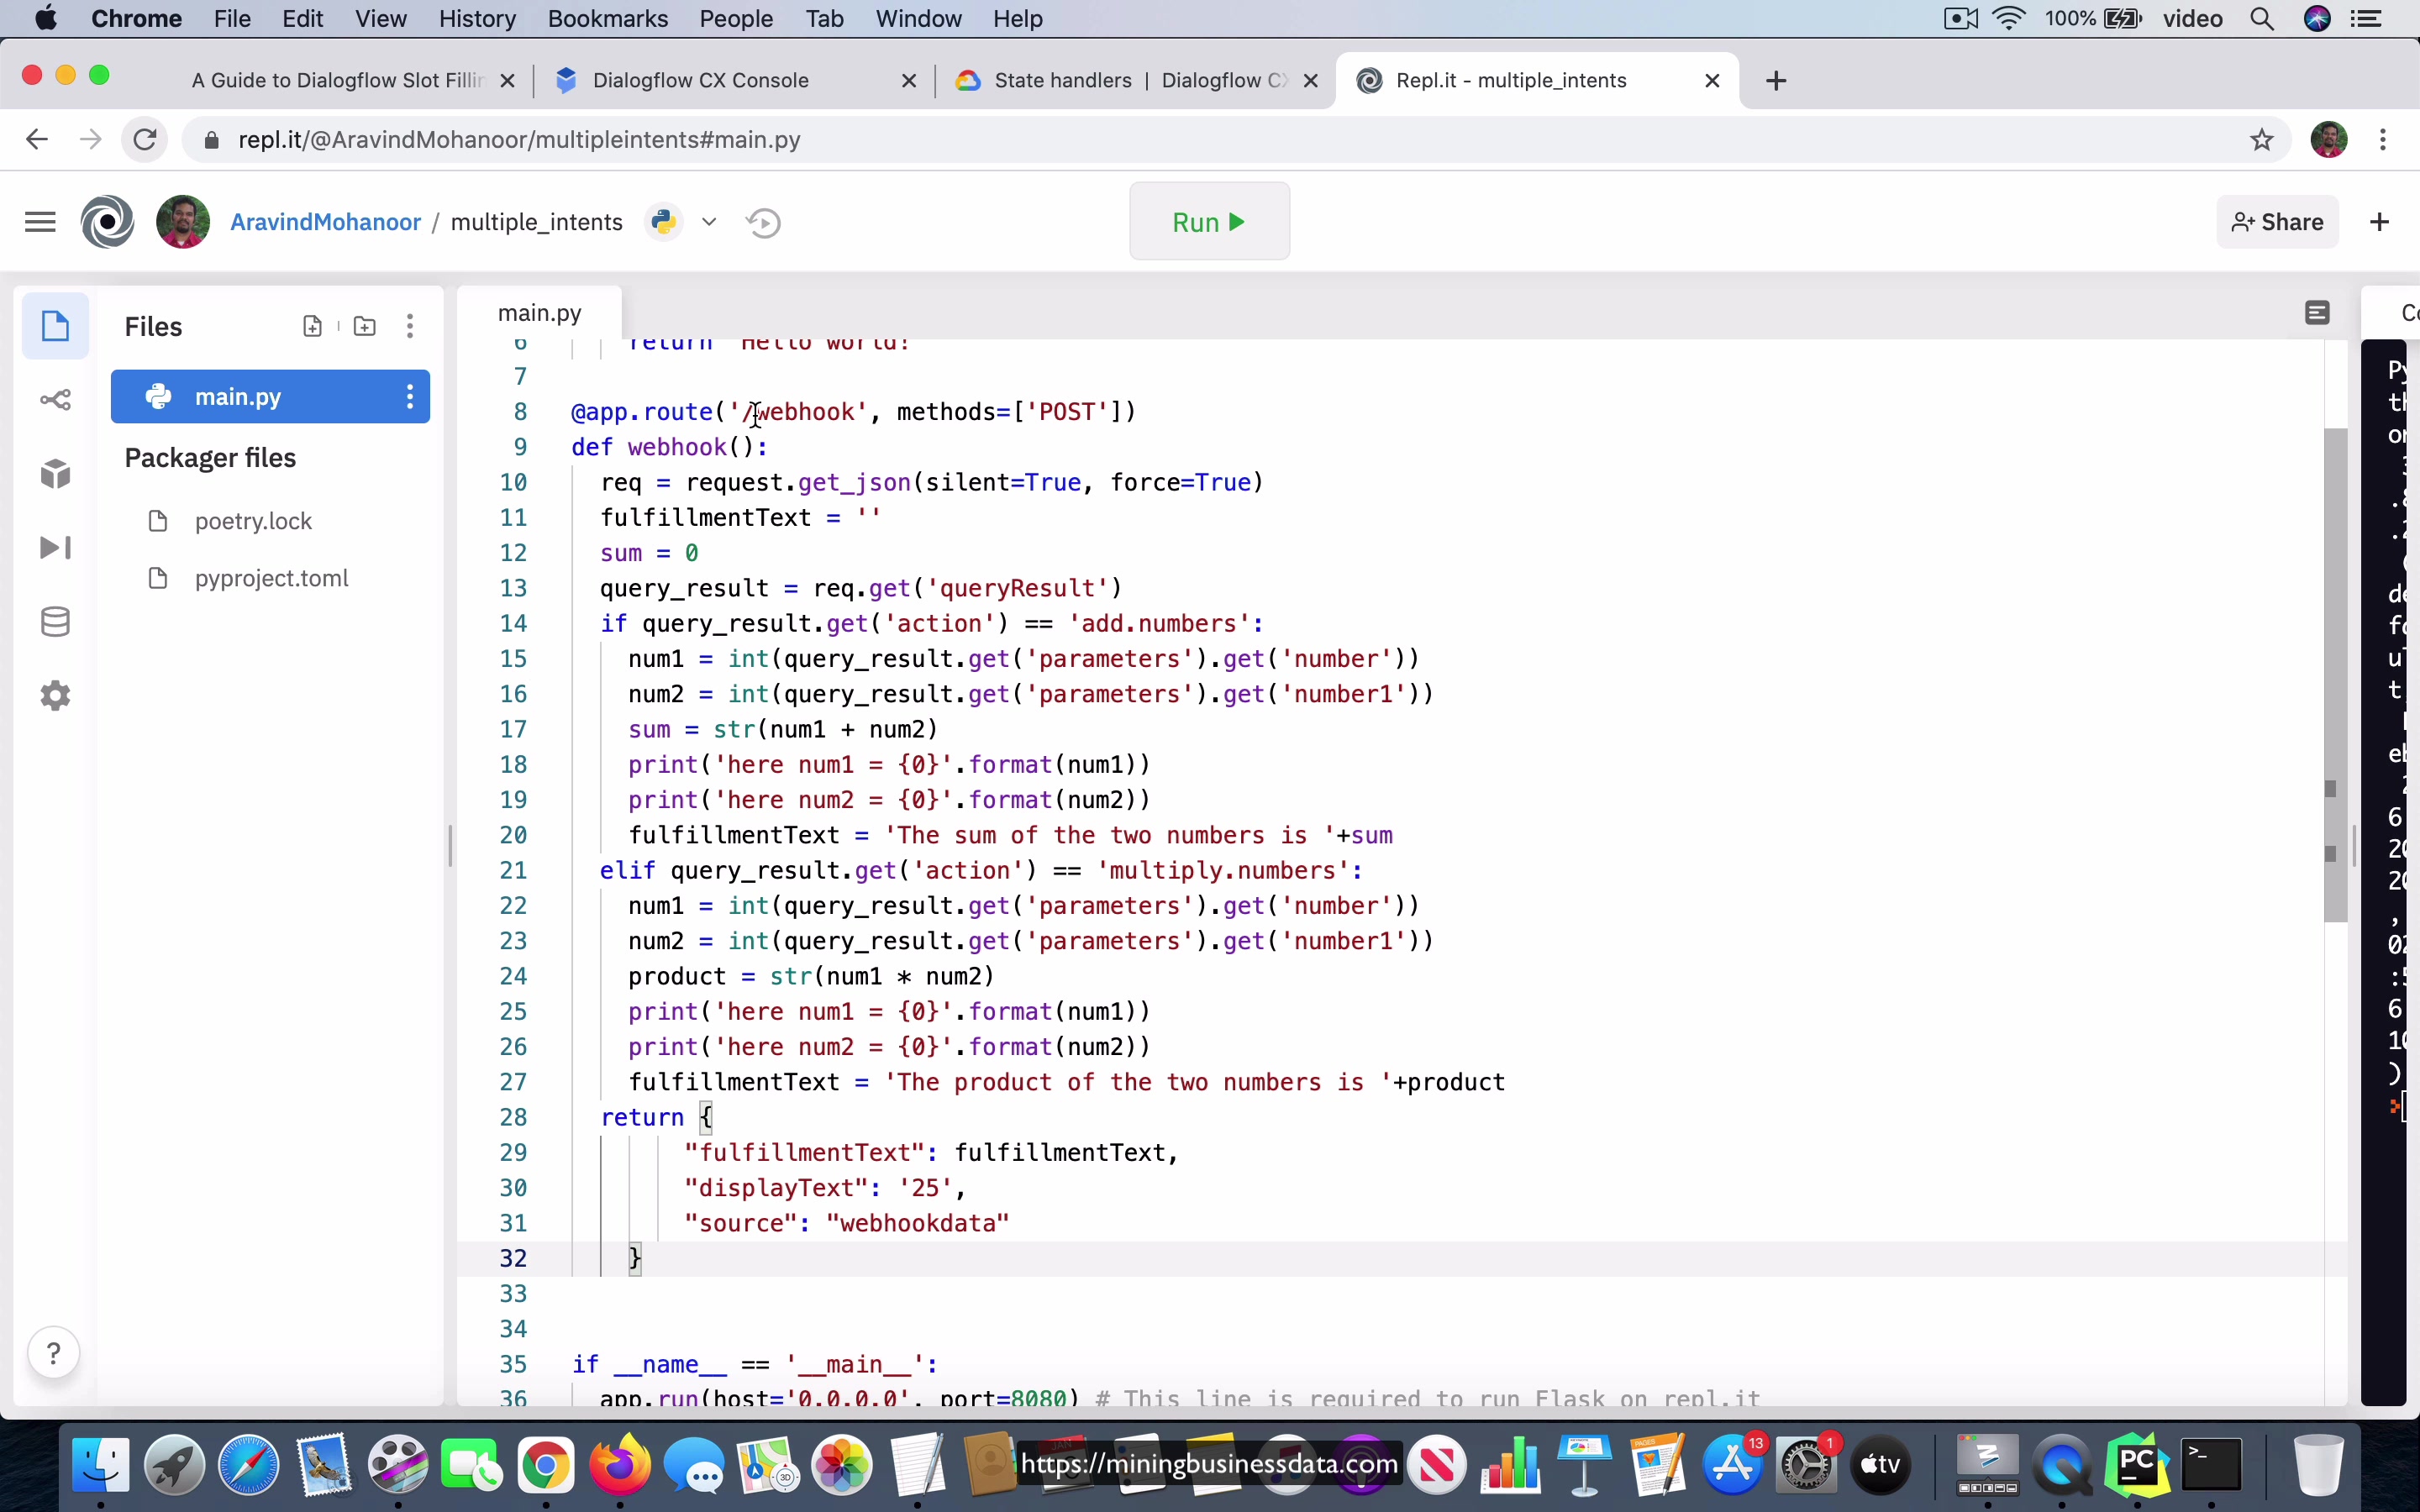
[00:00] Okay, so to provide some motivation as well as some contrast to what is going to follow in the next set of lessons, I want to show you how you had to do webhooks in Dialogflow ES. Now, what we have here is a webhook, which is, I have it hosted on a site called Replit, and it actually allows you to write code and run it online. So the code itself, if you take a look, it’s actually, it can handle two different operations.
The bot itself is just supposed to help people add or multiply two numbers. Okay. And once they provide like their query, like you can say something like add three plus five, okay, what Dialogflow will do is it will understand that they want to do the addition. And that intent will have an action called add dot numbers. And here, when the message is sent to the webhook, that is the whatever is collected from the user, all the information goes to the webhook.
[01:02] You can see that the webhook code is trying to take a look at whatever comes through in the JSON object. And it extracts the action from it. And if the action is add dot numbers, it executes this piece of code. Okay. On the other hand, if the action says multiply dot numbers, which is the other intent, then it executes this other piece of code. And you can see that it’s just doing addition here. And it’s doing multiplication in this branch.
And then it returns the result. And when it returns the result, it has to be in the format that we expect over here. Okay, it has to be a JSON object, and it has to have this field called fulfillment text, and things like that. Okay. Now, you see that the way you usually handle it in Dialogflow ES is that there is a single webhook endpoint. So when the user, not the user, but when the developer is trying to add a webhook to Dialogflow ES, they had to specify a single endpoint.
[02:03] And that endpoint is going to be, you know, this, this is the code which is running on the endpoint, which means that all the functionality of your bot has to be contained within. Now, you don’t have to put it all into a single method like this, you can have it distributed, but it’s still everything is in one place, you have to decide based on what you see in the action, you have to sort of call different functions to get the results that you want, which is okay, it’s not exactly that hard, but it’s still more complex.
And it actually did a few things, which was, I would say that it made webhook development more tricky. Okay. Now, as we go through this set of lessons here, you will see that one of the major changes in CX, which is that you can actually have multiple webhook endpoints. And in other words, you can call different URLs to for different intents, which means that you can just focus on a single intent and all the fulfillment you need to do for that.
[03:09] And you can just let it, you can put all the code within that one single endpoint, which means that it’s much easier to organize your code. But more importantly, it’s much easier to iteratively develop your code without worrying about whether you might break something. Okay. That’s the big advantage of having this multiple webhook endpoints in Dialogflow CX.
And I will show you how you can take advantage of that in the coming lessons.
Lesson: Skeletal Code
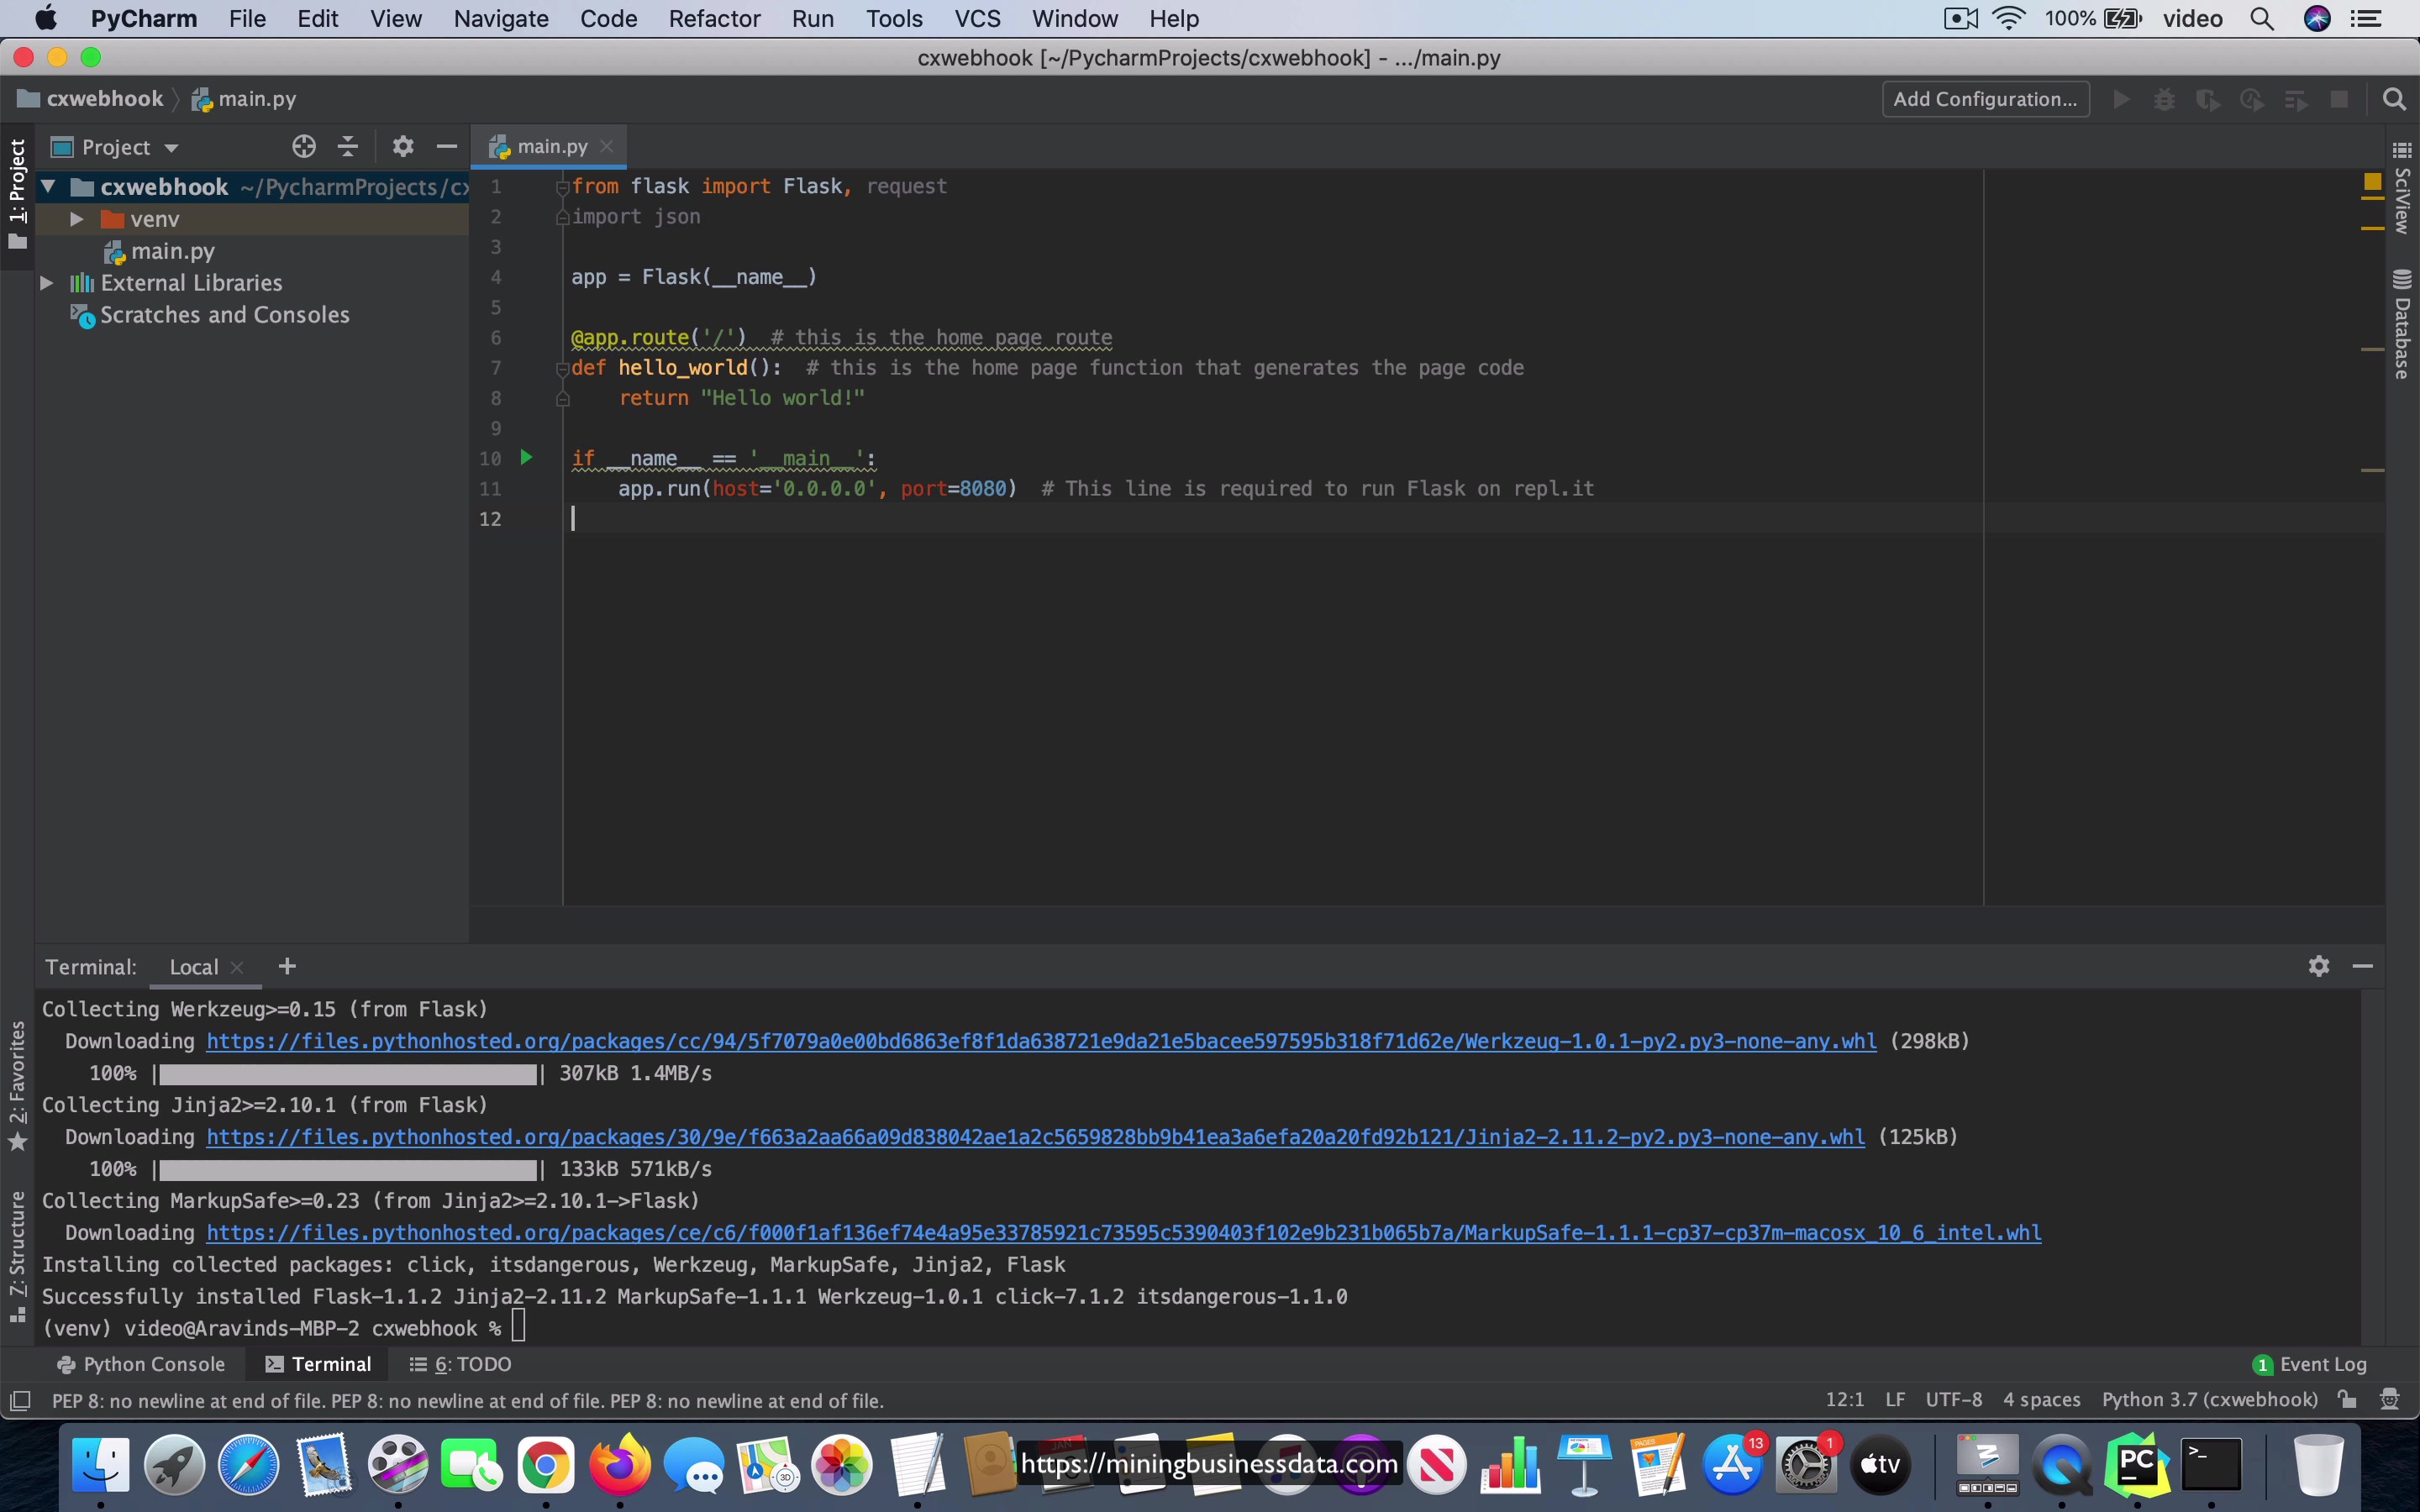
[00:00] So now as we start creating our webhook, what I would like you to do is start with some skeletal code and I’ll provide this under the video lesson and what you have here is, it’s nothing more than just a single route and you can see that it just returns the string hello world and then you can see that this is the code which starts the code, the program and also I just want to point out that I’m using the PyCharm IDE and all I have here is just a plain, what they call as a pure Python project, okay and I also made sure that I have done a pip install for Flask and by the way, if you are not familiar with Flask, I would recommend that you take a look at a website called prettyprinted.net, it’s run by a person called Anthony and it also has like a YouTube channel and I think that it has some
[01:00]
of the best tutorials for Flask, okay, so just to be make it clear, it’s called prettyprinted, okay, that’s the name of the website, I think it’s called prettyprinted.net, okay, so I’m not going to teach how to use Flask, I want you to go and learn that first and but it’s one of the easiest things to learn, so that’s exactly why I’m choosing to use that framework for this course. What you can do is, once you have this code in your main.py, if you were to say run main, you can see that it provides you this link and you click on it and you can see it returns hello world, this is as if you typed this URL followed by the slash, okay and then what happens is that, that code is actually handled by this method over here, so that’s the first thing and then the next thing is, you can put a breakpoint and you can do a debug like that and you do the same thing, you click on this, now you notice that it actually hits the breakpoint because that’s the method which is being called and when you continue, you should be able to see the hello world message over here, okay, so that’s the first step, you start with this skeletal code and then you will be adding more logic to
[02:26]
actually call the webhook from your Dialogflow CX agent.
Lesson: Webhook Response Object
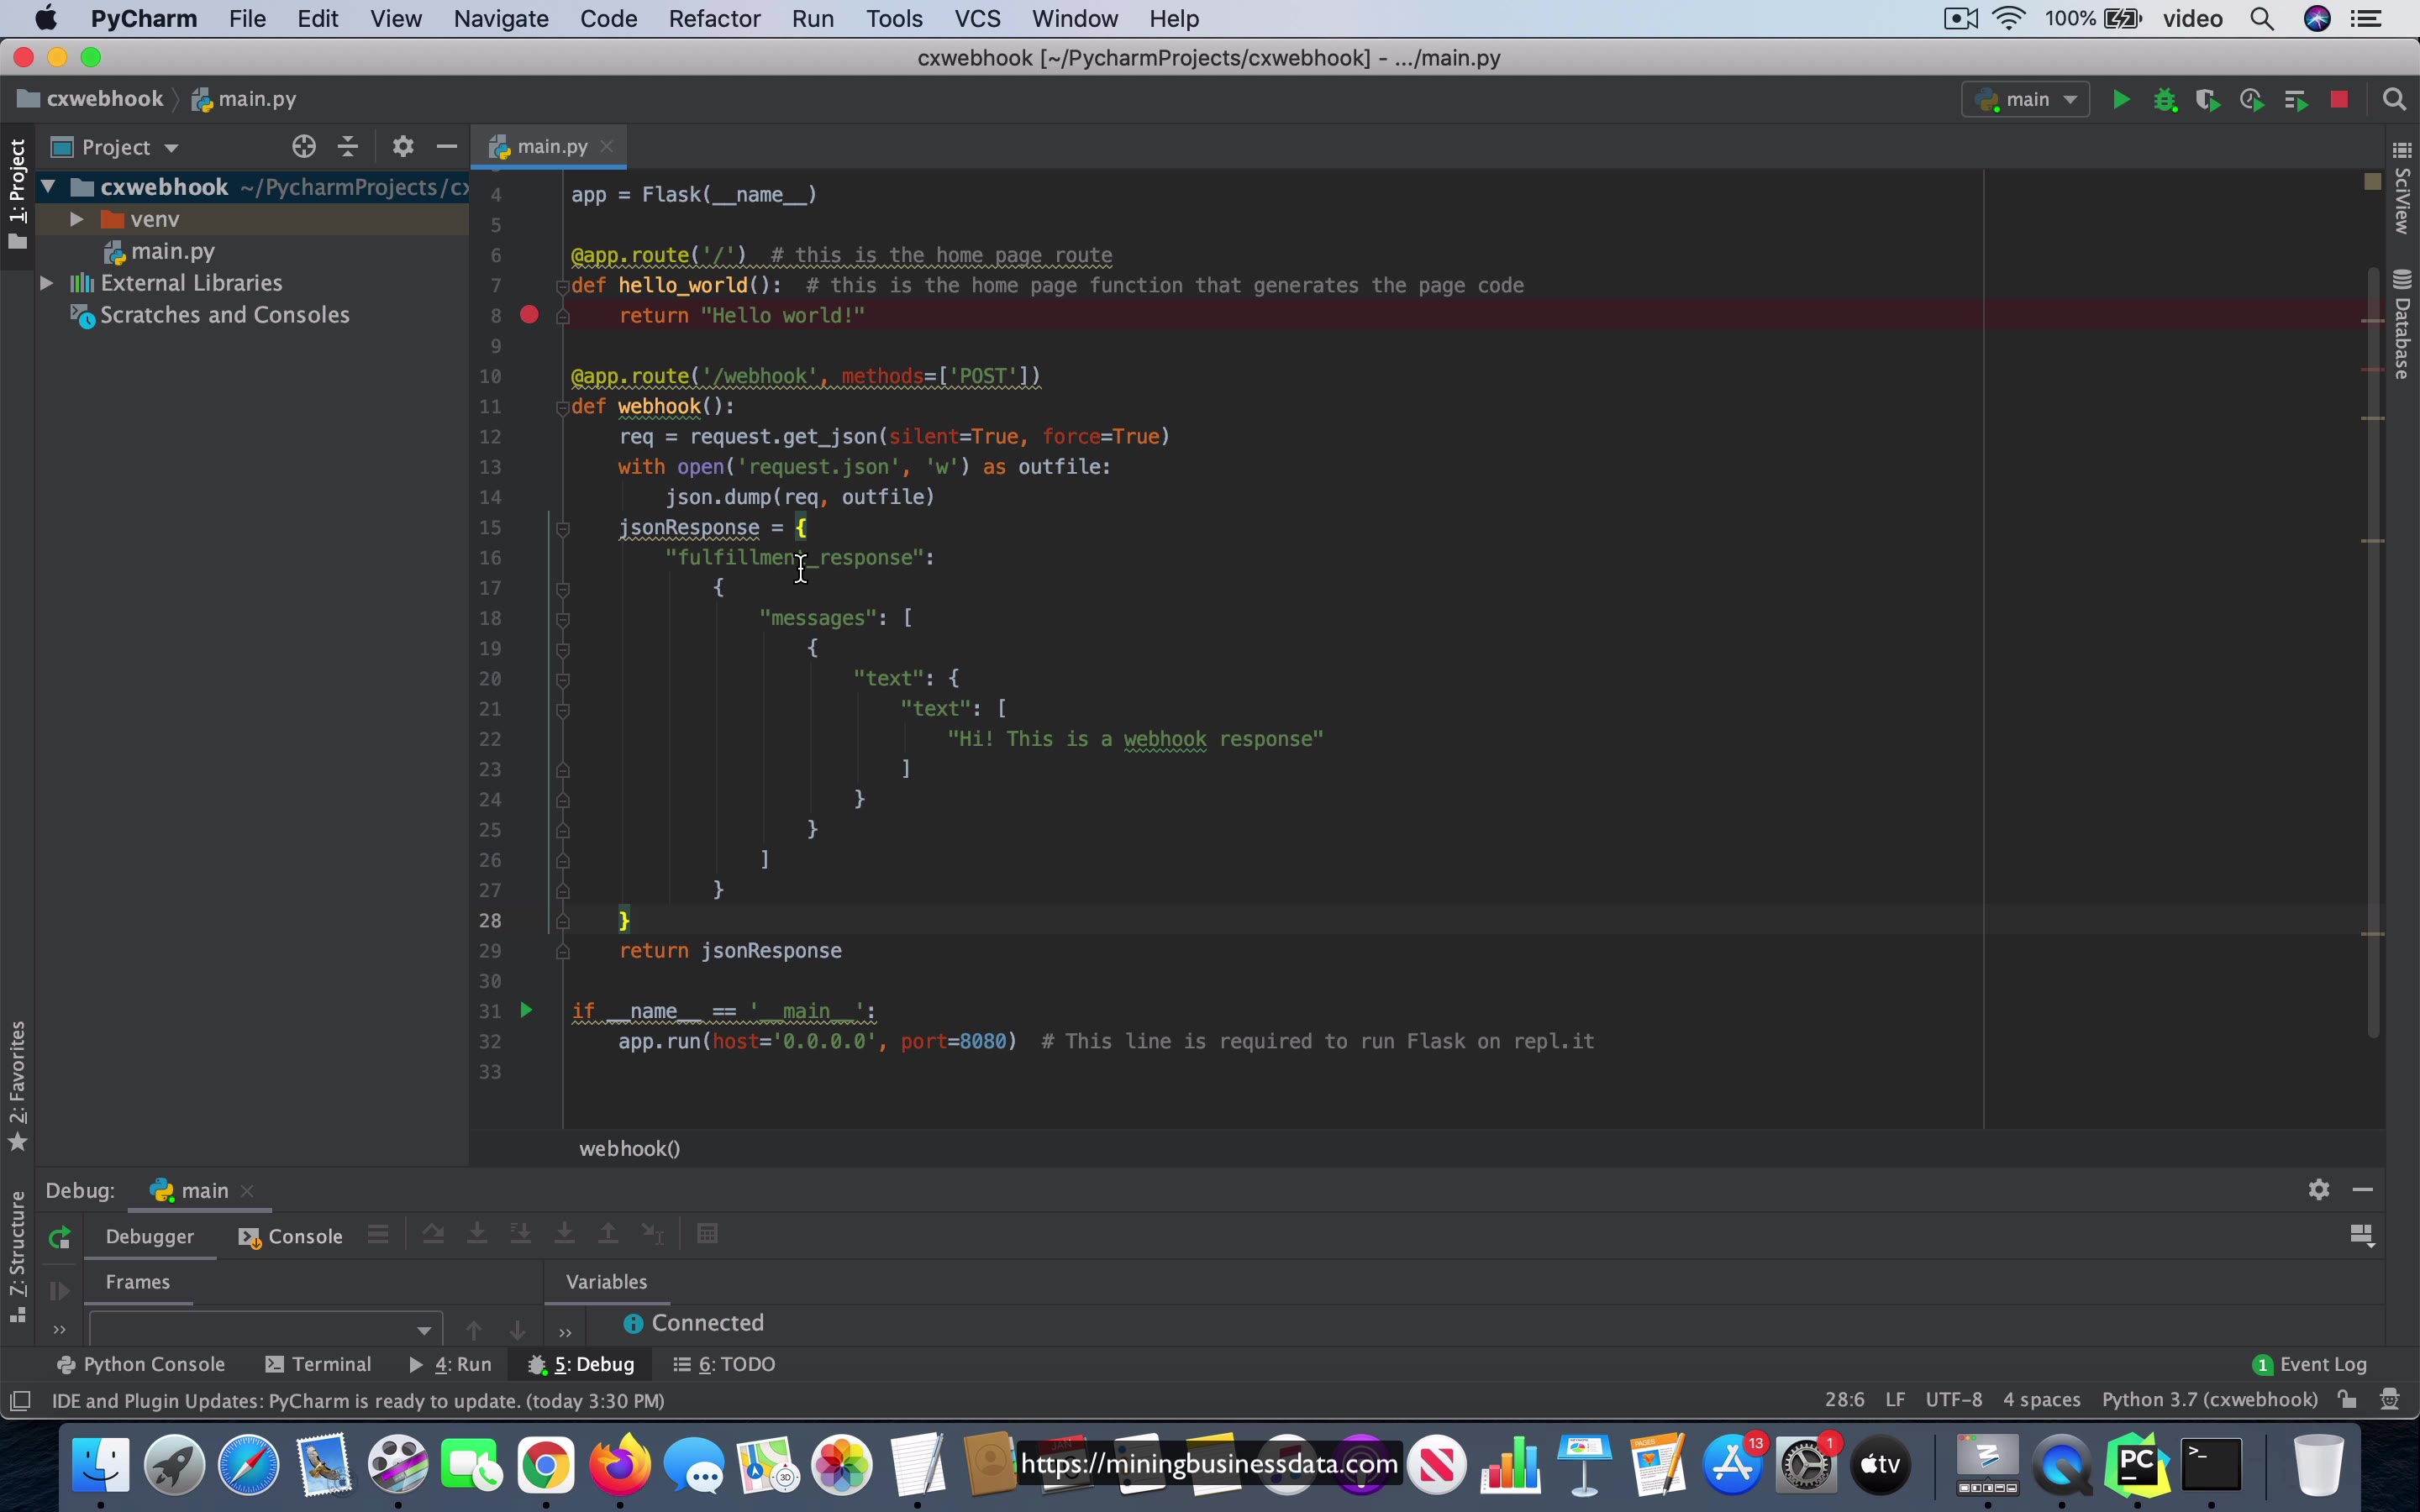
[00:00] So now that we have made sure that the skeletal flask code is running on your computer, the next thing I have done is I have added another route in this flask app and that route is going to be slash webhook and you can see that it supports the post method and also it actually does a few things. It gets the request object by using request.getJSON and then it actually dumps the entire request object into a file on the file system and then it constructs a JSON response object and then it just returns that JSON response.
So the purpose of this video is just to show you the format that you have to use to return what you would say a valid message object back to Dialogflow CX. So this is what it is going to look like. You need to have a fulfillment response key and then inside the fulfillment response field you will actually see that there is going to be this messages array, right.
[01:06] First there is an array and then inside that the first object will contain a text field and that will contain another text field which has an array which has actual text, okay. So when this response object is returned to Dialogflow CX, this will be able to display this message, hi this is a webhook response.
So this is going to be coming back, okay. So this is sort of like the very minimal message object that you need so that you can get your webhook code to send the proper response object back to your Dialogflow CX chatbot.
Lesson: ngrok setup
[00:00] So now let us set up the basic connection between the Dialogflow CX bot and our webhook over here. So what I’m going to do is, so first of all notice that this Flask app is running on port 8080. So what I’m going to do is I’m going to go to ngrok and you can start a terminal in the folder where I have the ngrok app and I’m going to do ngrok http 8080 and as you know, it’s going to create a URL for you to use.
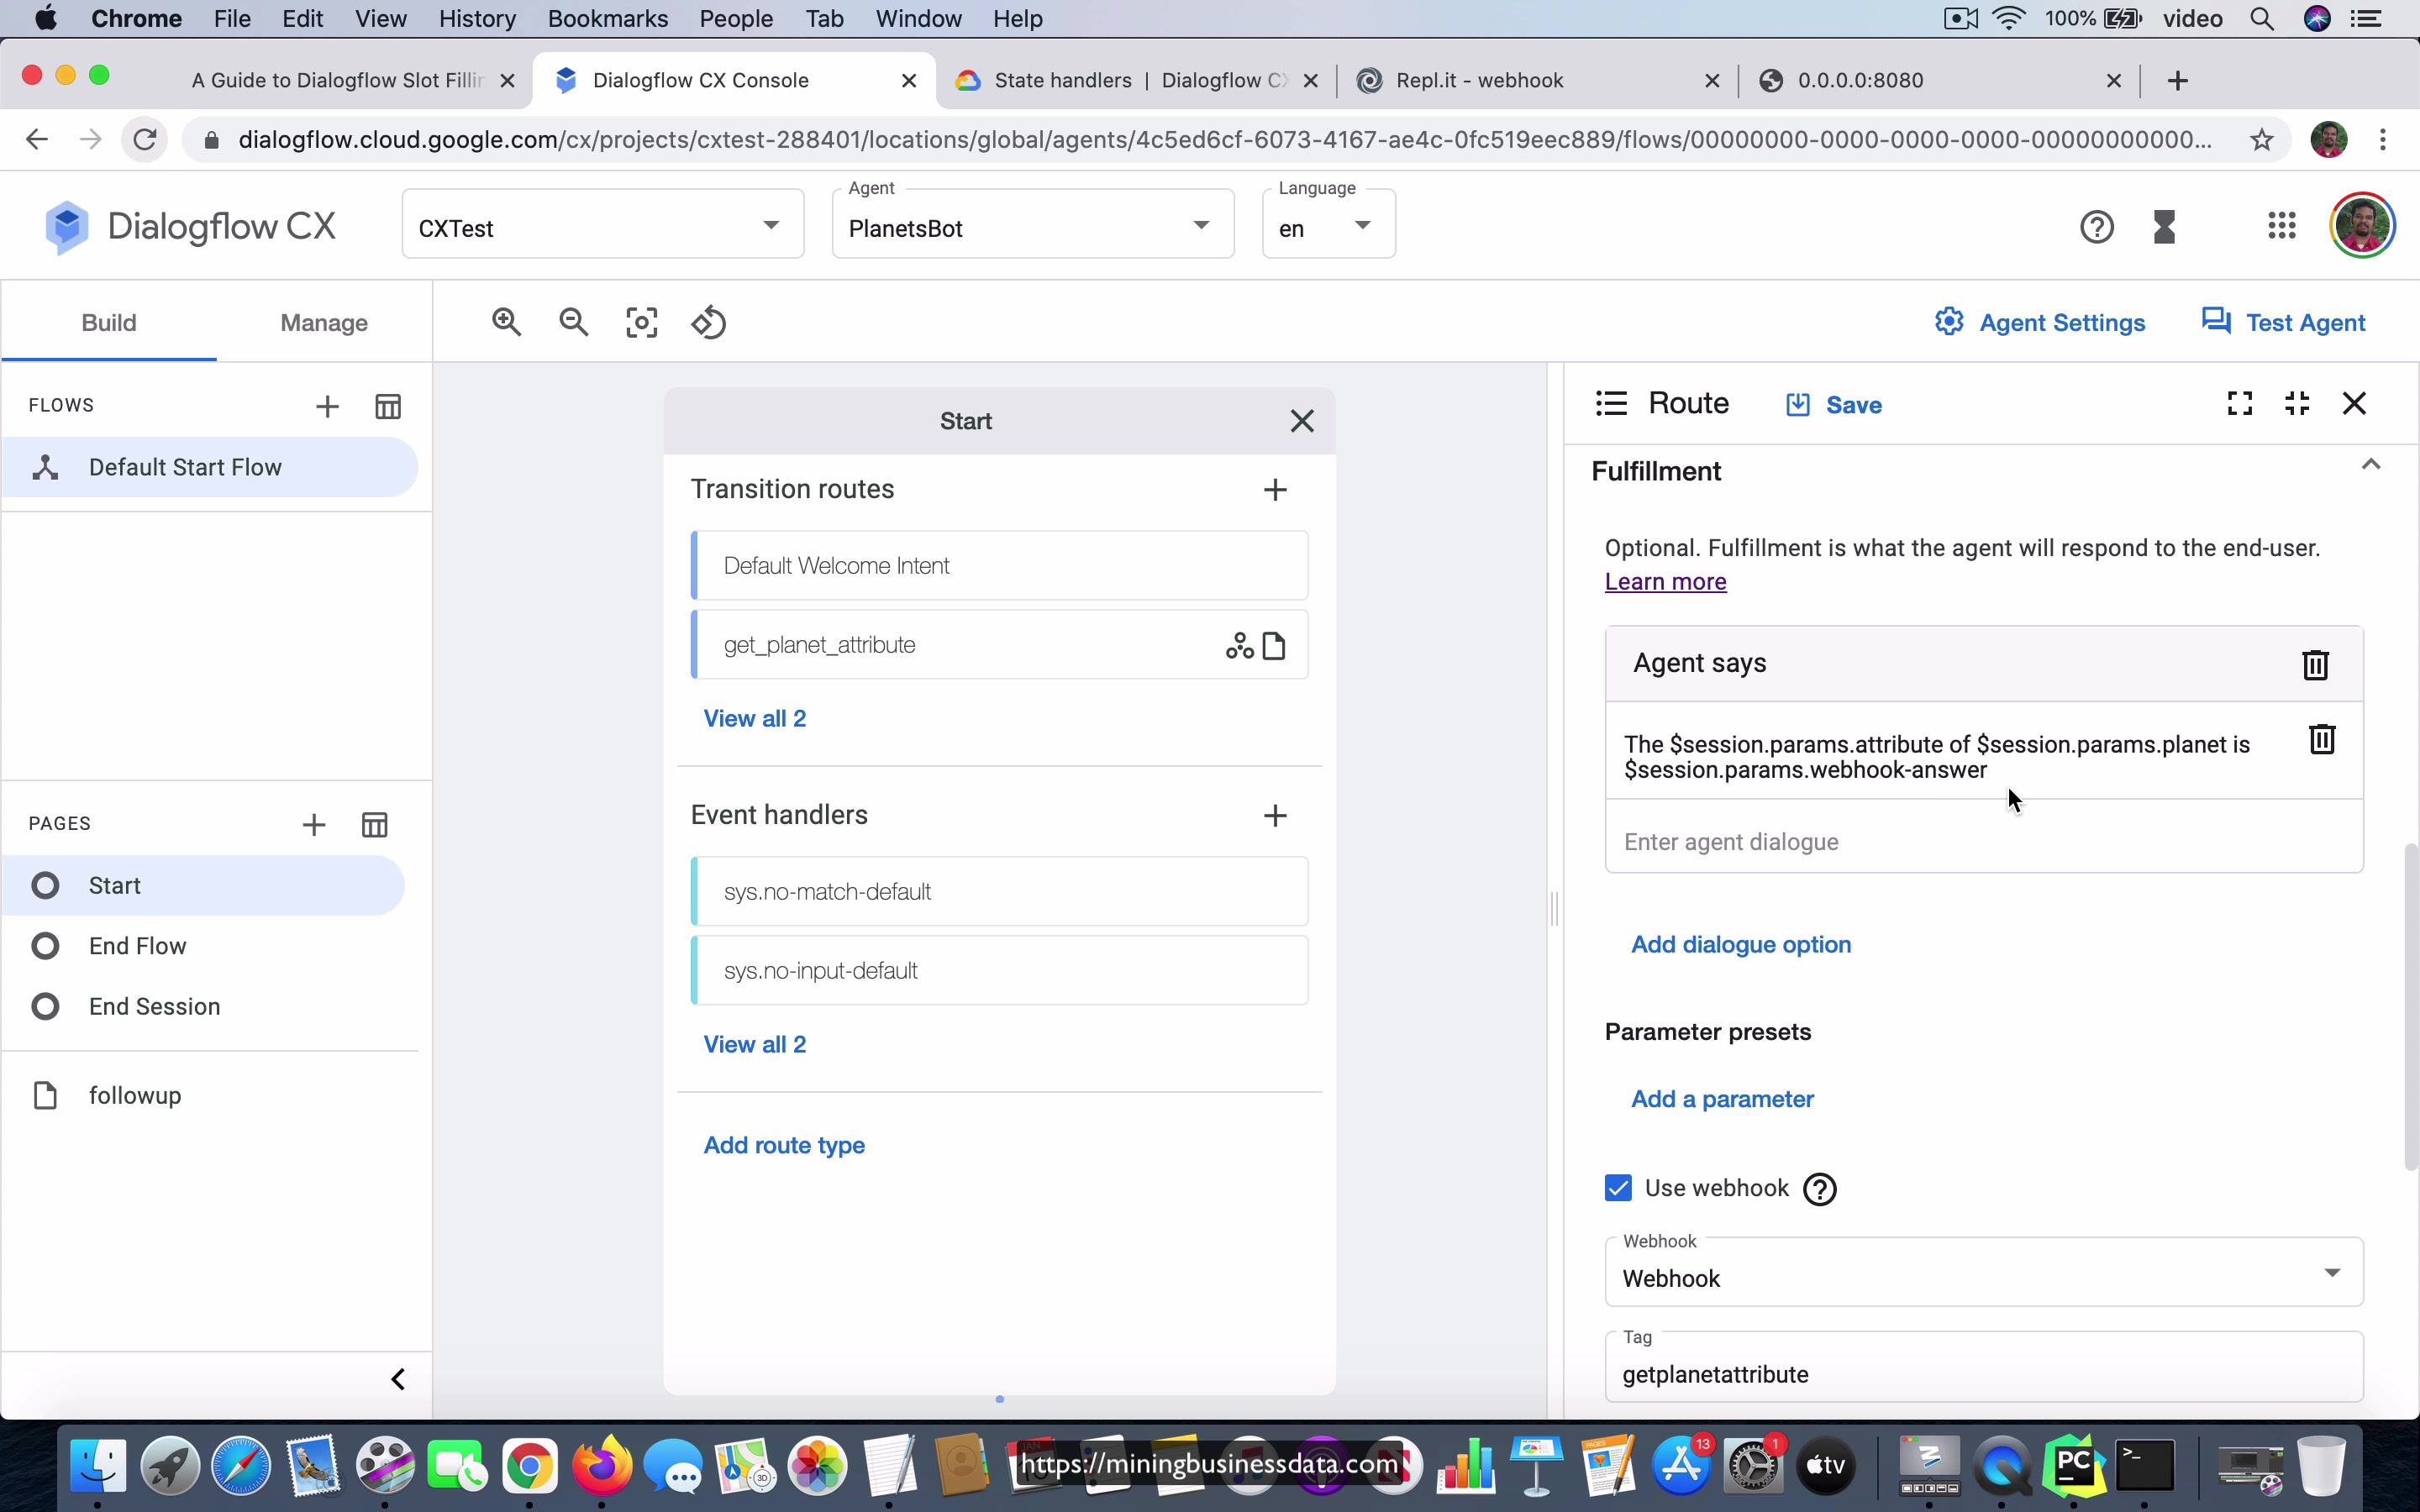
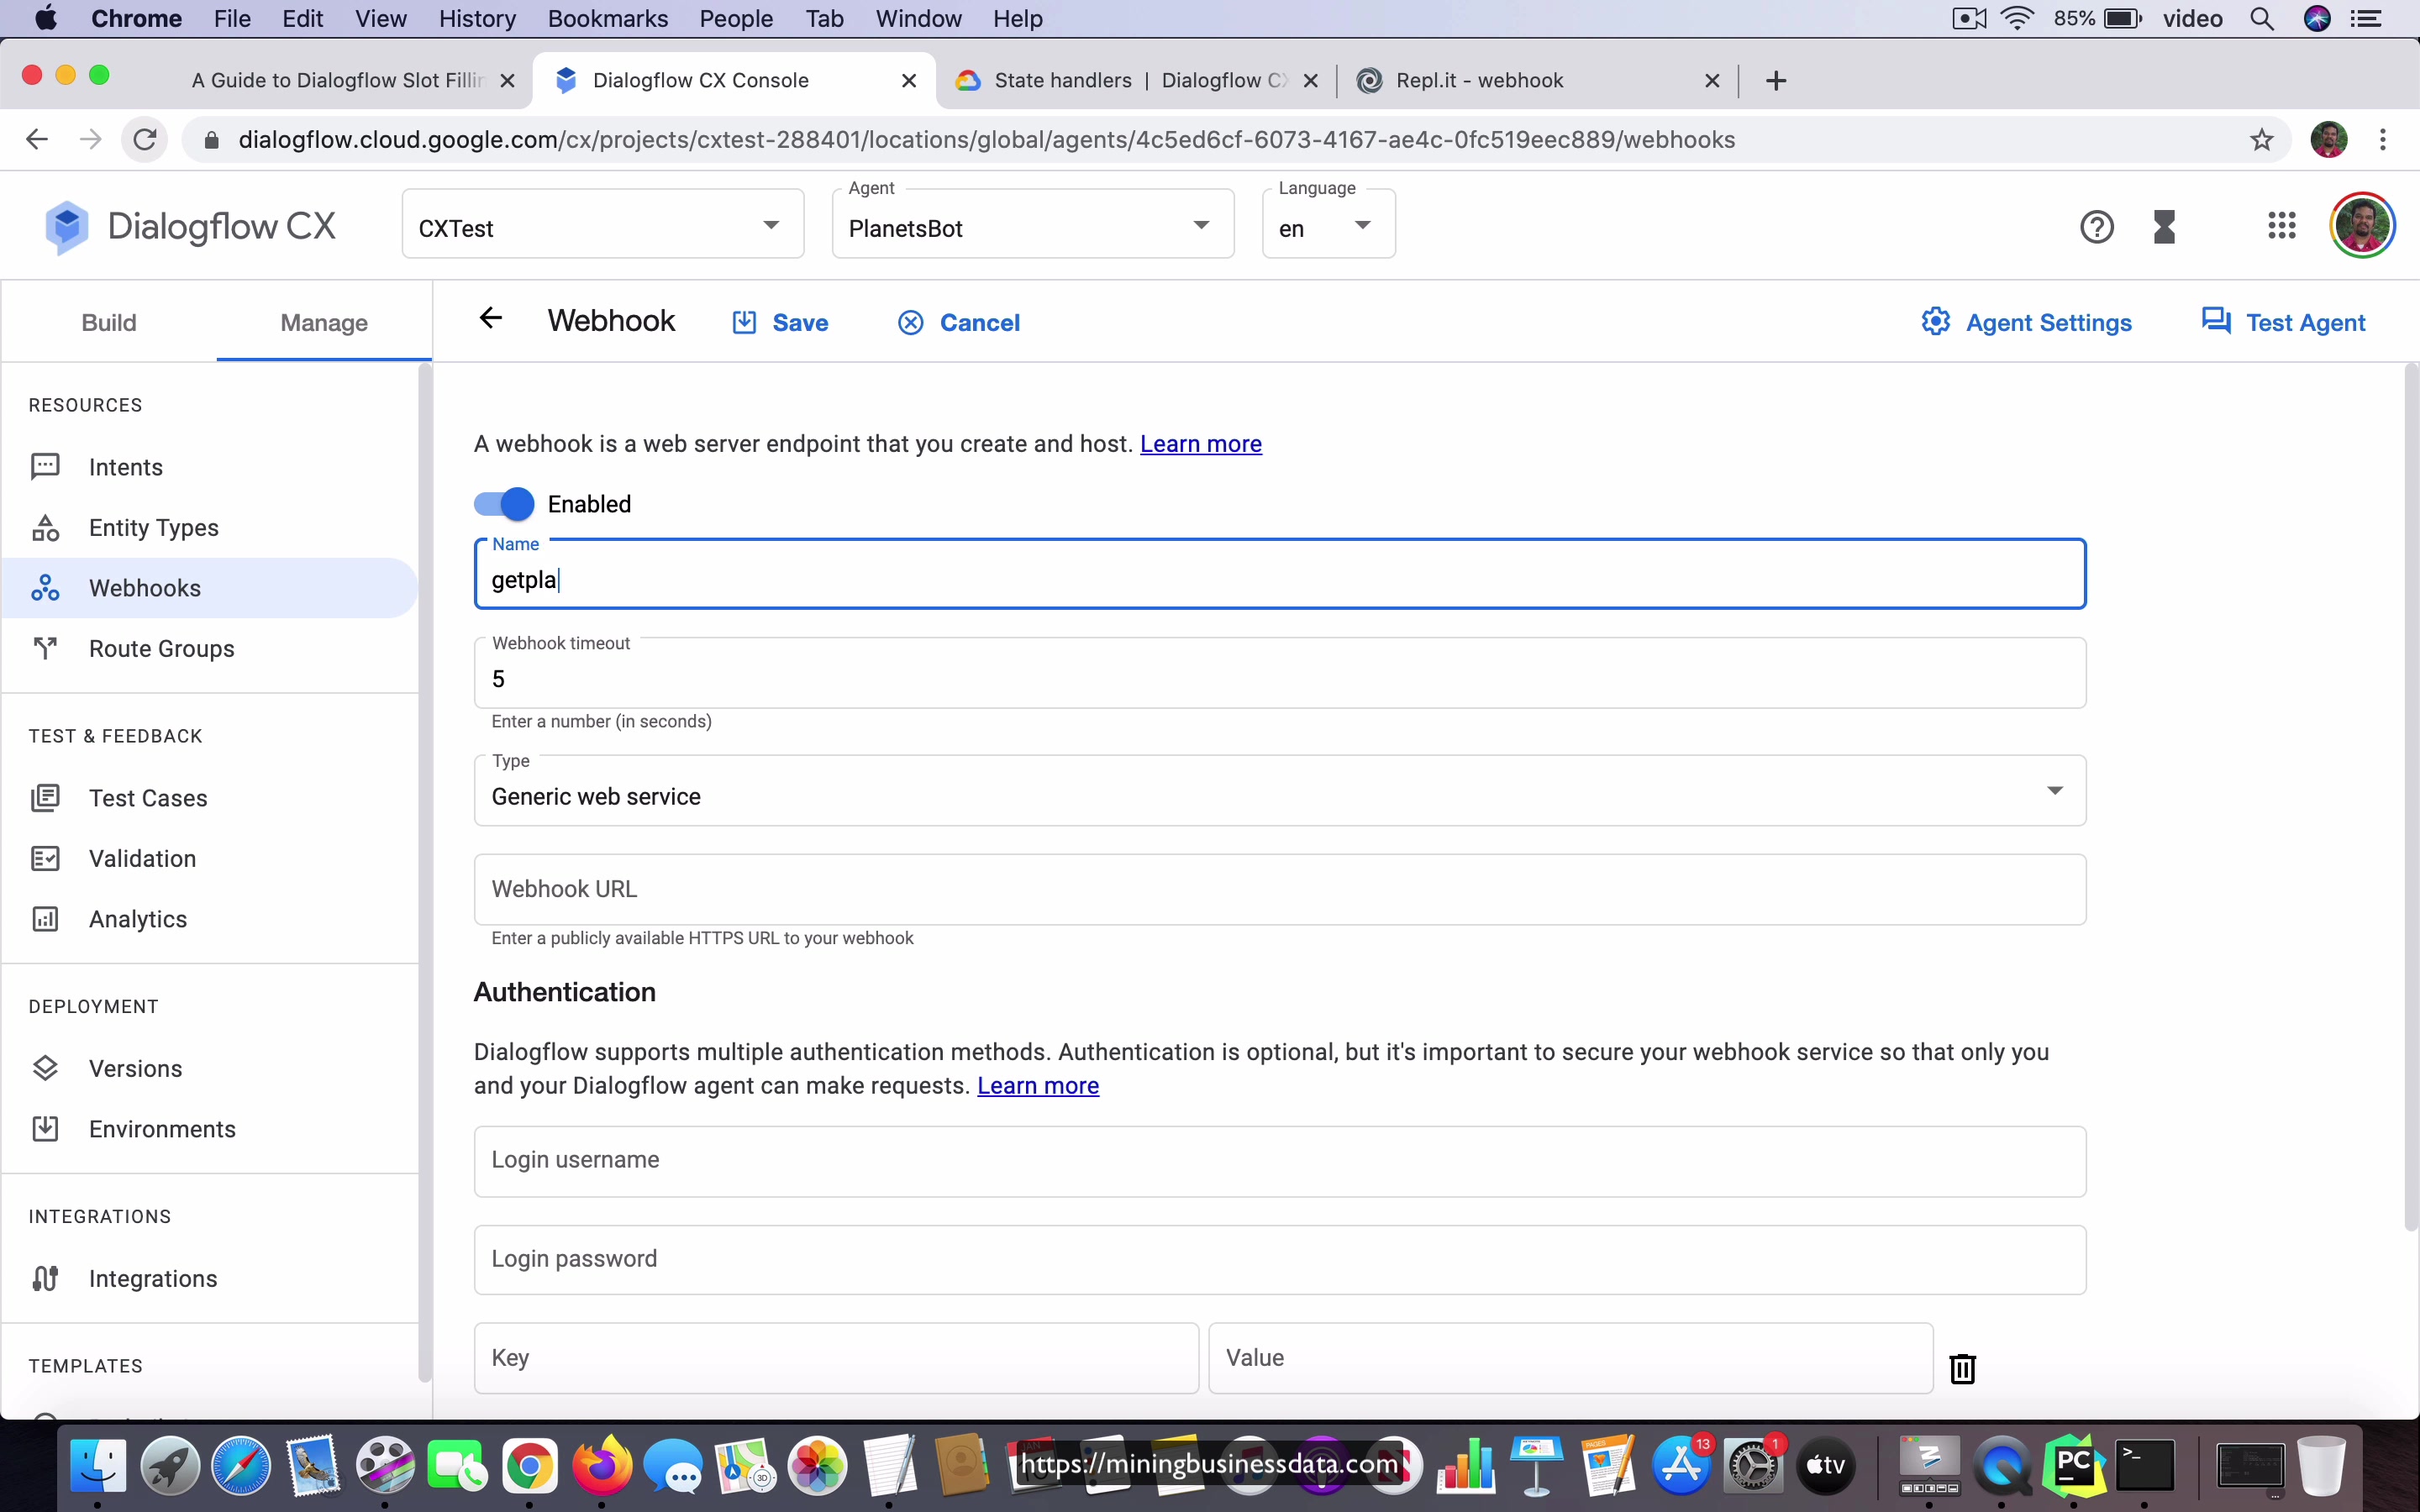
Okay, so let’s go ahead and copy this and go to Dialogflow CX. So I’m in my planet spot, I’m going to create a new webhook URL and it’s going to be, this is the base of the URL but then remember that the method which handles it is going to be slash webhook, right? And it’s going to be just a generic web service and all other things are fine. So I’m just going to say that this is called webhook. Okay, and let’s go ahead and save it.
[01:03] So we have this webhook. Now we will go to our intents, go to this get planet attribute over here. So what I’m going to do is I’m going to use webhook and I’m just going to add a tag and this tag is necessary, you can’t leave this empty. So let’s go ahead and save it. So what it’s doing now is it’s actually going to call this URL and with the slash webhook at the end and because we are using ngrok that will actually get automatically forwarded to our code over here.
So now back in our PyCharm IDE, what you have to do is you have to make sure that you are either having this code, it should either be running or it should be in debug. So what I’m going to do is I’m going to set a breakpoint here and I’m going to do a debug. So this is now actually serving requests and since the ngrok is running, if you hit this endpoint, it has to come to this method, that’s what we expect.
[02:10] Okay, so in other words, we have this get planet attribute intent, it calls this webhook, the webhook URL is actually going to be this URL which is what ngrok has provided to us and if this intent were to fire, if we were to get this intent to fire, it is going to show this information and don’t worry about what’s on this one for now and then it’s also going to call this webhook.
Okay, so let’s go ahead and test the agent. What is the color of earth? Like we expected, you can see that it has actually hit this webhook. Now, there is actually a time limit that’s about five seconds, we actually set the time limit how long you can have that webhook waiting before Dialogflow times out and it writes a response in your testing, you can see that it’s actually already written that response and that’s because nothing came back within the first five seconds.
[03:16] Okay, we will be changing that in the next run of this code but I just wanted to show you that this is sort of showing you that this ngrok and the Dialogflow triggering the ngrok, all of this is working.
What’s the big advantage of that? The big advantage obviously is that you now have a way to step through the code and you will be able to take a look at what is coming in your request object. For example, if I were to go step into the next line and I just print whatever is in the request object. You’ll notice that you have all this information coming through and this is all sent in the request object from the Dialogflow CX.
[04:01] Okay, and based on whatever information is coming through, you will usually, you know, do some logic and send some response back. What I’m going to do for now is I’m just going to have it instead of debug mode, I’m just going to have it in run. I’m just going to run this app and then let’s go back here and do the same thing. What is the color of Mars? And notice that this time it typed out the same thing as the previous one, the color of whatever is whatever, but then you see it actually has the second message, hi, this is a webhook response.
And that is actually coming from our code because you can see that it is actually going to write out, hi, this is a webhook response. This is just to show you how to connect your bot to the webhook code. And though we are not doing anything useful in the webhook code yet, this is the basic idea. And now that you understood, you know, how I’ve got all this connected, in the next set of lessons, I’m just going to assume that you’re already comfortable with all this and stepping through your code and all that, so that we can just keep focusing on the actual webhook code.
Lesson: Webhook Request Object

[00:00] So in this lesson, we will take a minute to inspect the request object coming in. So if you remember, in the code for that webhook method, what I had is, as soon as we got the request object, I was actually writing it to a file called request.json. And you have this file over here. And let’s just format it so that it’s easier to read. I just want to take a little bit of time to see the exact format and all the fields. Okay, so you have this detect intent response ID.
And then notice that there is this intent info object, there is a page info object and a session info object, there is the fulfillment info, which has the tag. And then you have the messages, which are what you already have declared inside that intent. Okay. So that is also sent over to your webhook code. Okay. Now, we are interested primarily in two things. There is the intent info, which gives us the parameters which are collected by that intent.
[01:03] Then there’s a session info, which provides the list of parameters which were collected through the entire session. So what we have to do, I just, you know, talk about it in, you know, algorithmically speaking, what’s going to happen is that in the request object, we are just going to first get the, you know, request object dot intent info dot parameters dot planet dot resolve value will allow us to get the value of the planet.
And in the same way, request dot intent info dot parameters dot attribute dot resolved value will allow us to get the value of the color, right? That’s the basic way you sort of get information from inside a JSON object. And then you can do the same thing inside the session info object coming through this in this JSON. And you will be able to get all the information that you need for writing the code that we are trying to do over here.
[02:02] So that’s what I’m going to do in the next lesson.
Lesson: Handling getplanetattribute
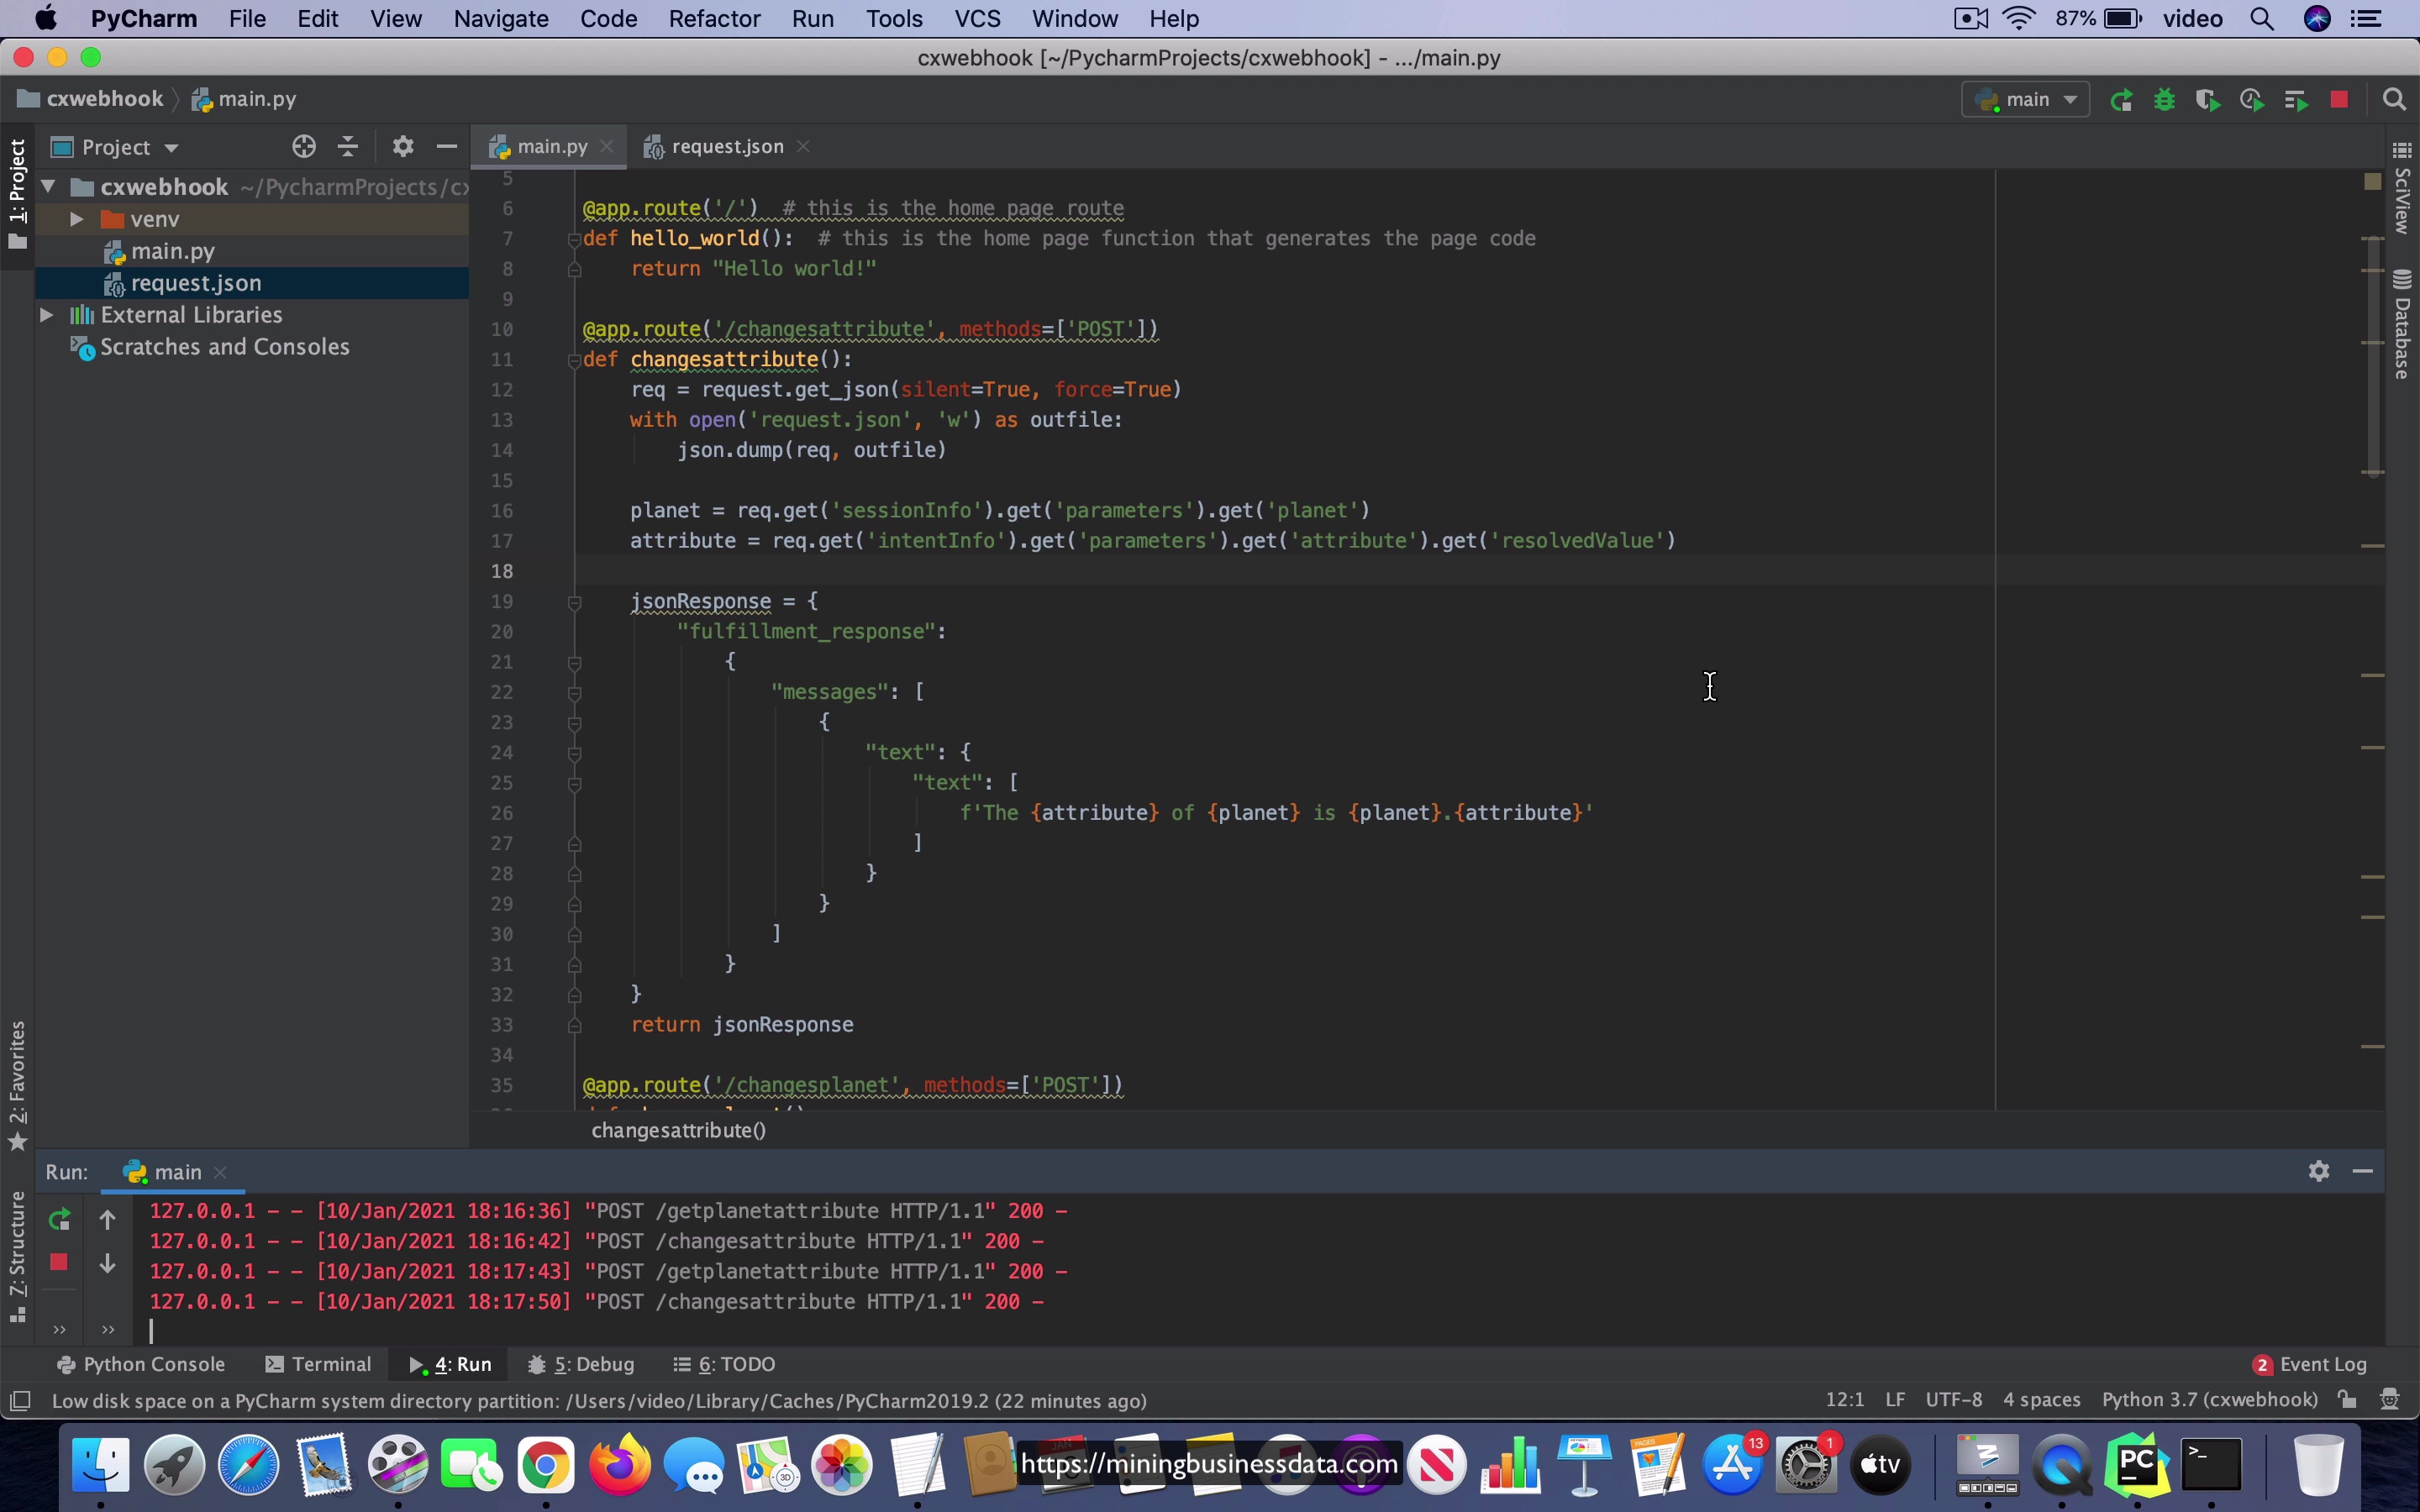
[00:00] So let’s write a webhook endpoint to handle the getPlanetAttribute intent. So what I’ve done is added a new flask route, which is going to be getPlanetAttribute, and it corresponds to a method called getPlanetAttribute. And the first few lines are the same, but what has changed here is I get this planet, the value of the planet by, you know, going through this request object where it’s request.intentInfo.parameters.planet.resolveValue. And then I look at the attribute in the same way, request.getIntentInfo.getParameters.getAttribute.getResolveValue. And then the JSON response is constructed by just with the F string, which is it just says the attribute of planet is planet.attribute. So you can see that I’m not actually doing any calculation, but the way I construct the response acknowledges that the webhook is able to understand exactly what information was collected in that intent.
[01:00]
That is, if you get the correct answers, like if it says something like the color of Mars is Mars.color, you already know that you got all the information that you need in the webhook. Now, how do you do an actual lookup from like a table and provide the actual answer and all that? I’m going to leave that up to you. You can just write some logic in this Python code here, where you can create like a simple, let’s say dictionary, which can do this lookup. I’m not going to do that because with all that we have here, you should already be able to understand how to do the webhook code.
And then you can do like whatever logic that you’re actually interested in. Okay. So what we are going to do next is go back to Dialogflow CX. And I’m going to go to this manage webhooks. And I’m going to go to webhook. And this time I’m going to create another webhook. I’m going to call it getPlanetAttribute. Okay. And let’s go to our ngrok over here.
[02:03] Copy this URL, slash getPlanetAttribute. Remember that last time we used slash getWebhook and this time we are using slash getPlanetAttribute, which is why I said that, you know, you have created a different endpoint for this particular webhook. Okay. So let’s save it. Now we have this new webhook called getPlanetAttribute. Go to the build, go to start, go to getPlanetAttribute intent.
Now I’m going to change it to use the getPlanetAttribute webhook instead. Okay. Everything else is the same. So if we were to go and test this, and I want to make sure that I’m running this first. So let’s go ahead and run it and go back to CX and we can say, what is the, let’s say weight of Saturn. So if it works properly, you expect it to say the mass of Saturn is Saturn.mass, because remember that the result value of weight is mass.
[03:11] Okay. And that’s exactly what we got. The mass of Saturn is Saturn.mass. And this shows you that the webhook code over here is now able to get the intent attributes as expected. And it’s able to respond back with the correct information.
Well, although it’s not actually done any calculation, we still know that the information from the CX bot is reaching the webhook properly because this information is being echoed back and what we get back is actually correct.
Lesson: Handling changesplanet
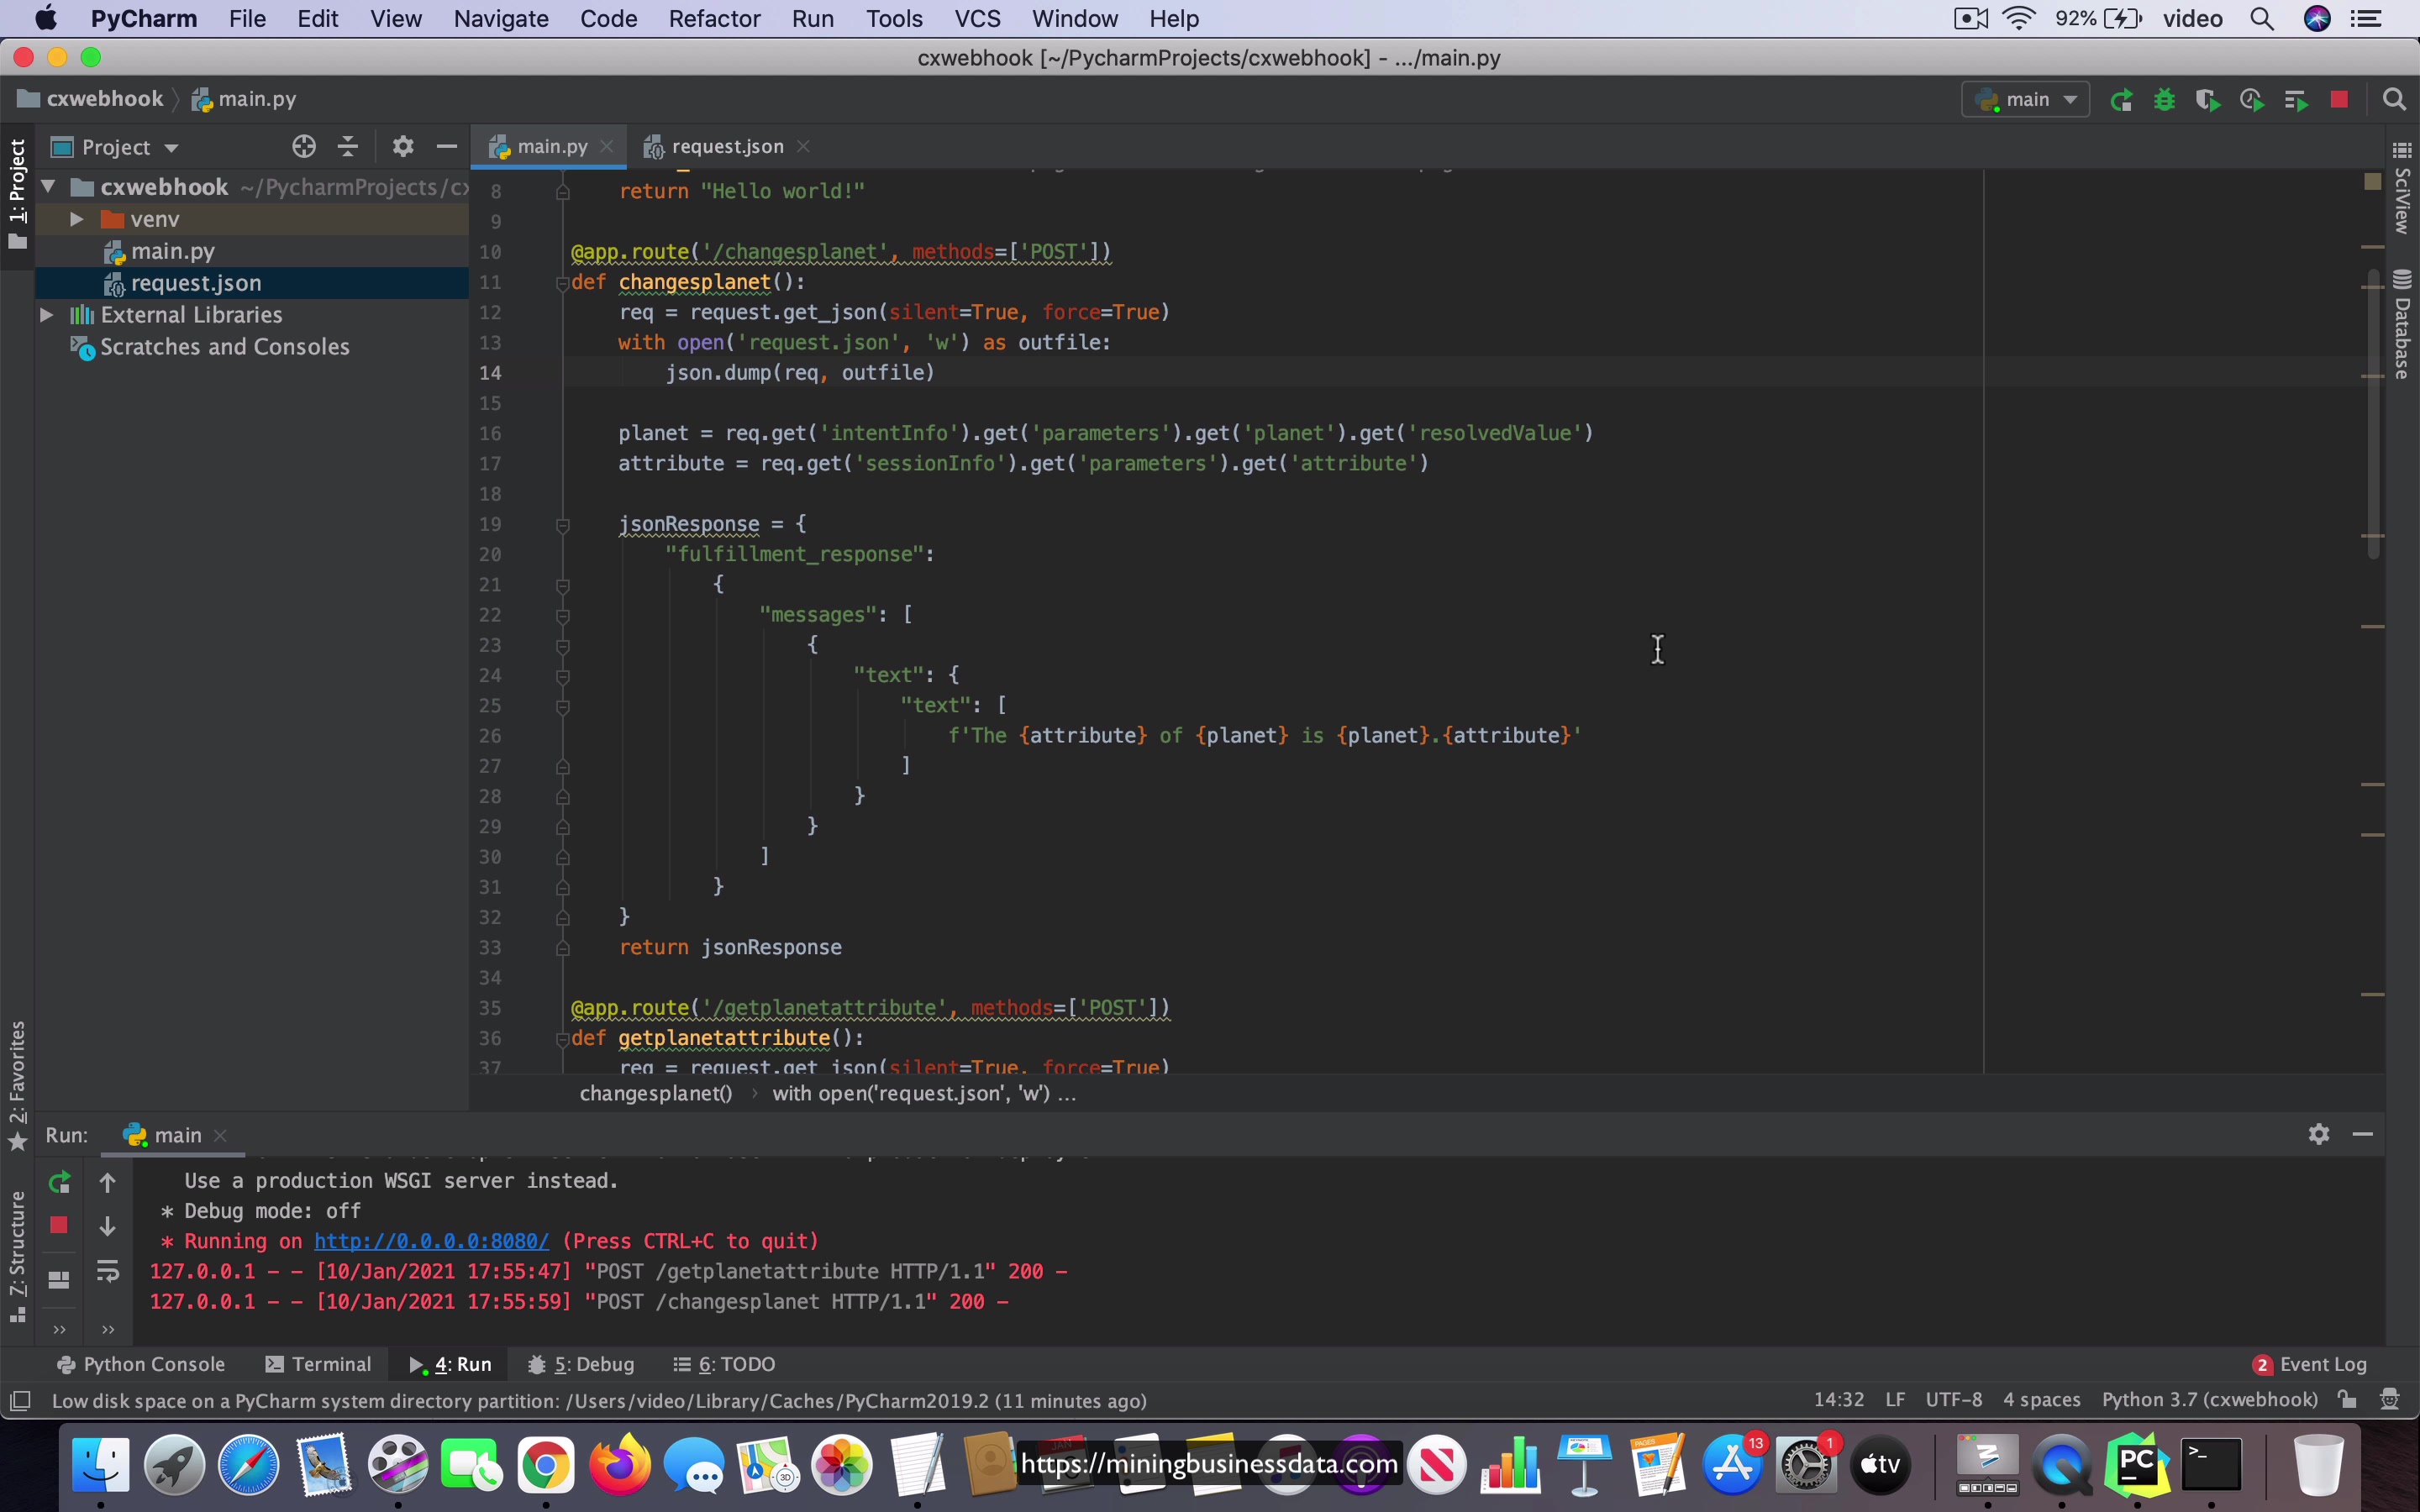
[00:00] So now let’s look at how to create a similar endpoint for the changes planet intent. So what I have here is I have created a new flask route called slash changes planet with the corresponding method and other the other first few lines are the same, but what has changed here is that the planet information is going to come from the intent info object, but because the user does not specify the attribute in the query they are not going to you know, you’re not going to get attribute from the intent info.
Okay, so I just just to give you like a way to think about it. Let’s say that the user says what is the color of Jupiter. Now you have both attribute and planet and then after you get the answer you say what about Mars. So notice that here in the second query you still have an act you still have a planet but you don’t have an attribute. So you can’t get the attribute value from the intent info which means that you have to use the session info object to get that attribute value, right?
[01:08] And once you do that, you can just use the old response message as it was and then in the what I’m going to do inside the webhooks is that I’m going to create another webhook called changes planet and change the URL endpoint. The base will be the same but the the method that you call at the end is going to be changes planet and then in the intent itself if you were to go to changes planet, you are going to use the new webhook endpoint called changes planet, right?
With that what you can do then you can do a test. See what is the color of Jupiter and it should come back with the color of Jupiter is Jupiter dot color and then you say what about Neptune and you can see that it says the color of Neptune is Neptune dot color.
[02:06] So we know that this is triggered this follow-up changes planet intent in the follow-up page and looking at the response we know that the webhook sent the correct response back. So this is how you will create additional endpoints for each intent in your Dialogflow CX bot.
Lesson: Handling changesattribute
[00:00] So now to complete out the full bots, all the intents that it has, the other endpoint I have is the changes attribute which you can see is the endpoint is going to be slash changes attribute and in the same way the planet value is going to be obtained from the session info object while the attribute object is going to be obtained from the intent info object. All the other things are just the same and I also created a webhook called changes attribute and then I’m going to use it and let’s see how it works in the simulator.
What is the color of let’s say Neptune then you can ask what is its volume. You can see that it says the volume of Neptune is Neptune dot volume which is just what we expected. Now I’m going to ask you a question about this right let’s just think about it.
[01:02] What I have here even though this is a good illustration of having multiple endpoints and making your code you know easier to read and manage and all that you should ask the question do we really need three different methods for this particular use case. For example if I know that I can just get the information from session info for both the planet and the attribute no matter which intent fired would I not be able to just use that and combine all of these things into a single function and the answer of course is yes you can.
So what I’m going to do in the next video is I’m going to create just a single function which can handle all of this and then that way we don’t need to call multiple endpoints for the bot. With that said I think that this still gives you a good idea of how you can create multiple endpoints and there are some use cases where it makes sense.
[02:04] For example in the in the addition versus multiplication that we saw in the ES part the logic for the addition is actually different from the logic for the multiplication. So there it doesn’t make a lot of sense to combine the two you know functions or the two endpoints together but here it’s the same logic in the sense that once the information is obtained all that we are doing is echoing back some indication that we got the correct parameters and that’s all we are sending back in the response object.
So here we can actually easily replace this with a single endpoint.
Lesson: A bug in Dialogflow CX webhooks
[00:00] So something very interesting happened just now this was supposed to be a demo of me going ahead and deleting some webhook endpoints and then showing you that you can change the Intent webhook to point to a different webhook. Okay, and Then showing you that you could combine all of these You know functionality into one just to show you the code This is what the code will look like if you were to combine everything Okay You will get the planet and the attribute from the session info and then you can do this return JSON response and it will work I know it will work because I tested it before I started recording the videos But what I did notice which is very interesting is that once I delete a webhook over here when I say over here when over here if I were to delete a webhook over here and Then I go to one of the intents and then I try to change the webhook which is being used by this intent Let’s say I do this and I try to save it Notice that it’s actually not allowing me to do that.
[01:07]
It says it something is not existing and I think that that’s a bug Okay, I’m not 100% sure whether it’s a bug or not Maybe it might be related to something some change that I made But from what I have seen till now, it looks like a bug in Dialogflow CX itself. So I Just want to show this because in my personal view You are going to run into these kind of issues in CX even now CX was originally released as a beta version in September 2020 it was I think on the 1st of September in fact And then it was really quickly rushed out out of beta into general availability in mid December 2020 and That’s about two and a half months where it was in beta, right?
now the I’m now recording this in the second week of January 2021 and My personal opinion is that I think that CX has been really rushed.
[02:09] Okay, so now this is not such a deal-breaker you are you have ways around this and You just have to be kind of careful when you go about like deleting and adding webhooks like this But I just wanted to show you this because you can see that there are some very raw edges in Dialogflow CX even today and If you are going to start using CX for building your bot You better be prepared to face these kind of issues and I’m guessing that it’s going to be These issues are going to be there for a while.
Maybe like a few weeks. So Just just I wanted to show you this This video and also show you what’s going on because I can see that this is This is something which can potentially affect people who are trying to get into Dialogflow CX as as of Jan 2021
Lesson: Reroute conversation flow based on webhook response
[00:00] So in this lesson we are going to take a look at how you can reroute your conversation flow based on some parameter which was set in the webhook. Now before you do that the first thing that you need to understand is how can you change or update session parameters from your Dialogflow webhook and I actually have an article about this on my site, you can go and take a look it is called updating Dialogflow CX parameters from webhook and you will see that I explain how you can add, update and delete existing parameters, of course if you are adding that is a new parameter but I just explain how you can do that.
Now the basic idea is that you have to get the session name from the incoming webhook request object and then use that in the session info JSON object that you will be embedding into the JSON response, okay, so the JSON response will have a field called session info which should contain inside of that there should be a field called session which has a value session name which is just derived from whatever you get from the incoming webhook request object.
[01:11] So that will make sure that the existing sessions parameters are getting updated, okay. Now coming back to this, into the Dialogflow CX console what I have done here is essentially I have added this webhook, I am just going to modify what we have seen till now in the planet spot, okay, and I am going to go into the code here, I have set up ngrok so that we can see this working in real time, so I will just create a debug this, I will just set a breakpoint here, okay, I already set up ngrok for this, so what I am going to do is I am just going to test this agent and see if we are hitting that breakpoint, so I will say what is the color of earth, so you can see that it is hitting the breakpoint, so let us go ahead and continue and the answer comes back with the color of earth is earth.color which is what we have been doing till now and that is just you know it is pretty obvious what is going on there.
[02:14]
So what I will do next is I am going to add some additional logic into the code and that code is going to do the following, if the incoming request has the planet earth that is if it is about planet earth then I will create a new session parameter called is underscore earth, so is underscore earth is initialized to 0 but if the information is requested about earth that is if the planet value is earth then I will say is underscore earth is equal to 1 that is to indicate that the user initially asked something about planet earth and then I will also add it in as one of the parameters inside the session info object, as I mentioned before the session itself will be set to session underscore name which you can just get from the incoming webhook request and then we will add another object called parameters where the
[03:14]
name of the parameter will be the key and the value of the parameter will be the value here in the JSON, okay. Then you are going to send the whole thing back. Now here is the interesting thing, right. So you have the start page and you might remember that the get planet attribute as soon as the response comes back it is supposed to go to the follow-up page which is over here and then the user can change the attribute or they can change the planet.
Now what we want to do is if the user first asked a question about planet earth we would like to go to a new page called the page itself will be called earth and that will be able to answer specific questions about earth which is different from the other planets that is we know more about earth and we can ask different questions it is just a you know contrived kind of an example here but I think you get the picture.
[04:11] If the user’s initial question was about earth then we want to move the flow over to this page called earth and then allow the user to ask further questions from that point on. I am not going to actually define new intents into the earth page but I am just going to show you as an example how it will work, right.
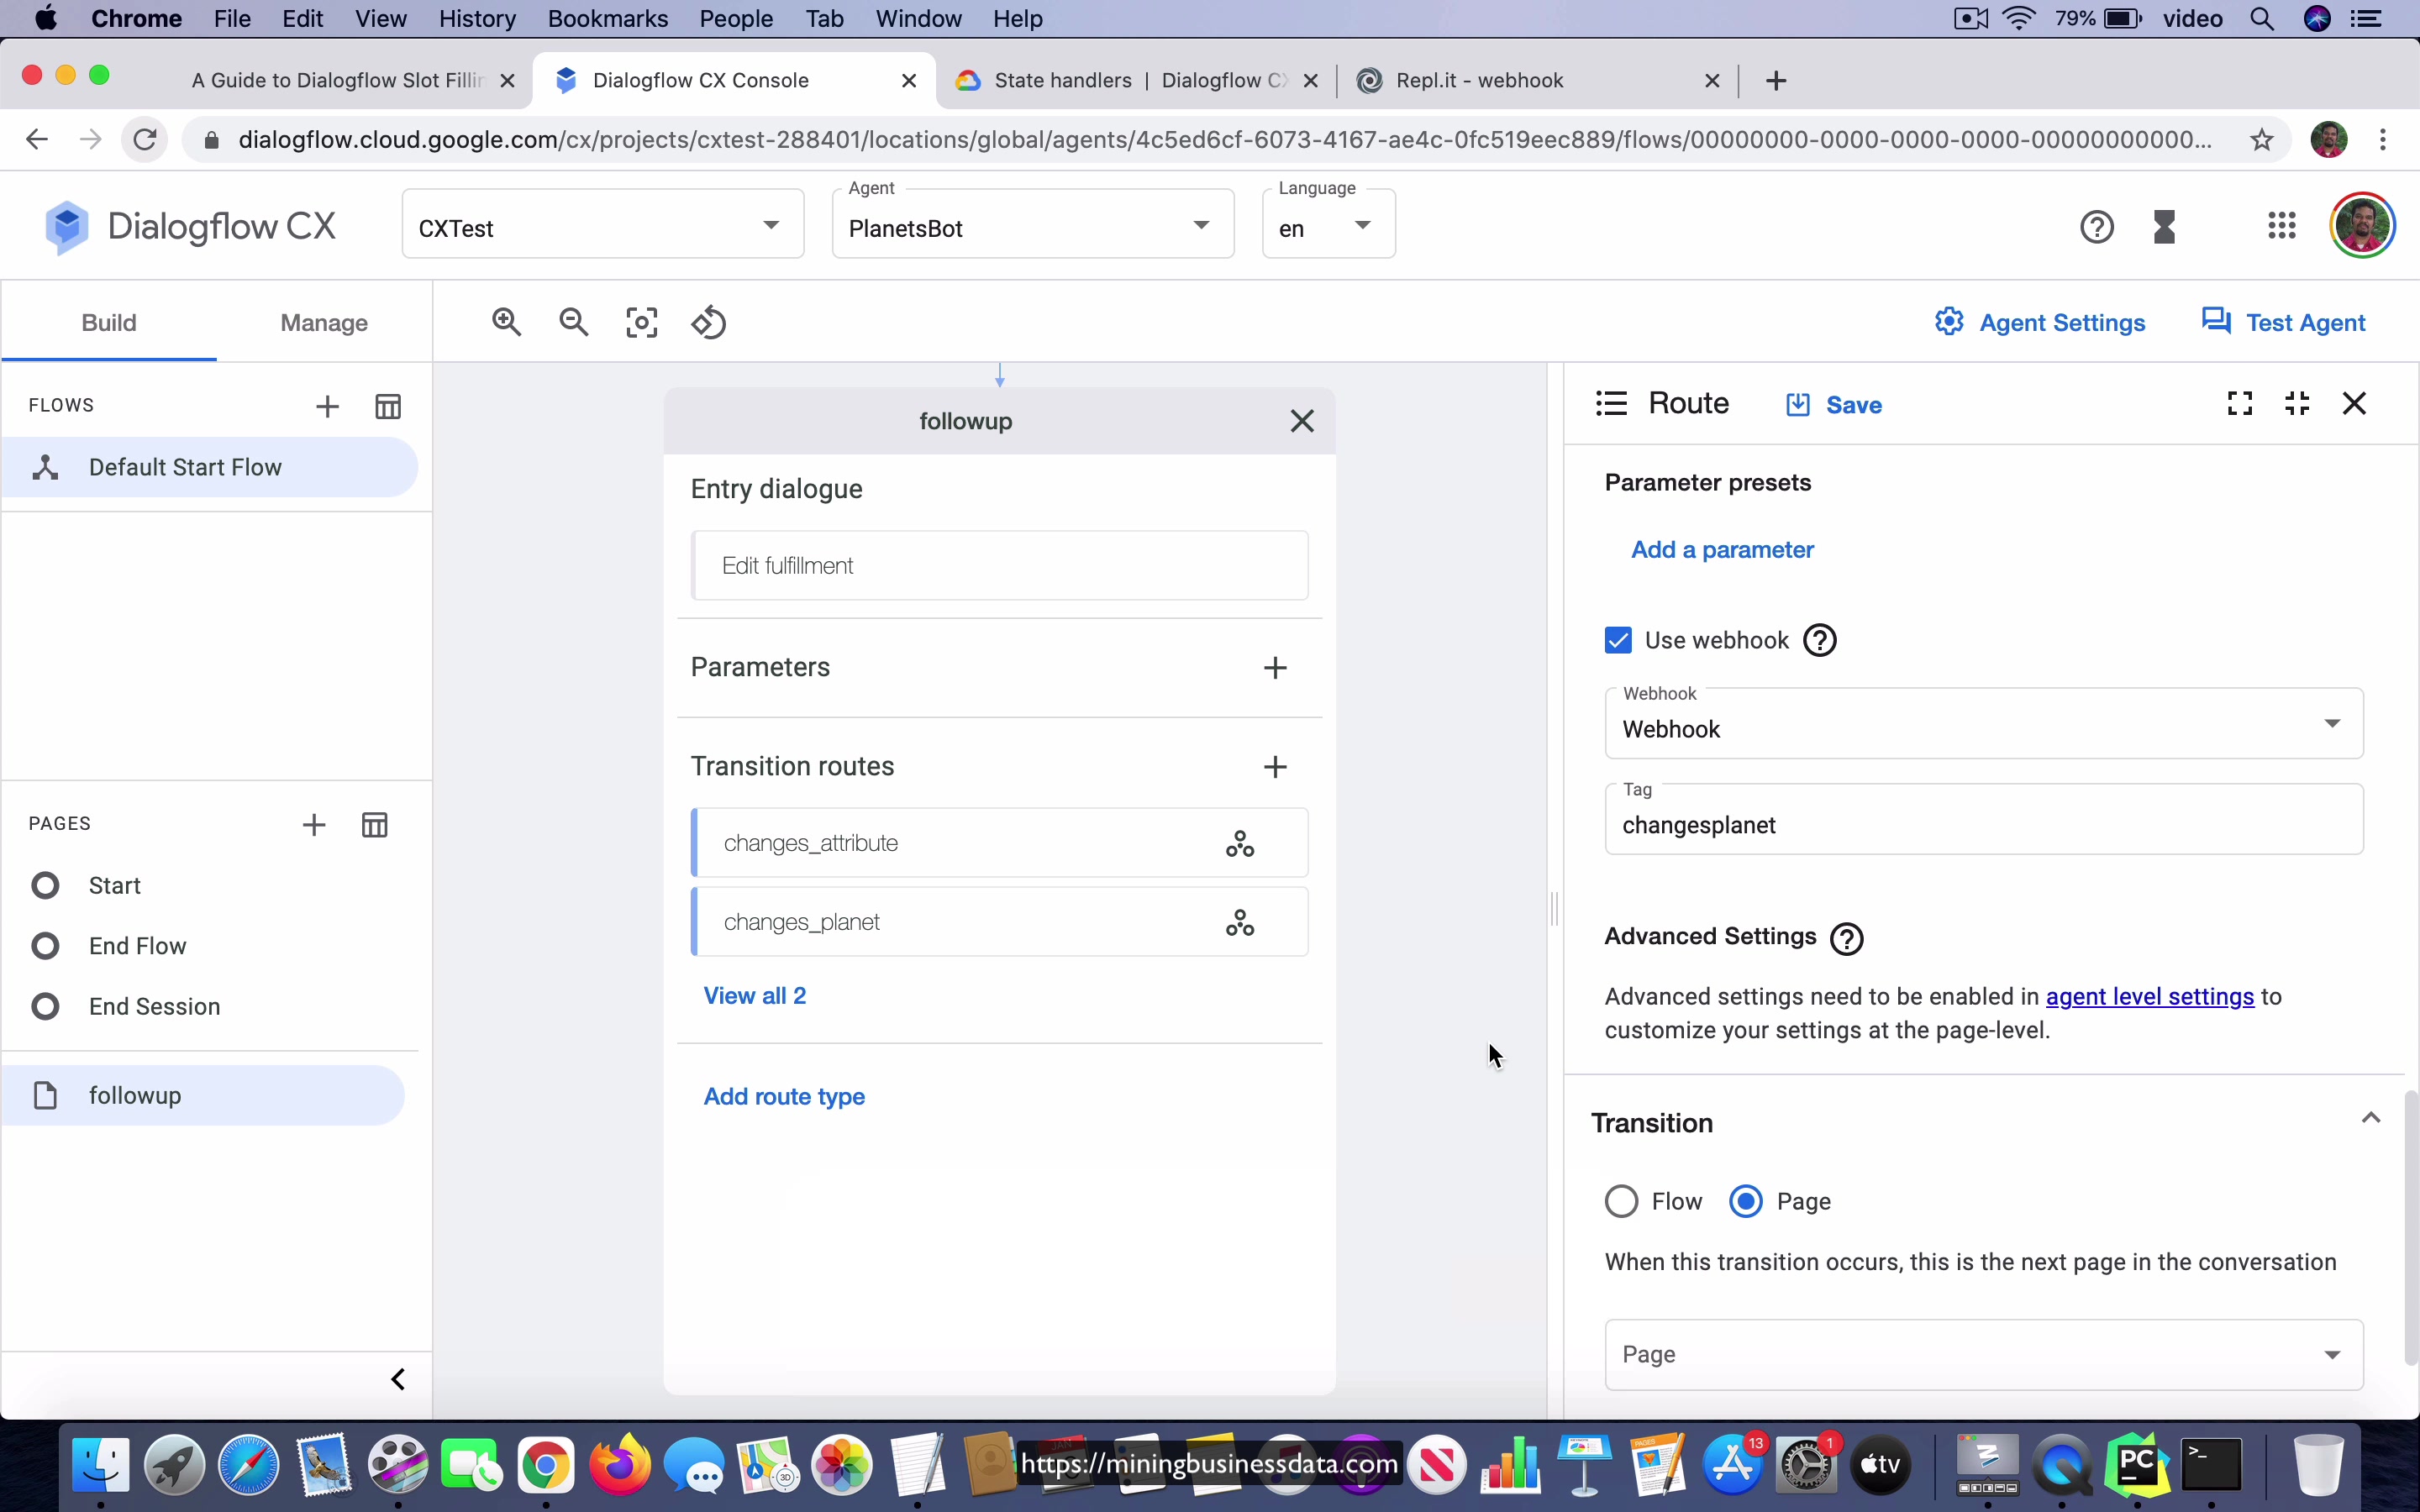
So let us start by adding new condition route no intent here and the condition route will just be session.params.is underscore earth equals one. Now I am using string values here because it just simplifies things instead of doing the type casting and wondering what is the correct type and all that and then I am going to move it to this page called earth, okay.
[05:01] So you save it and what you see here is that you have this new page created inside this visual flow and you can see that this is added as one of the condition routes into the start page, okay. So let us go ahead and test the agent and I am going to show you what happens in a minute. So let us say what is the color of Mercury. By the way if you ask for the color of Mercury as you know the planet which we are requesting is not earth.
So you can see that is earth is going to be set to zero here and let us go forward and now you can see that the Default Start Flow went to the follow up page which is pretty much what we expect, right. Let us start again. What is the color of earth? So this time we are choosing earth and let us see what happens. Now you see that is earth is going to be set to one and when we go to this simulator you see that the follow up page has still been, I mean the flow has still transitioned to the follow up page.
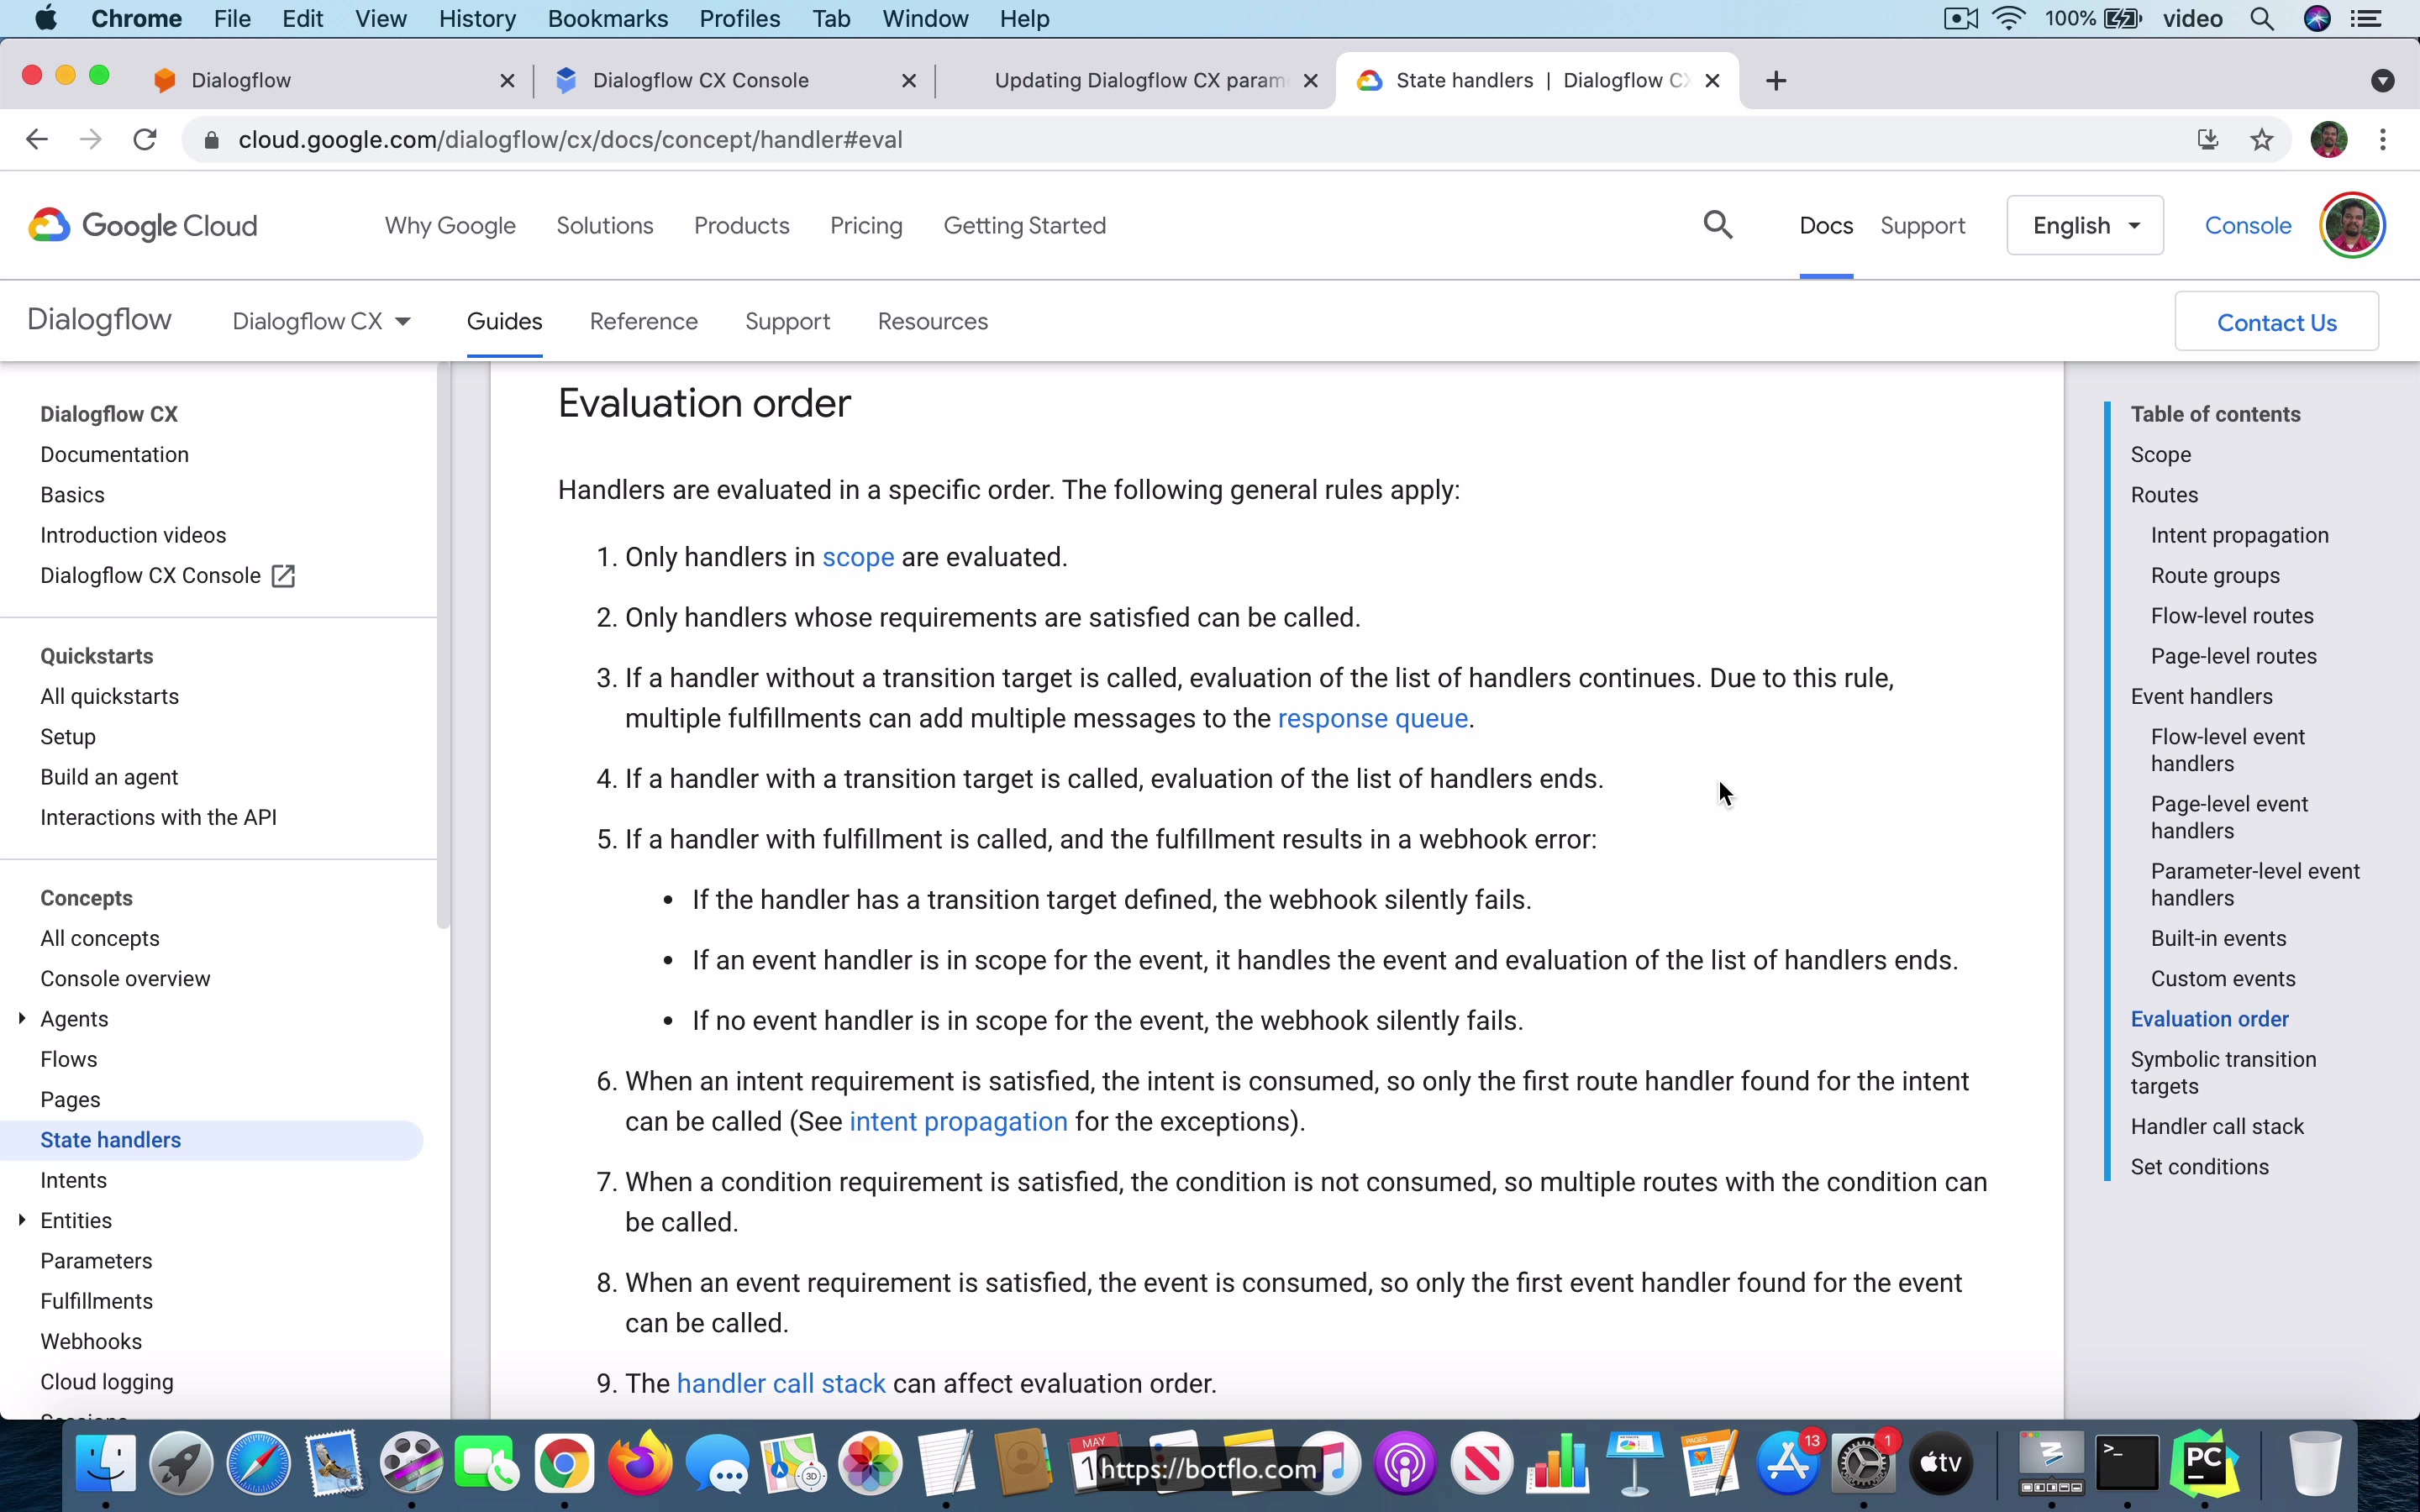
[06:14] Now what does this actually mean? This means that even though this condition is true it did not do this transition to this page called earth and there is actually a reason for that. Now if you go and look at the state handlers in the Dialogflow CX documentation you will notice that there is this something called evaluation order and here you can actually see that if a handler with a transition target is called evaluation of the list of handlers ends.
Now the state handlers is actually a pretty complex topic all by itself and in fact I will go so far as to say that that is probably the most complicated thing that you need to understand in Dialogflow CX for you to make complete sense of how CX works.
[07:06] And I do not have a chapter on that yet because I am trying to design it in such a way that it is possible to come up with a good example and it is not that simple. But as we are going through this example right now this is actually a good indicator of what happens when you have to handle this evaluation order, when you have to deal with the evaluation order. Till now in all the lessons and chapters we have seen before we have not actually had to deal with this evaluation order till now.
So but as I said you can see that if a handler with the transition target is called evaluation of the list of handlers ends. What it means in practice is if I were to just let us just close these two things. Now this is the list of handlers in the start page and you can see that there is two intent routes and then there is a condition route.
[08:01] When the user asks for the color of earth that will actually map to this intent. That means that the intent will be consumed in the Dialogflow CX speak and that already does this transition to follow a page. What that means is that the list evaluation ends here. It has already moved over to this page over here and that means that we are not going to go to this earth page at that point.
So that means if you had this condition set to true it is still not going to do anything in this particular example because the list of handlers has been evaluated and one of the list of one of the handlers has already transitioned over to a different page which means that it never reaches this point. Okay. Now what you can do to fix this issue is actually it’s fairly simple.
[09:03] What you need to do is take this route delete this from this start page we don’t need it here and just move it over to the follow up page. So here you can do the same thing condition route $session.params.isEarth equals 1 and then in that case you will transition it to the earth page.
Okay. And just to make it clear that you have transitioned to earth page I have added this thing called entered earth page into the agencies so that we know that that has actually happened. Right. And let’s see what happens this time. So let’s go for the view like this. We’ll start with what is the color of Mercury again and one more time you can see that so it has gone to the follow up page which is true which is what we want is earth is 0.
[10:07] So that’s expected. So what I’ll do is I’ll start the conversation again what is the color of earth and this time what you should see is that notice what happened. So the is earth is now set to 1 and as a result the current page is actually earth and we can confirm that by looking at this text here where it says entered earth page.
So this will only be displayed if it has already entered the earth page. So what do we learn from this lesson. What we see is that when you are using the condition routes like here you have to make sure that you understand the evaluation order otherwise you might end up creating condition routes which might never get triggered. Okay so that’s very important. Now I will create a chapter or I don’t know maybe a few lessons on the state handlers and hopefully that will become more clear but the important thing here is that you can when you get information back from the webhook you should make sure that you are honoring the evaluation order when you are trying to use the information coming back from the webhook to do state transitions that is if you want to go from one page to the other based on information coming back from the webhook.
[11:32]
Now you have other ways to handle it like you can for example create a page in the middle like before the follow-up after the start and all it has is just a single condition route and that condition route could be you know if the session.parameters.isEarth equals one then you can go to the page earth and if that condition route is not satisfied you can just have another condition which is set to true and that just goes to this follow-up page over here and that’s one more way to effectively you are doing the same thing and how you actually design it is I think it’s kind of up to taste and maybe if there are some other requirements those requirements might dictate exactly how you do this logic but it’s important to note that you can do this you know you can you can do all this with using condition routes provided you follow and understand the evaluation order.
[12:30]
Let me just add a quick thing just so that people I notice that sometimes people do get confused about this so let me just make it clear here you can’t put the condition in this place and expect the transition to happen and the reason of course I think that should be kind of obvious it’s because this condition is not a condition for what comes back from the webhook rather this condition is a condition for what happens when this intent gets fired that is if the user says something which could fire this intent and this condition is satisfied that’s when you’re going to see the rest of these things even going to happen so even the webhook call will not even be made for example if the user asks for something right and you find that there is a condition here which is false right if the condition here is false and the user asks for something it’s not actually going to call the webhook over here okay so that’s something else that you need to keep in mind when you’re
[13:29] trying to do this you have to make sure that you understand that there is an order in which all these things happen okay so this is how you can use information coming back from the webhook to design your transitions and your flows in Dialogflow CX.
Let me very very quickly add one more thing in this particular example you did not have to see the value coming back from the webhook just to do the transition because when you do this get planet attribute it’s already going to get these parameters the information about these parameters and in other words this is something which is done before the webhook call the parameter called earth is already extracted before it’s even sent to the webhook so technically you could have as well done the transition without even calling the webhook but you know I’m giving this as an example and I want to simplify it as much as possible so that is why I had the additional condition checked in the webhook code which checks to see if the planet is earth and then sends a new parameter called is underscore earth and then allows that I mean you can use the new parameter to add more logic and do other kind of page transitions
[14:46]
in your Dialogflow CX part.