03 Dialogflow CX Flowcharts and test cases
Lesson: Why ES First
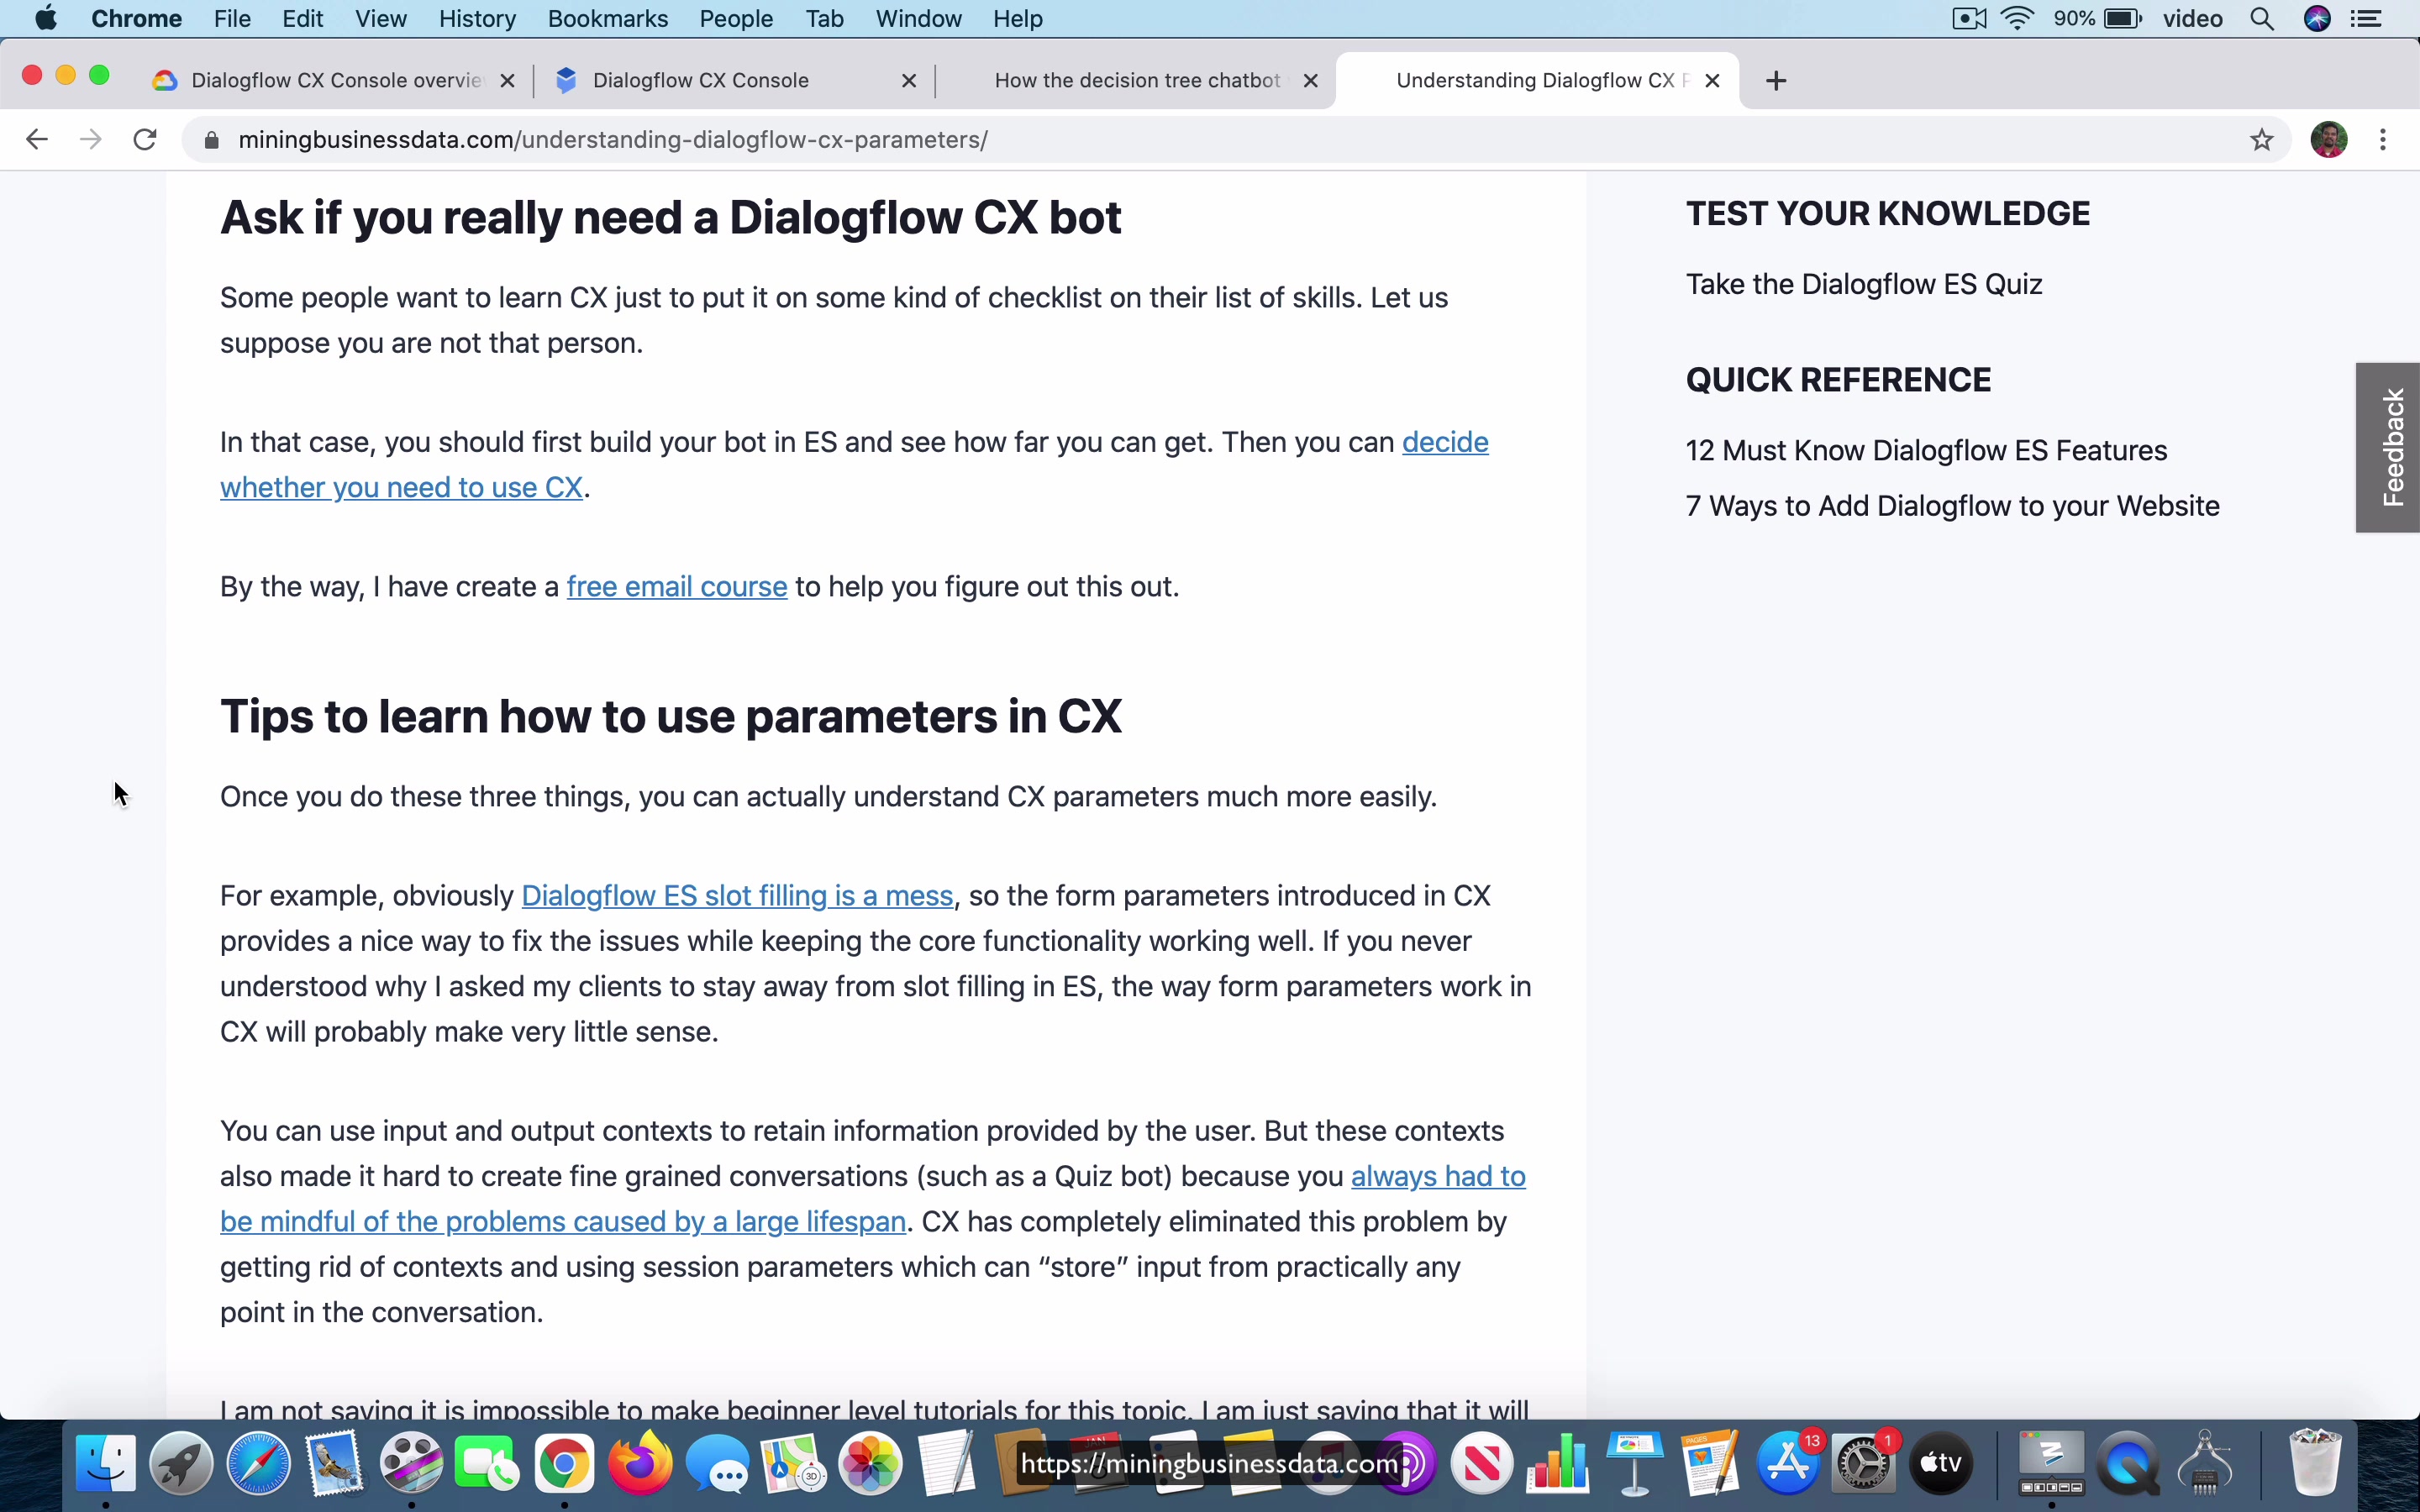
[00:00] Recently someone asked on my YouTube channel to make a tutorial about parameters in Dialogflow CX and they also mentioned that it is really confusing compared to Dialogflow ES and of course this comment is very true but one of the things that I also feel lot of people are missing is that Dialogflow CX is sort of an improvement over ES and not only that it is meant to be used at least in my opinion only in the situations where ES is not sufficient for your bot and I will actually say that there is a lot of stuff you can do with just ES.
In fact, I have created lot of material in my courses which will help you to do that and I also think it is much easier to learn CX if you learn the Dialogflow ES bots first that is if you learn how to build you know reasonably complex conversations even using Dialogflow ES and the reason for that is because it will show you really what is missing you know it is like CX sort of starts where ES ends in my view and if you never understood the limitations of why it was hard to create these more complex conversations in ES then getting jumping right into CX will actually be of course this is my personal opinion but I actually think that you are likely to waste a lot of time.
[01:30]
Now I can imagine given that I have already created a lot of training material for ES there will be some people who will say that yeah you know this seems to be this seems to be a little self-serving because of course you will say that I mean that’s I don’t know what else to say except that you can give it a shot and see how it goes because for example the perfect example for me is slot filling which of course we will we will come to that later in this course because slot filling the way it was done in ES caused so many issues that I quite literally recommended people not to use it and I have not changed my opinion on that till now I have not had a good reason to do that and if you’ve understood the case I made for not using slot filling in ES it will actually be much easier for you to see what is going on not only with slot filling but even with the parameters
[02:30]
as they have been declared or as they have been designed in Dialogflow CX because you will see that a lot of things which are designed in CX are meant to do a better job of capturing user information through the whole conversation and also preserving and maintaining that information while at the same time allowing the user to go off track and these are all the kind of things which were very difficult to do in ES and what Dialogflow team has done and I think till now I think it’s a really good job what they’ve done is that they have created sort of from the ground up they have created a new framework for for handling precisely these kind of situations which is also why I don’t think that you should use CX until you your bot reaches a certain level of complexity so with all that said I’m going to more or less you know assume here that you are already
[03:30]
familiar with a lot of my ES material and if you are not you are willing to go back and learn that stuff from those older courses and older material and that’s how we are going to go forward in this course I’ll take a lot of examples which is based on what I’ve already built for my ES bots previously and I’m not going to explain how those things work I’m going to expect you to go back and learn that from the material which is already there and this course is going to move forward sort of from where those ES bot course left off
Lesson: Decision Tree Flowchart

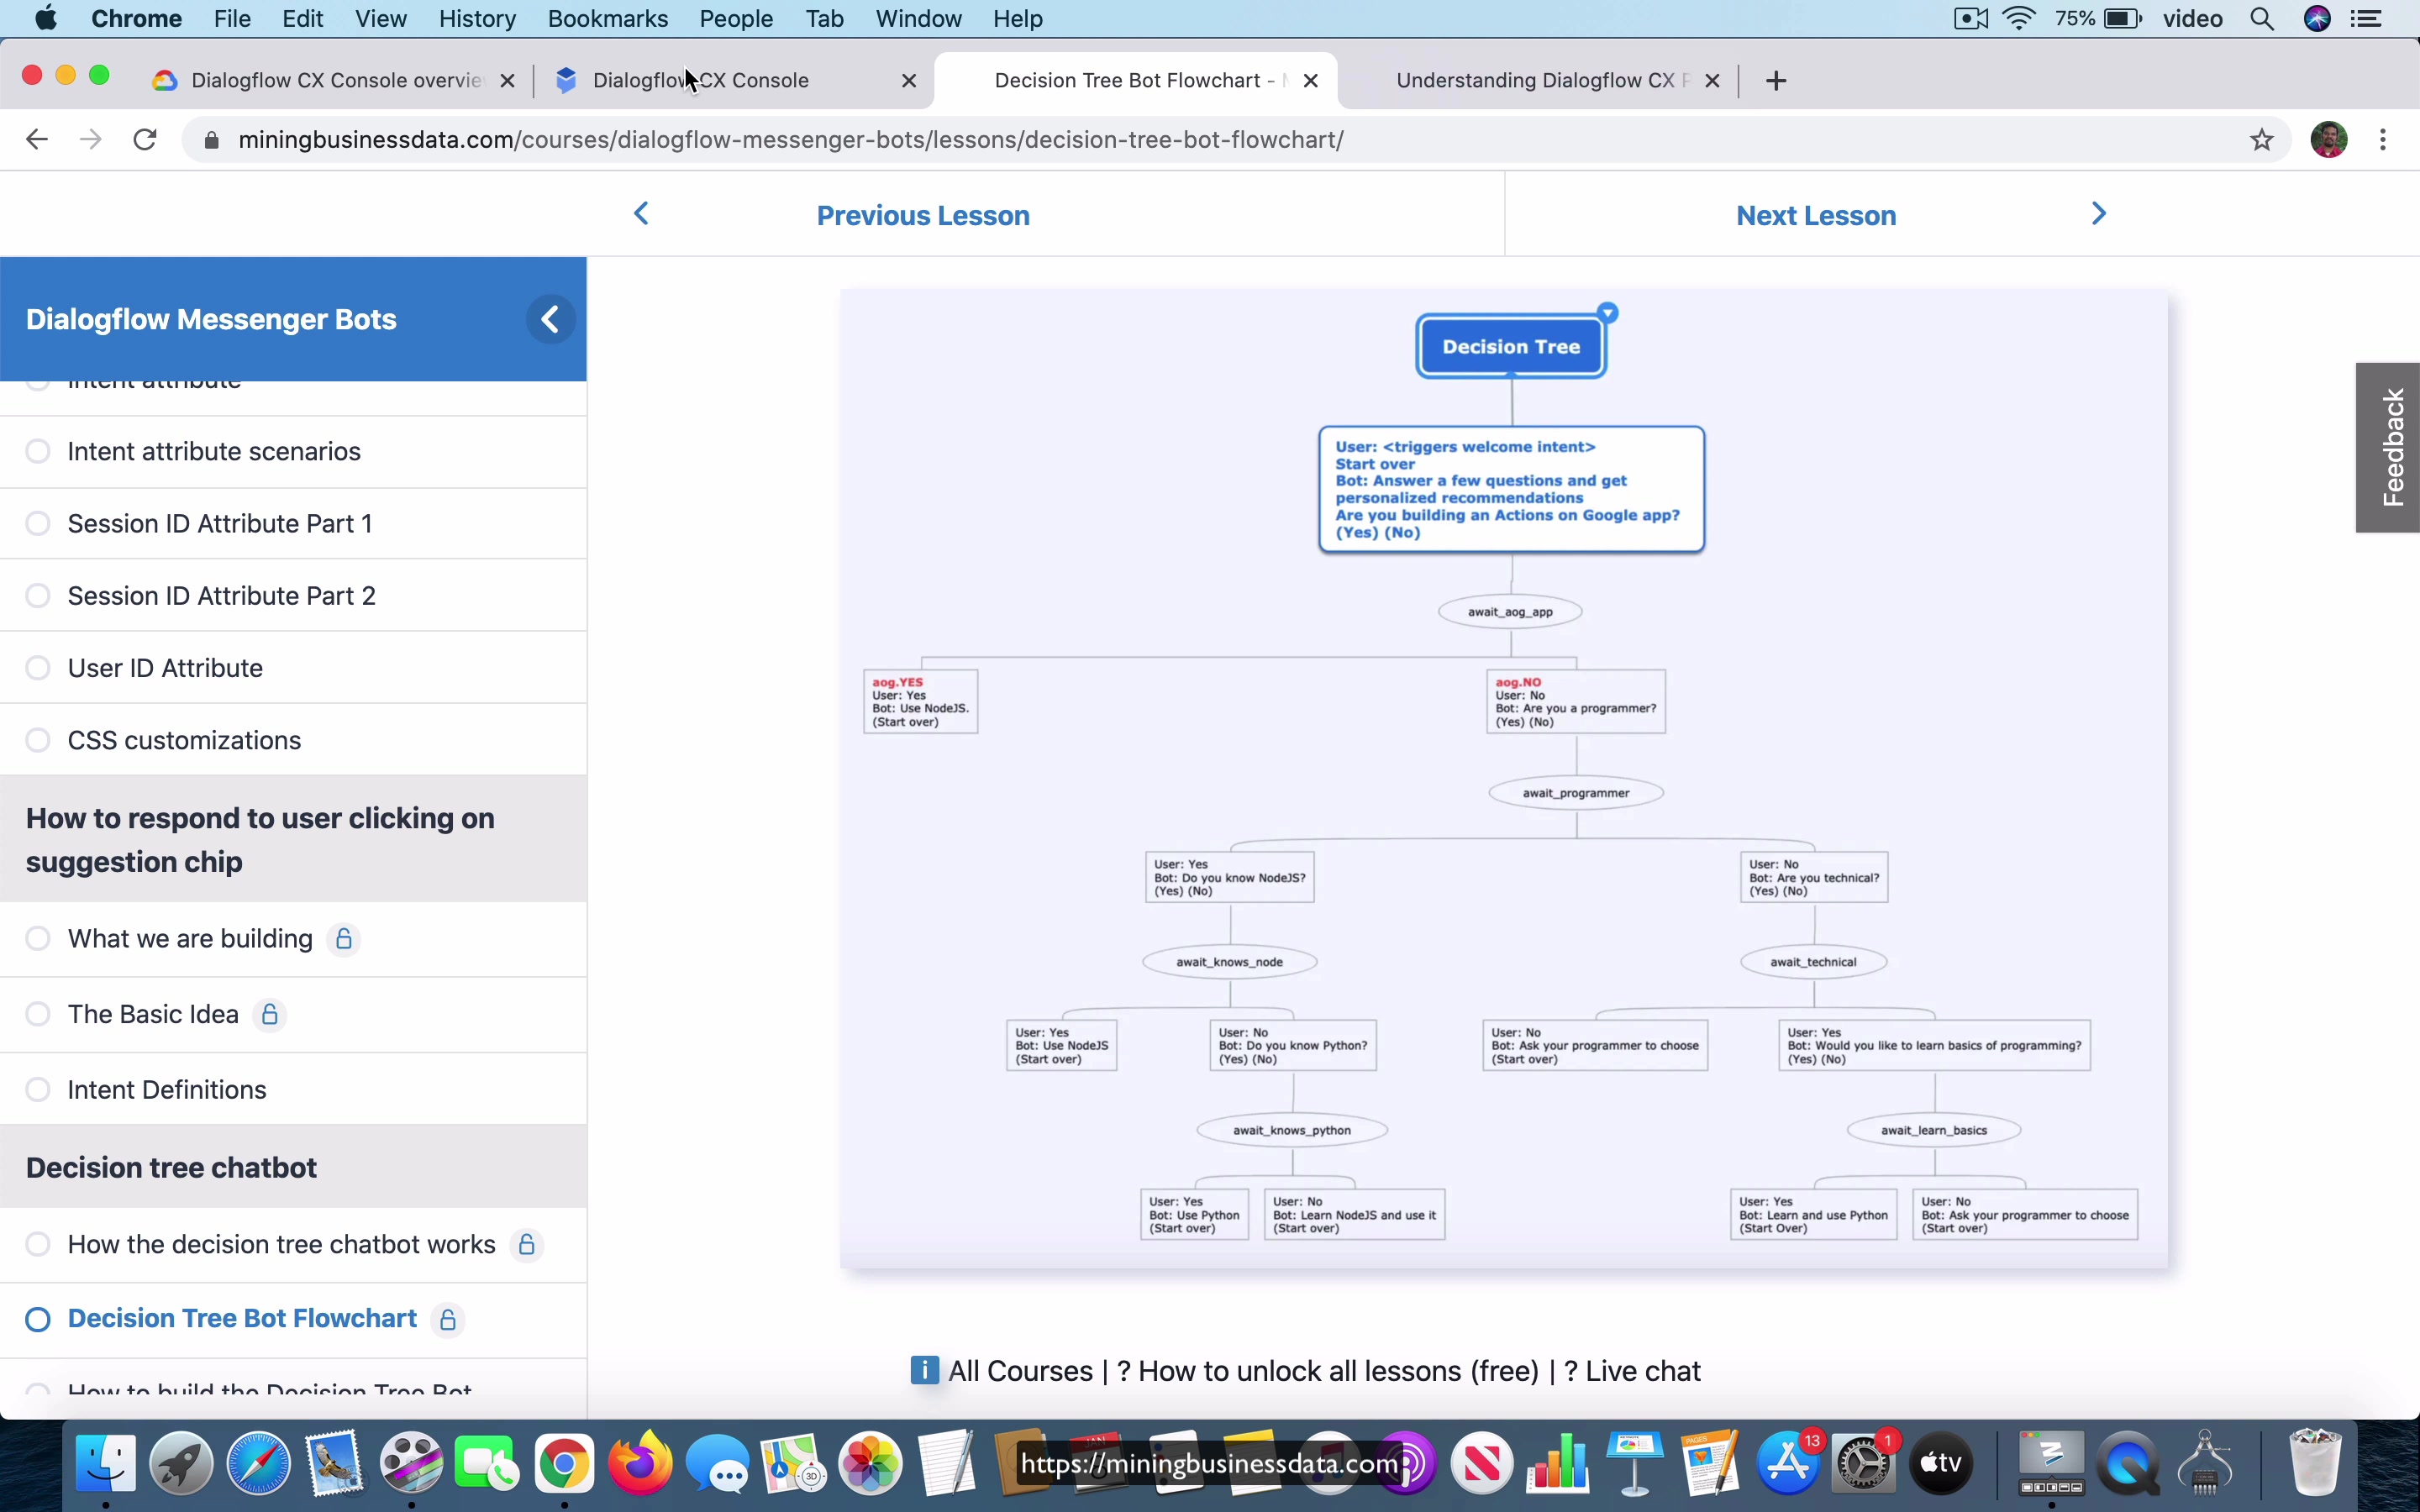
[00:00] So the first thing that we are going to do is create a decision tree chat bot based on my decision tree chat bot that I already built using ES. So this is what the bot this is how it works you can see that it first starts with a prompt which is which programming language is right for your Dialogflow chat bot and it’s going to ask the user to just it just asks the user to fill out a set of not fill out but really like click on buttons which are yes or no answers and based on that it will give some recommendations.
So let me just walk you through what it’s doing here it’s going to first ask are you building an Actions on Google app and let’s just say that the user says yes so you can see that it says use NodeJS since it has the best documentation for Actions on Google bots so if the if I were to start over and it’s going to come back with that same question now I’ll say no then it’s going to ask a question are you a programmer and let’s say that I say yes and then it asks do you know NodeJS and let’s say I say yes again then it’ll say just keep using NodeJS because you’re already familiar with it and what’s not mentioned here is also that a lot of the documentation for NodeJS in general is better than or more well maintained than for the other programming languages in terms of Dialogflow when it comes to dialogue documentation you will find that the documentation for node.js is generally superior to the documentation for the other programming
[01:31]
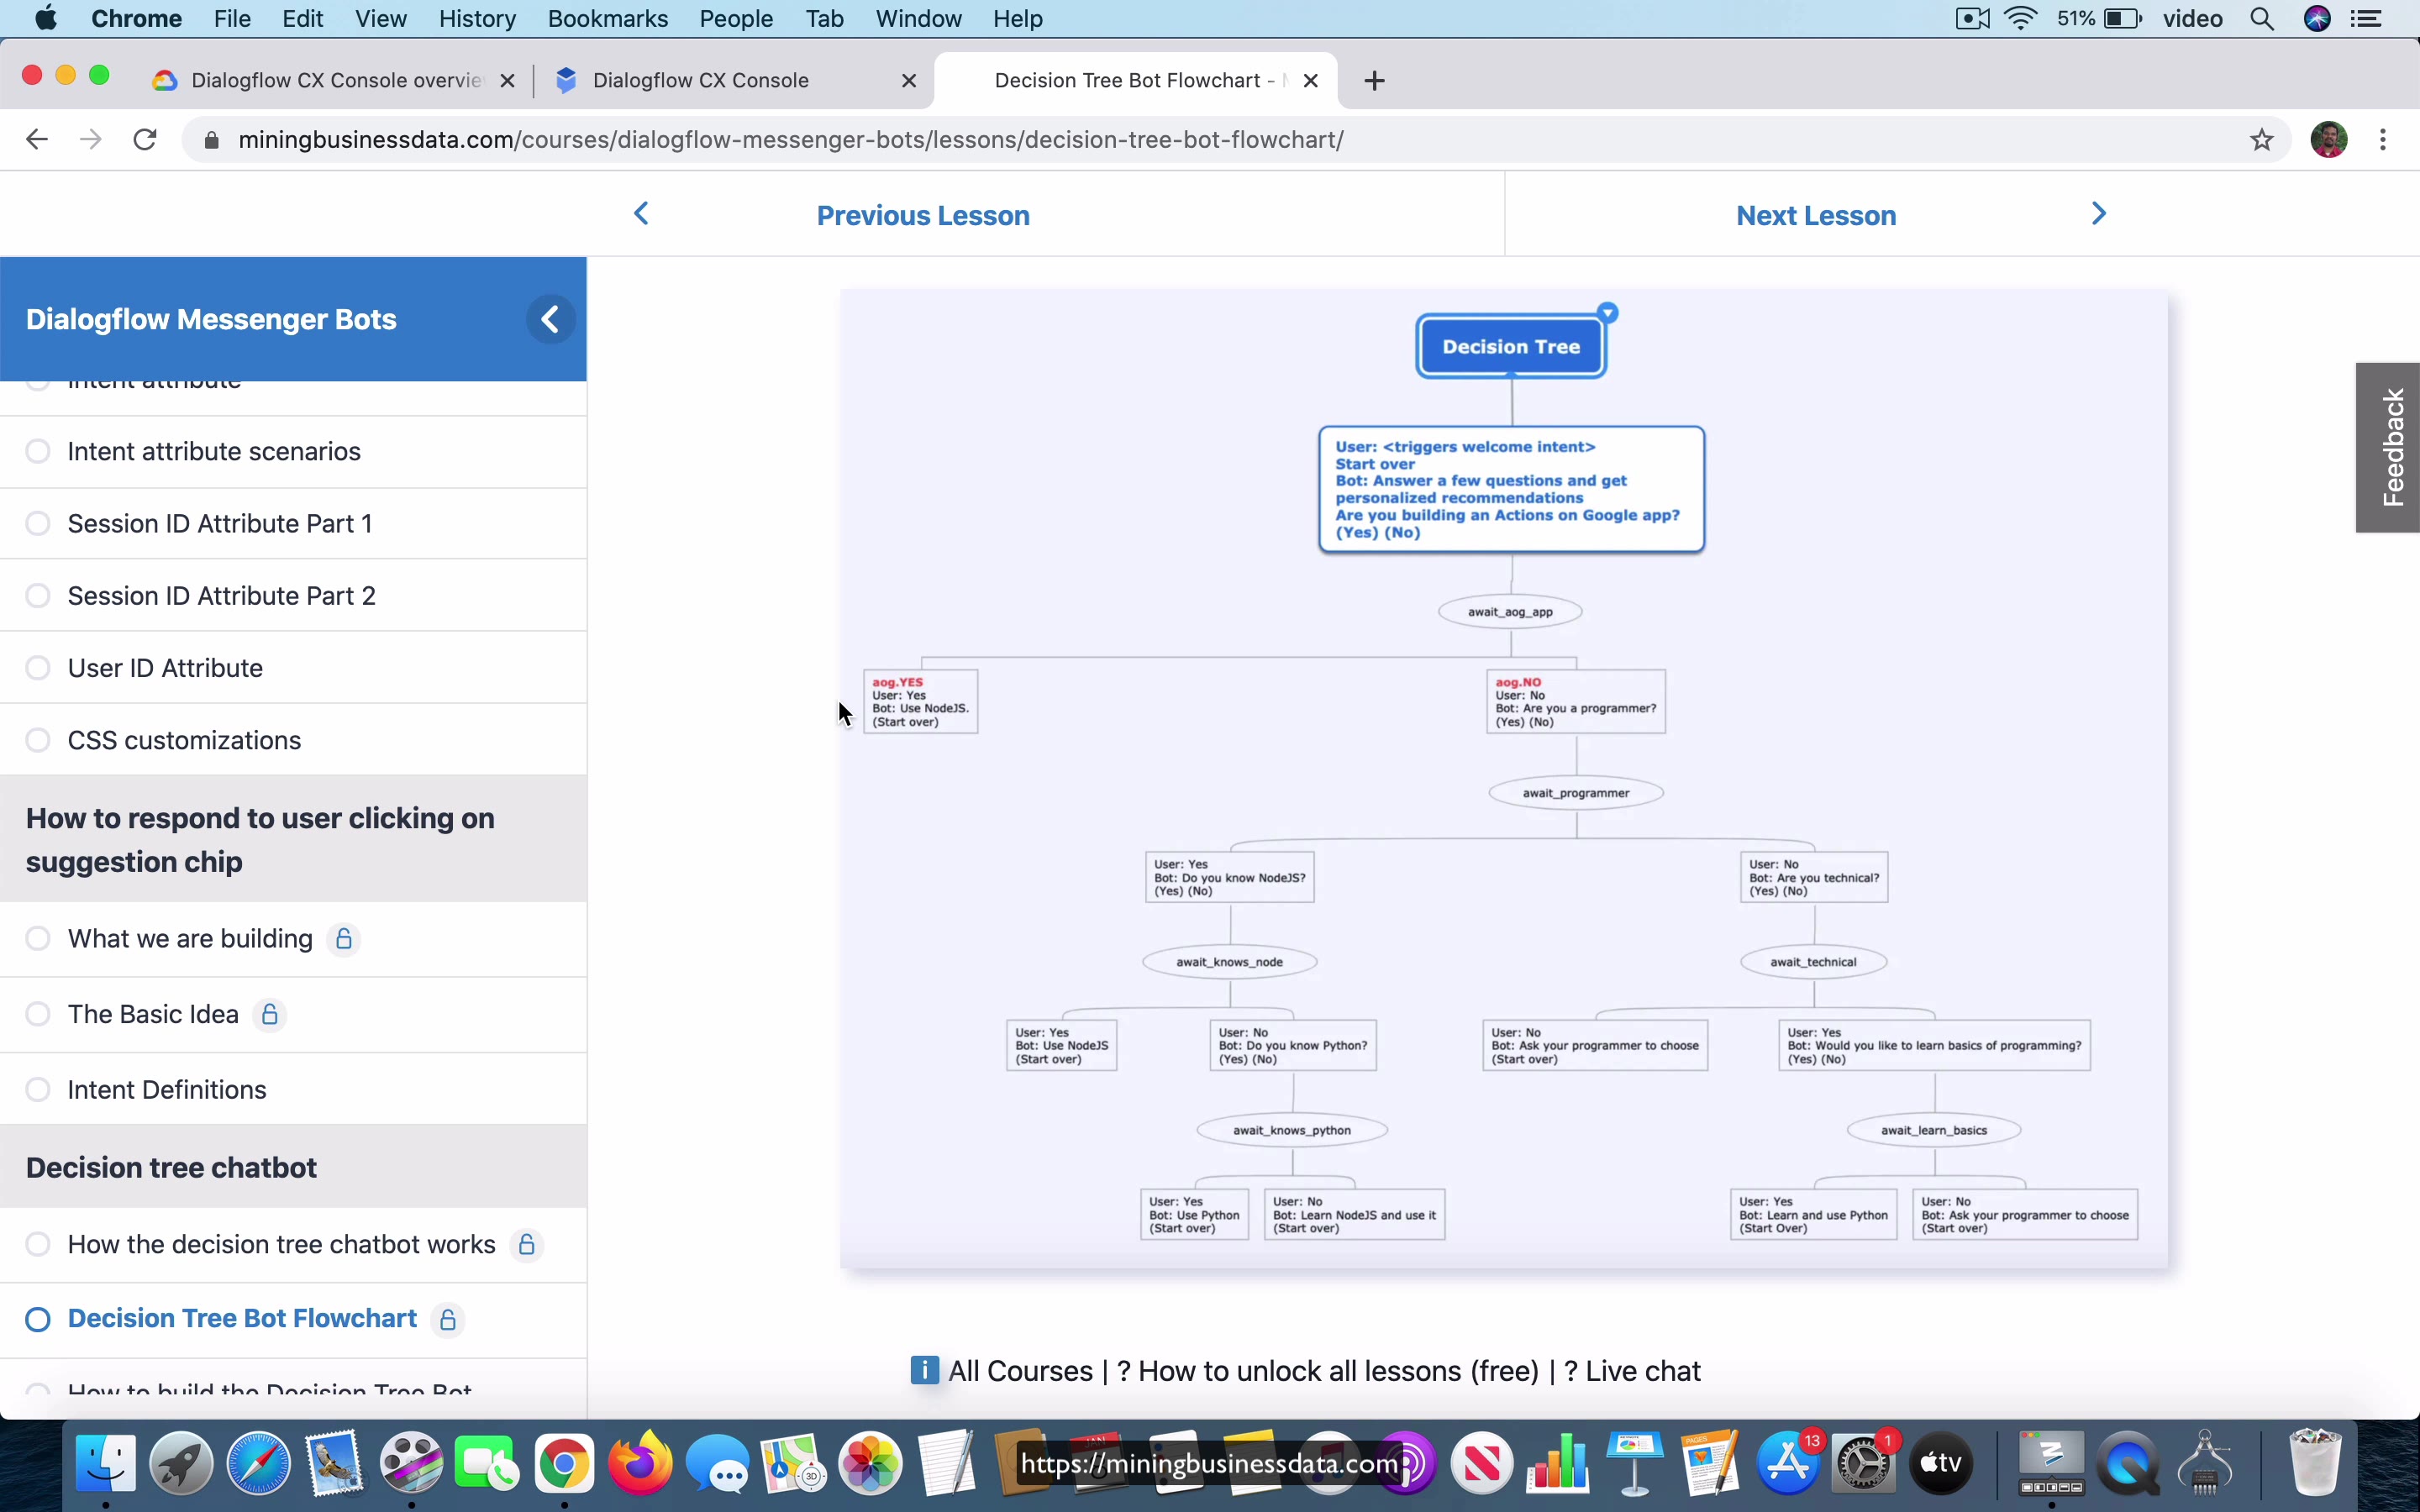
languages. Alright so how exactly is this flowchart going to work I actually have the flowchart right here if we go to the next lesson and by the way you can go through this material for free so you see that this is the decision tree this is what it’s going to look like it’s going to ask about are you building an Actions on Google app and if the user were to say yes it’s going to say use NodeJS if the user said no it’s going to ask if they are a programmer if they say yes it’ll ask if they know NodeJS suppose they say no it’s then asking do you know Python and if they say yes then you can use Python because after node.js that’s probably the best supported language in terms of Dialogflow documentation and then if they say no they it actually says because the you can say the top two languages are node.js and Python the bot recommends that this person learns node.js and use it okay and then on the other hand if the user were to say they are not a programmer it’s
[02:32]
then going to ask them if they are technical and if they were to say no then it’s just going to say ask your programmer to choose the language because at that point you know the programmer is probably going to make all the choices in terms of the design of your webhook and all that right and if they say that they are technical it’s going to ask them if they want to learn the basics of programming and suppose they do say yes then it’ll recommend that they use Python they ask the bot ask them to learn Python first and then use it and then because it’s the easiest language to learn and if they say no then it’s just going to say ask the programmer to choose what language they want to use for the bot right so this is just a flow chart overview of how the decision tree bot works and as you might remember from my previous material what you have to do to keep the conversation moving forward is you have to keep setting
[03:32]
this await underscore context name as the output context and use it as the input context for the following intent right you keep doing this so that you can chain or sequence these interns together and you can have your Dialogflow es bot once you have completed this whole thing right with CX actually this all becomes in a way this all becomes a lot easier because all you are doing at the point is that you are just going to make sure that you represent the await underscore something right you change this into a state or in the case of CX they call it a page right a page represents a state in Dialogflow CX so you change this await into a page and once you have done that you will be able to more or less you should be able to follow this flow chart and get this whole sequence working pretty much in the same way and that’s exactly what i’m going to do in the following video.
Lesson: Initial Flow
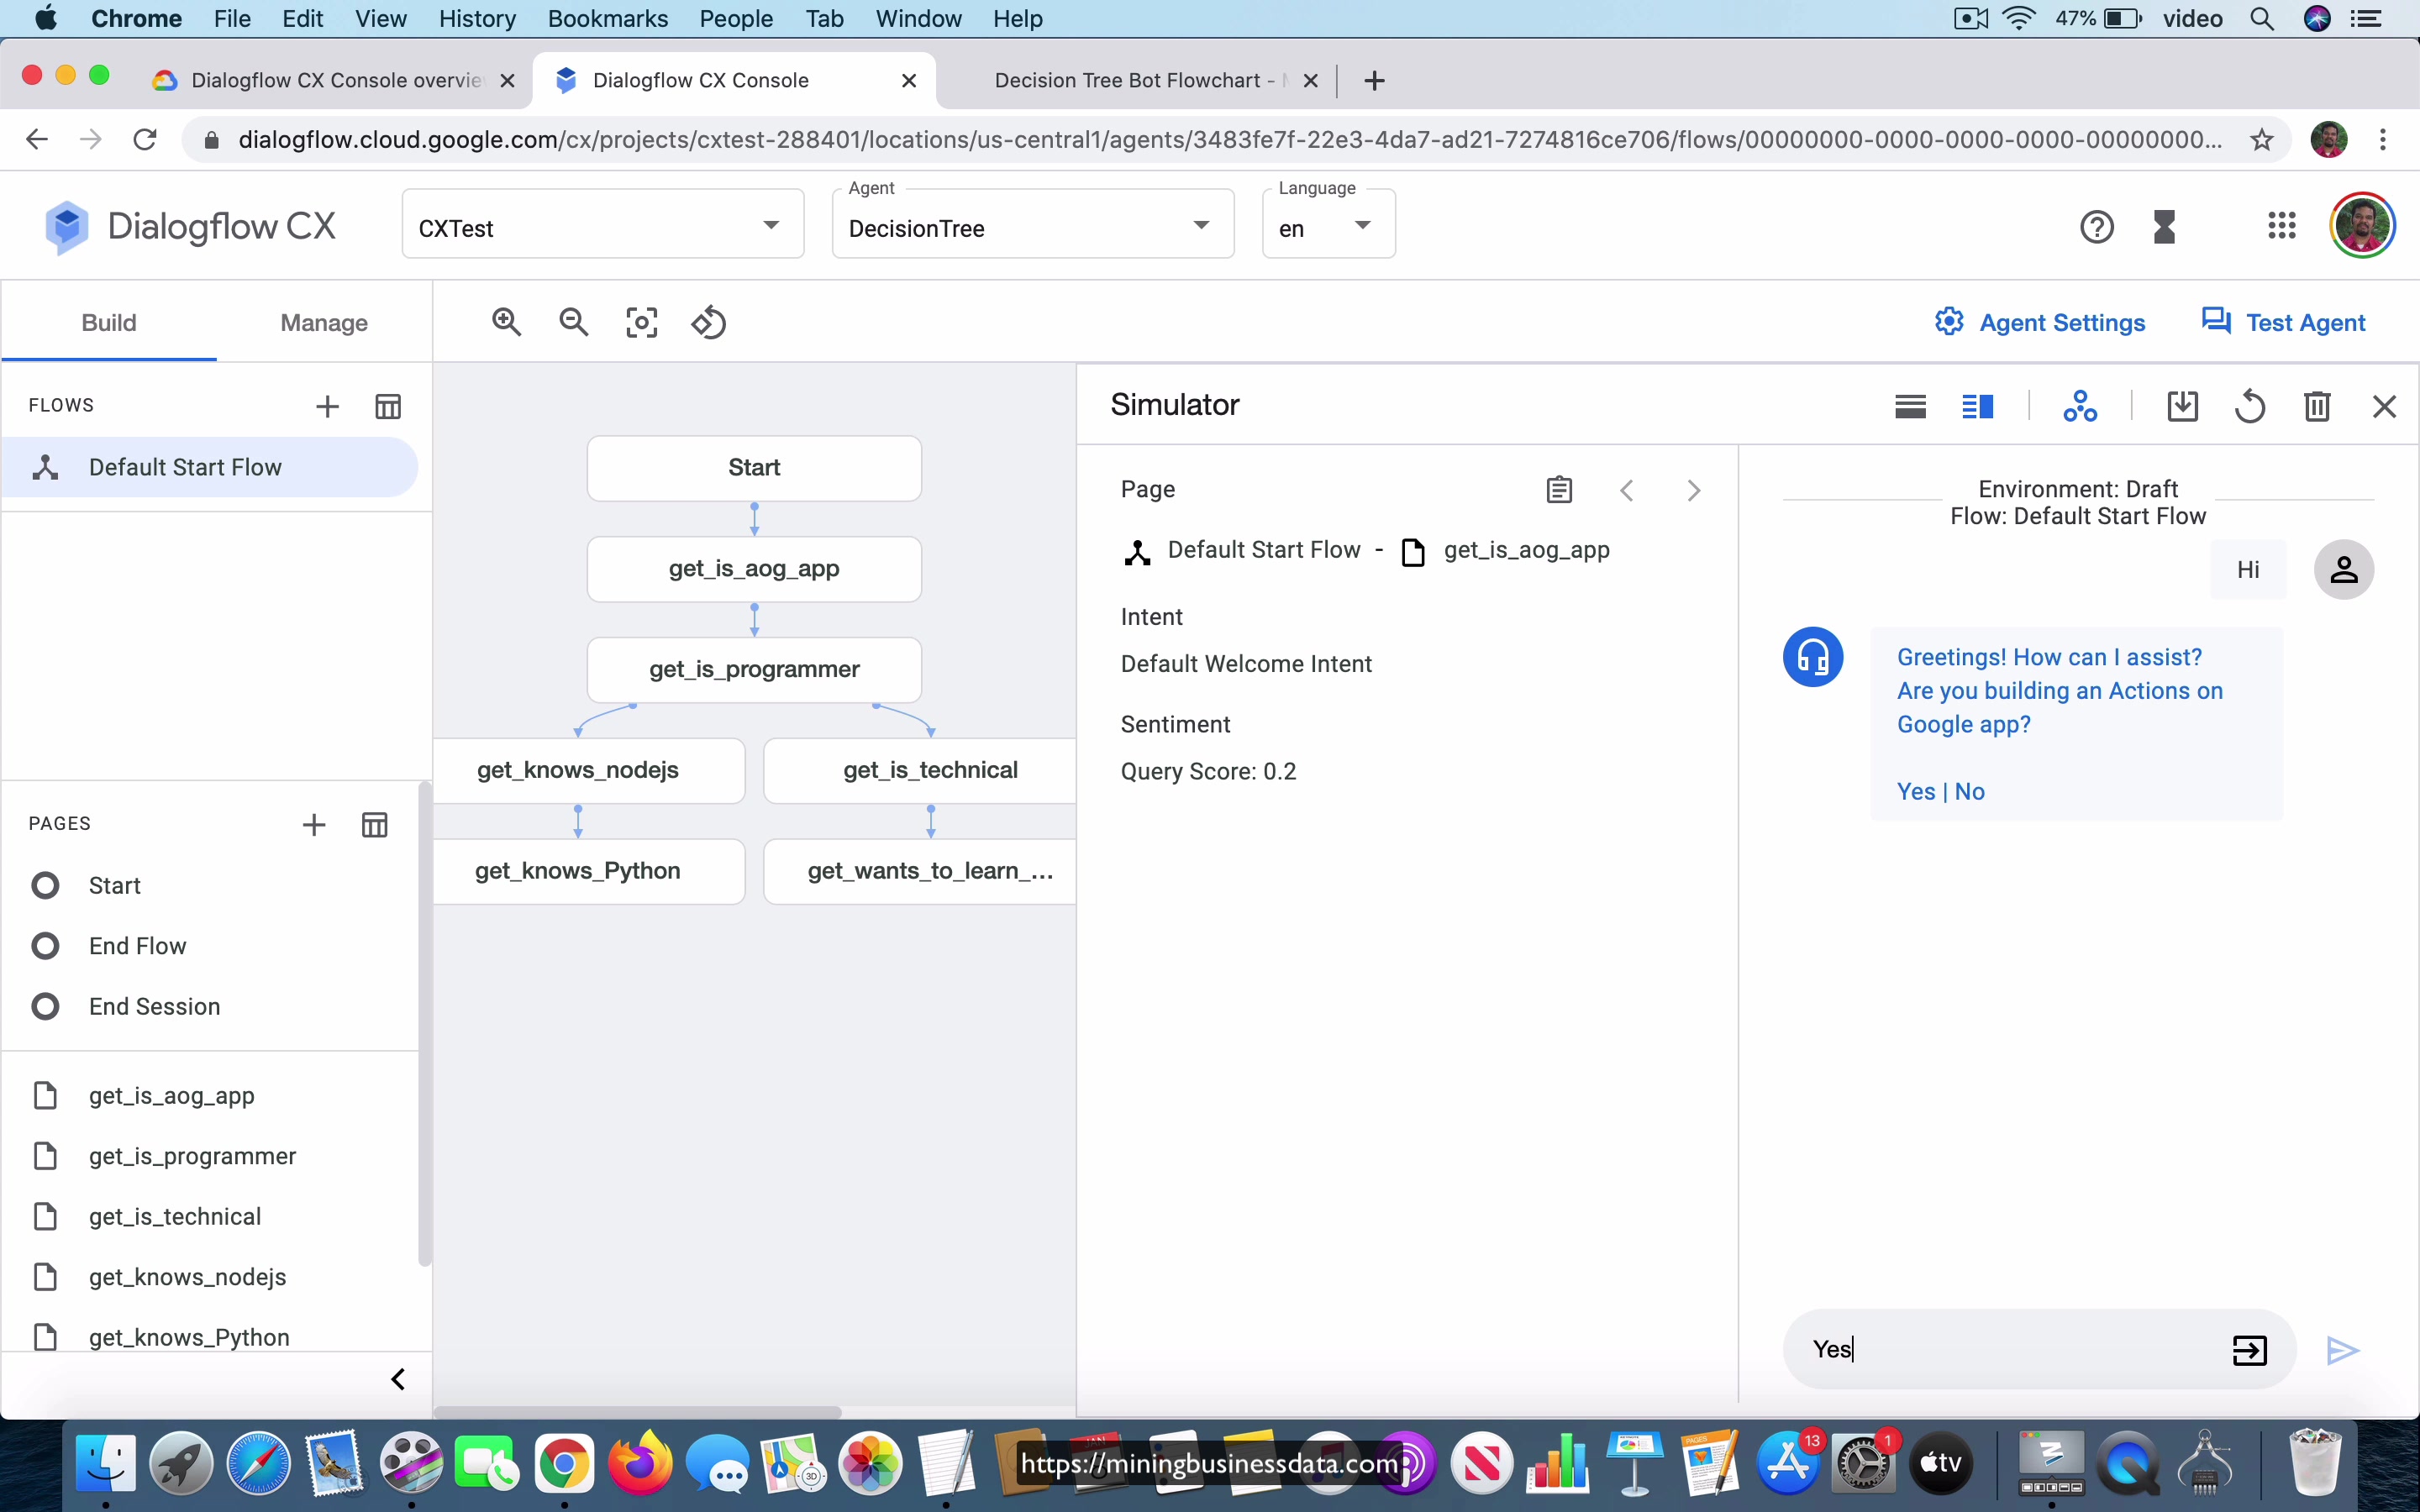
[00:00] So what we are going to do in this lesson is we are going to take a look at the flowchart that I have already designed for the decision tree board and also based on the lessons we have already done for the CX course how to do the you know pages and states and how to transition between them and all that you already have a fairly good picture of how to create these pages and keep transitioning between them so I am just going to move forward you know fairly quickly the Default Welcome Intent if you notice it’s just going to have these phrases just going to say hi and and all that and what I’ll do is at the end of that phrase when the user says the default welcome I’m just going to pretend that we are going to start adding the immediately we are going to ask the user whatever the bot is going to do here it says answer a few questions and get personalized recommendations so it’s just going to ask are you building an Actions on Google app okay so it’s just
[01:00]
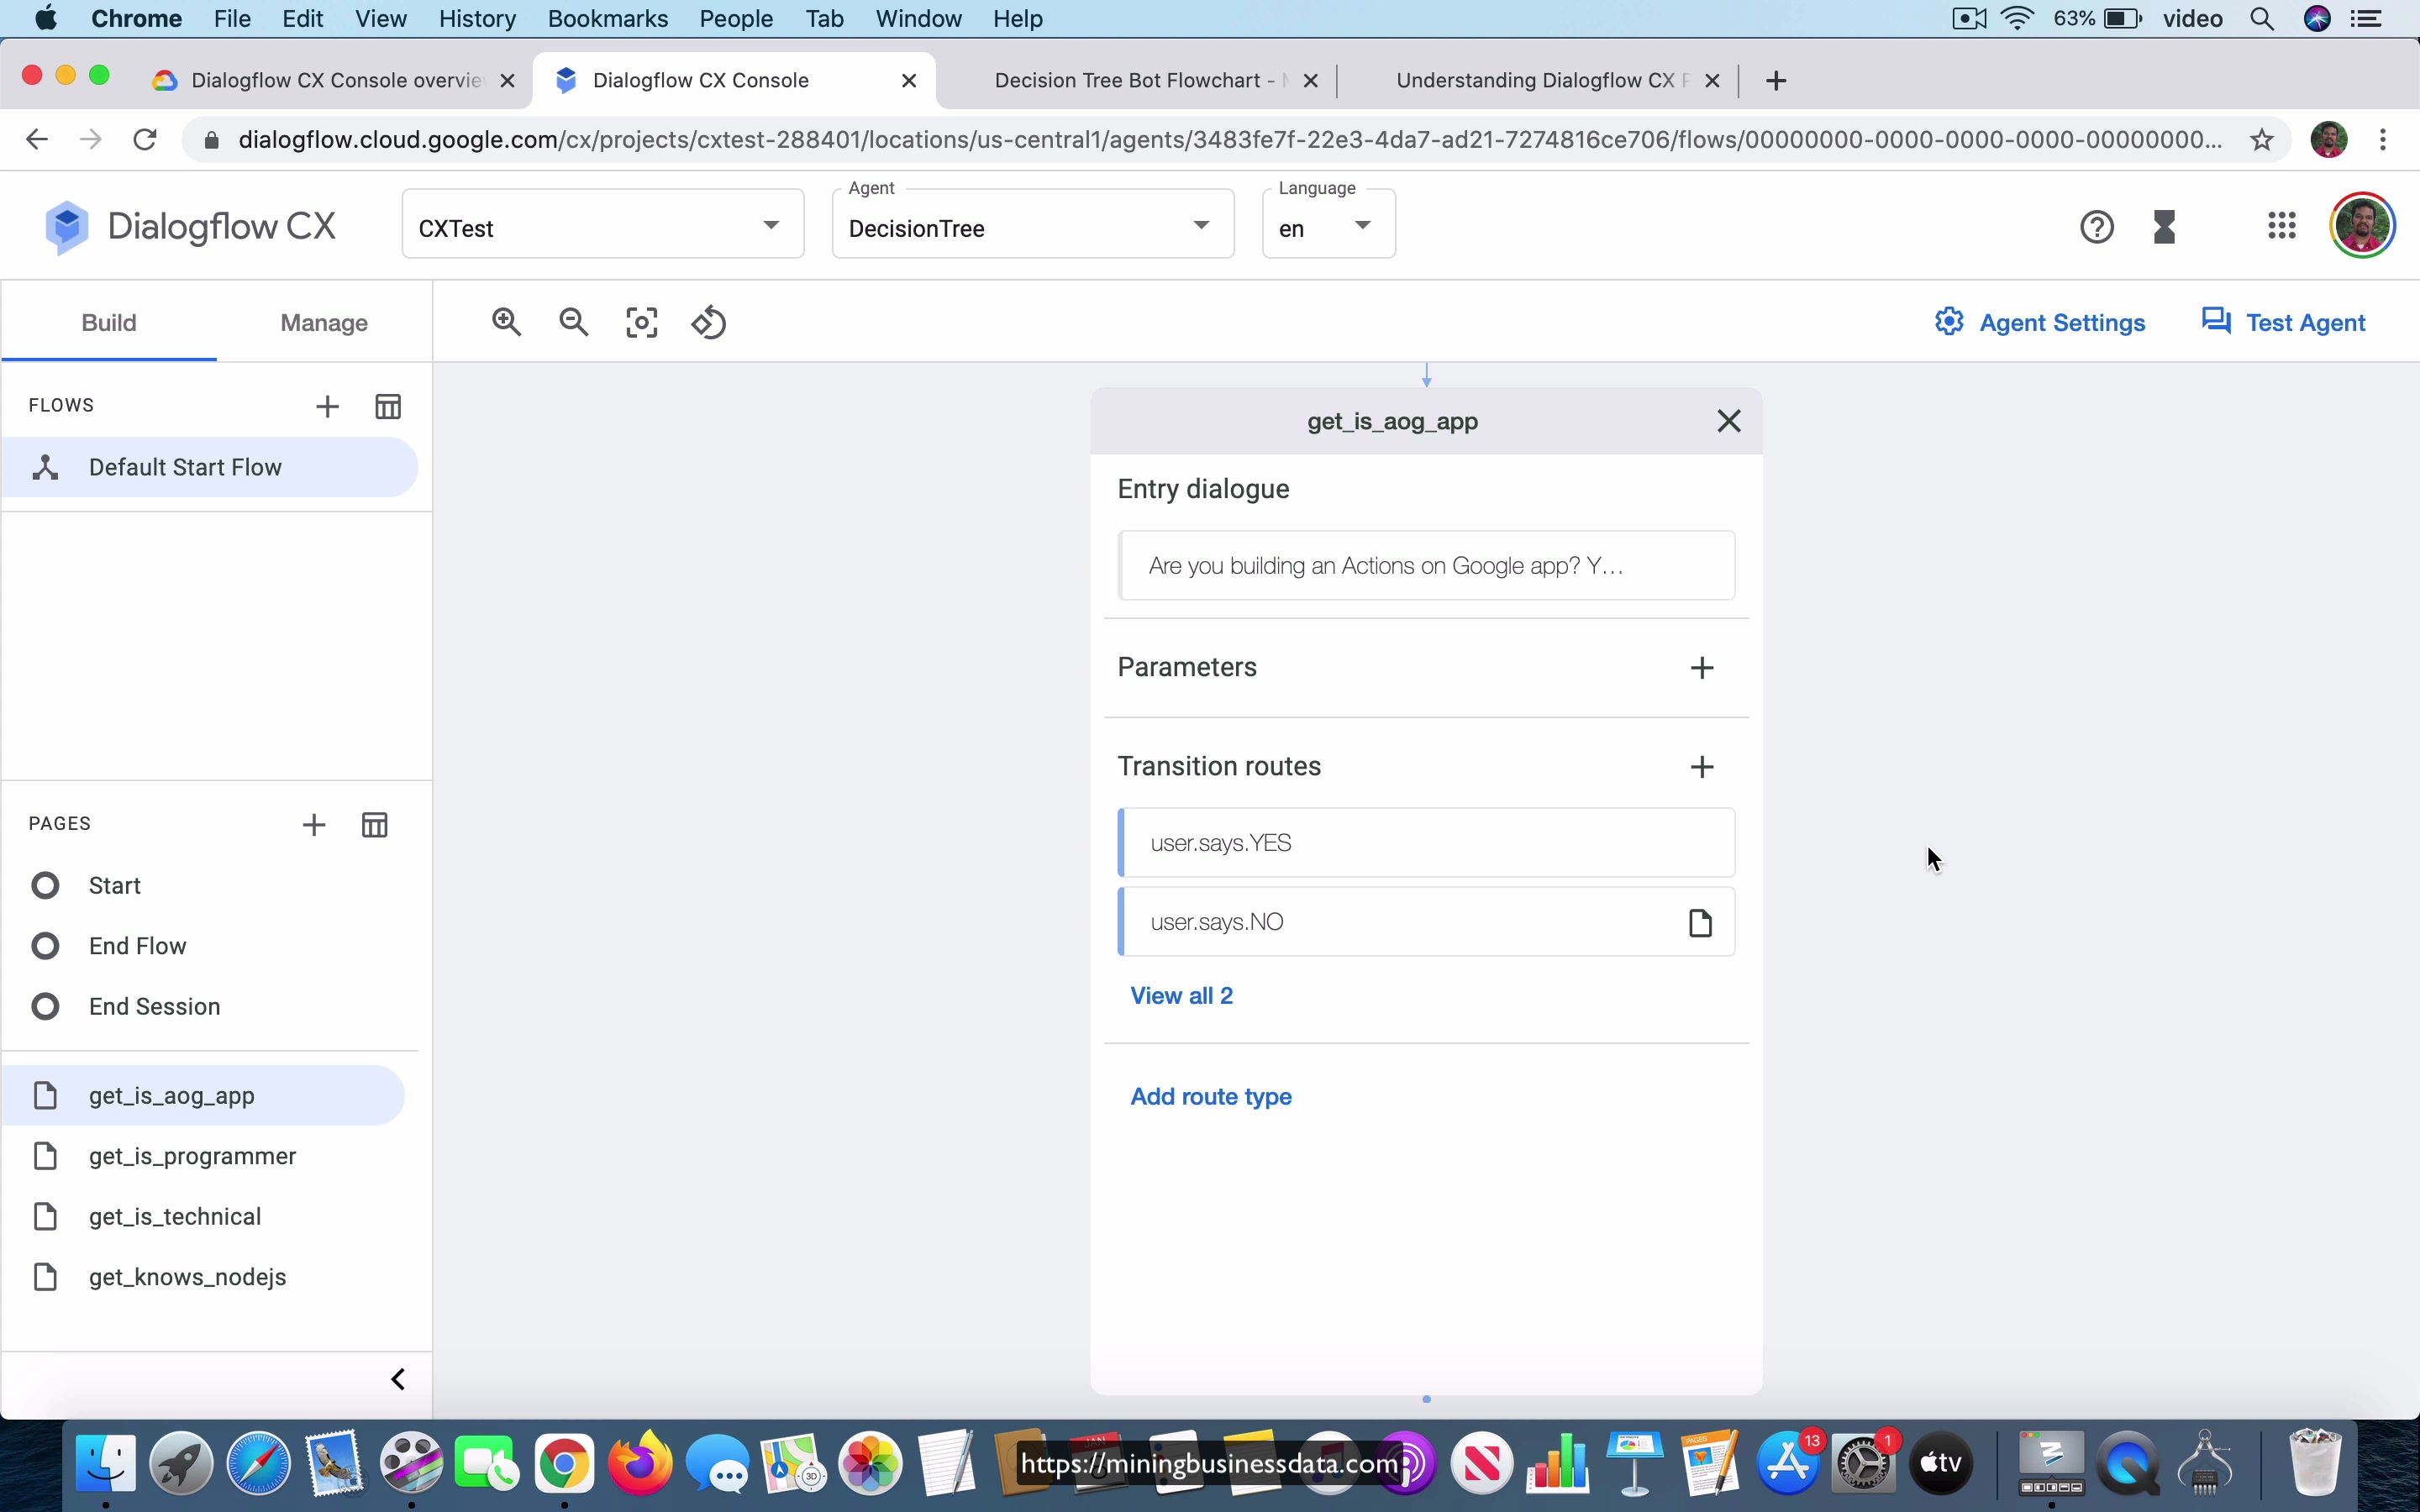
going to say are you building and actions right and the page it has to transition to it’s going to be a new page and I’m just going to call it get a is a or G just let’s call it something like that okay so let’s go ahead and save it and as soon as I save it you should notice that it’s created this new page called get is a or G app and based on the page name you you kind of know that the state it is in at that point is it’s asked the user if they’re building an is a or G app or not I just also want to point out that you could have done the same thing by putting the agent says here for example you could have said are you building
and Actions on Google app okay and in fact I’m going to save it over here and in case you’re wondering why I’m doing that it’s because that sort of puts everything into in one place so I am going to actually delete it from this this because otherwise it will you know appear twice okay so all we did now is as soon as the user said hello it’s going to ask the it’s going to transition to this page called get is a or G app and then it’s going to ask are you building and Actions on Google app that’s it so let’s go ahead and test it so it’s just going to say hello you can see that it’s taken the good day what can I do for you today from the first flow I’m sorry the first page the start page right and then it’s asking are you building an Actions on Google app and that actually is coming from the get is a or G app page
[02:59]
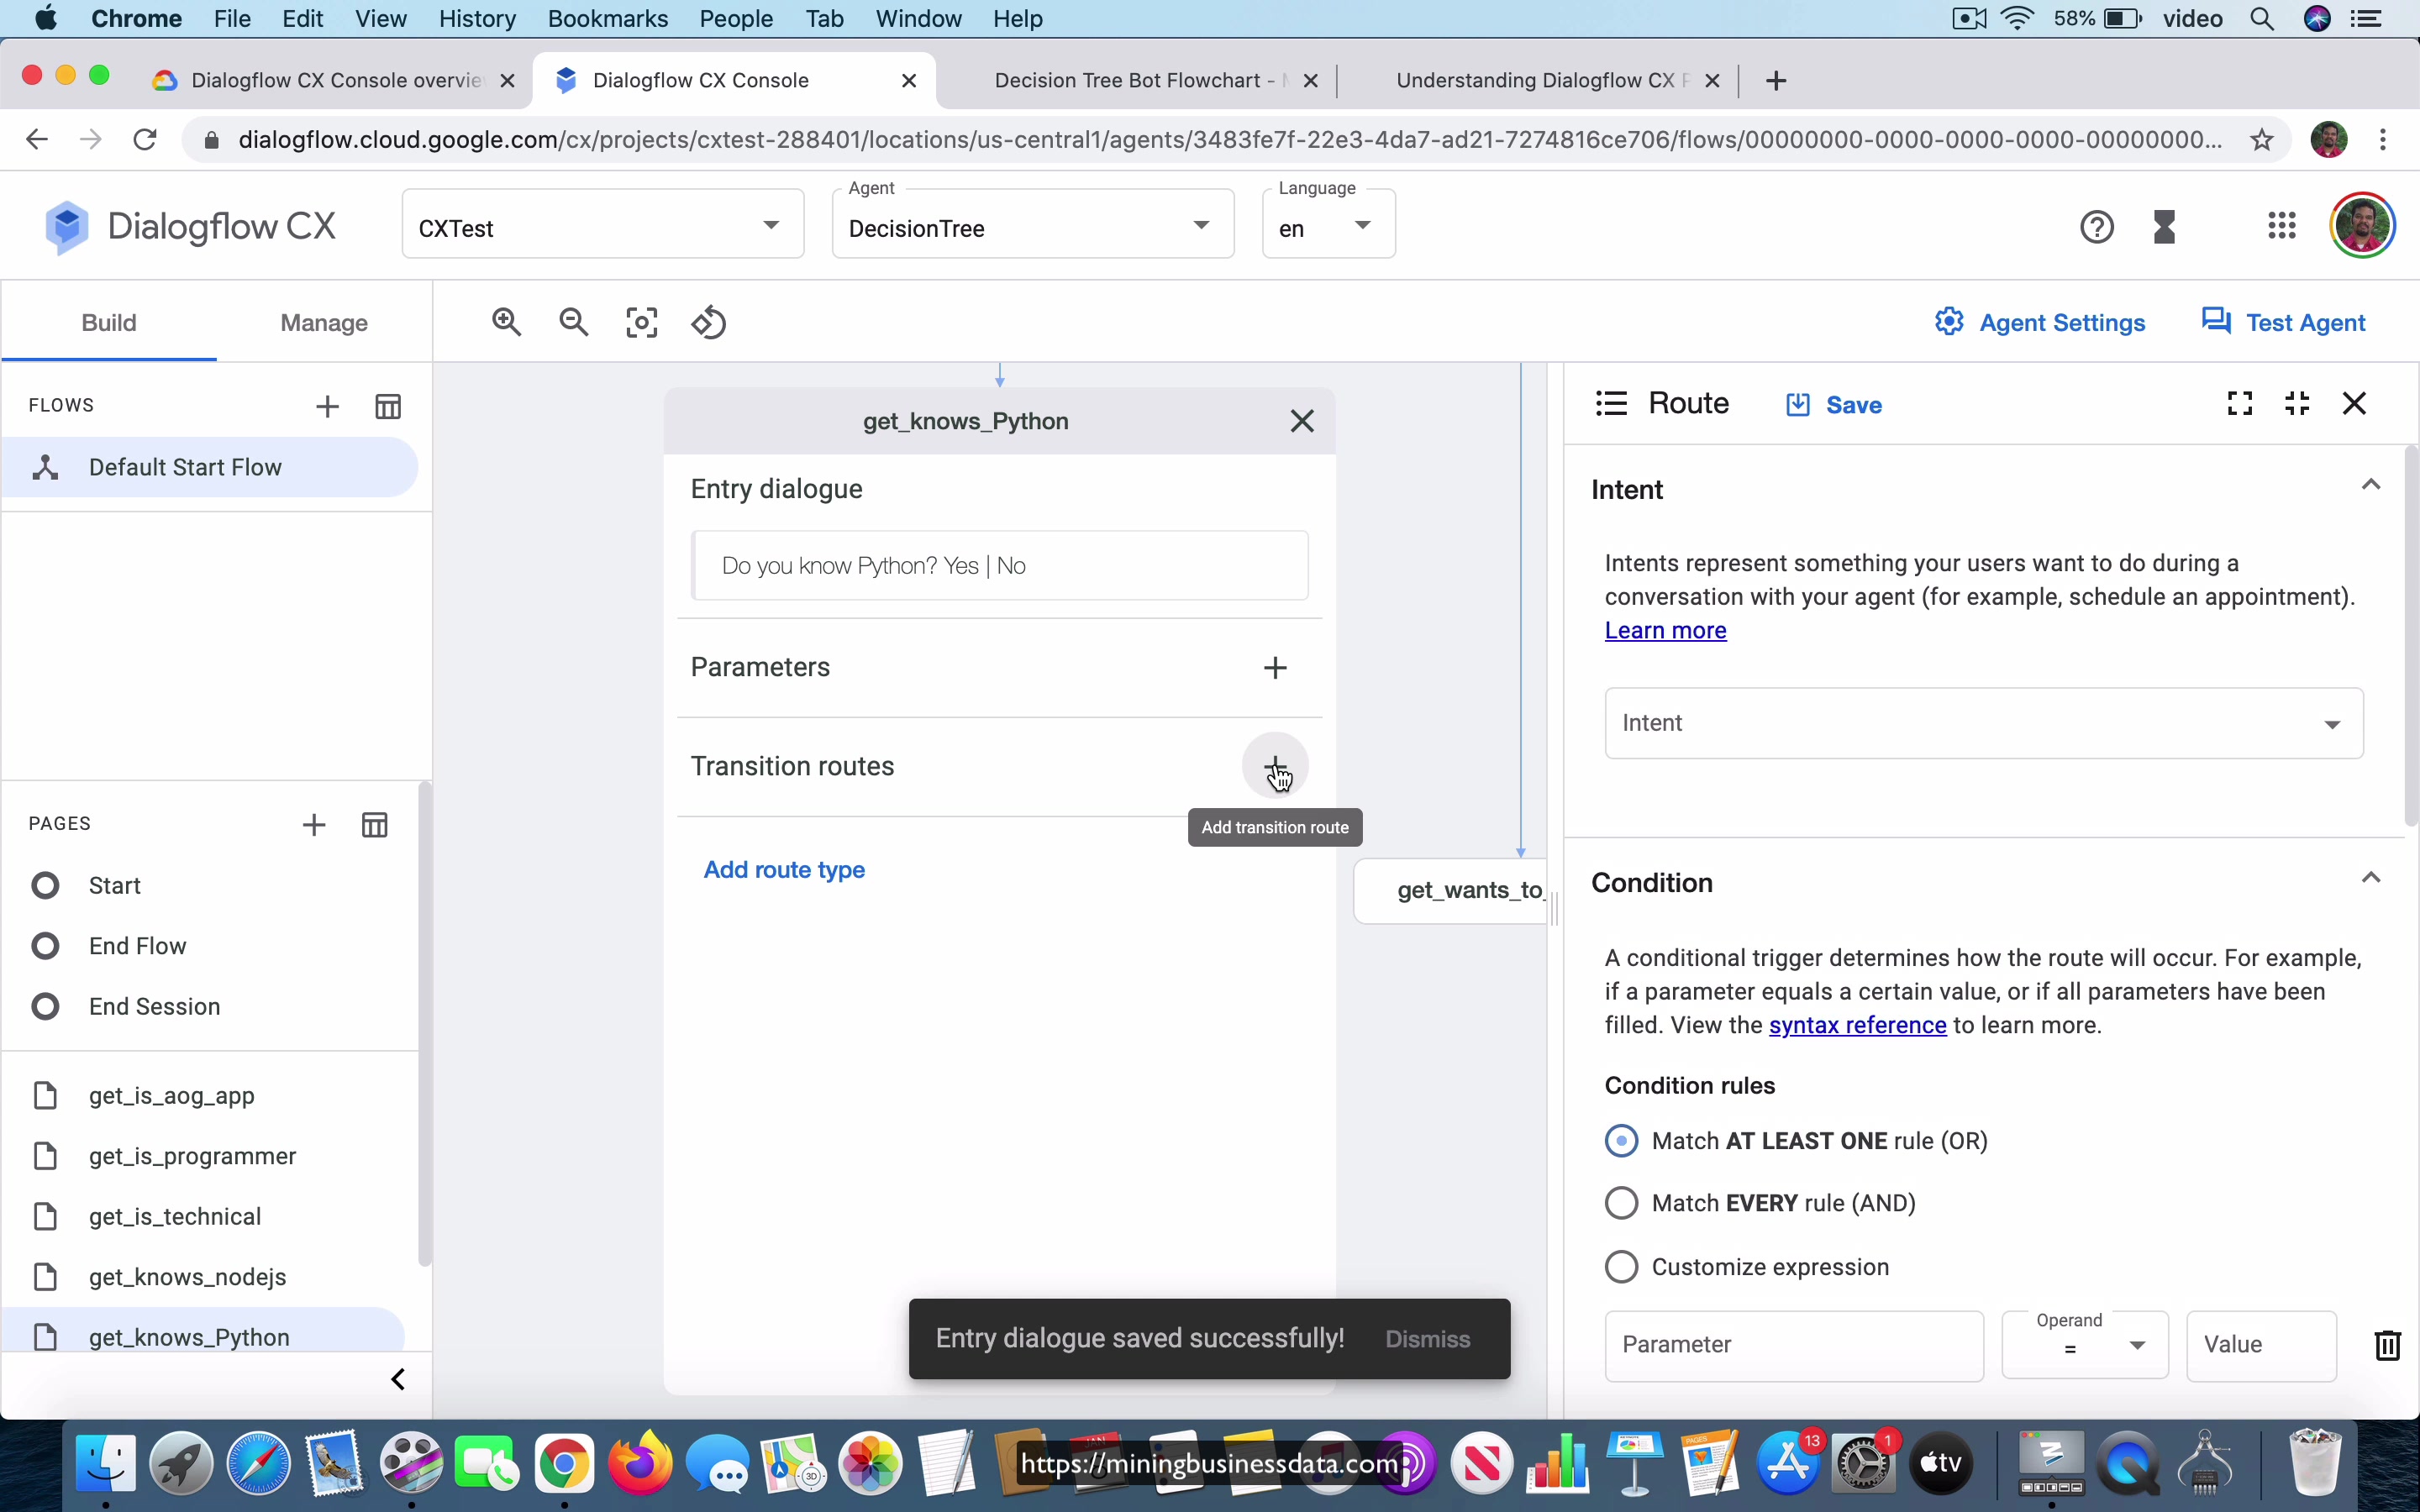
and also I want you to notice that it’s showing you that this transition has happened it’s gone from the default start to the get is a or G app which means that this is where the text is coming from okay so let’s close this and go back here so the user can only say yes or no and in fact I am going to edit this and just make it a little more obvious okay just let’s just put these pipe symbols with yes no in them just so that it’s kind of telling the user that you are going to make a binary choice here you will either choose yes or you will choose no okay and here what I’ll do is I’ll just add an intent okay and the new intent is going to be user says let’s do it like this user says yes okay and I’ll just have a single training phrase and it’s just going to be yes I’m going to keep this simple for now maybe you might want to say yes I am of course
[03:59]
or you know whatever variations you can think of but the point here is for now it’s just going to say the user is just going to say yes okay and if the user said yes and that is if they are building an a or G app I want them to you don’t have to transition to a new page at that point literally you can just have the agent say choose NodeJS because it has the best documentation for a or G apps okay just let’s just go ahead and say that I’m going to quickly go over and test it so it’s asking this and then I’m going to say yes so it says choose NodeJS because it has the best documentation pretty much what we expected till now right then what I’ll do is I’ll add another transition and here I’m going to say add new intent and in this case of course it’s going
[04:59]
to be the user says no and the training phrase is just going to be no let’s go ahead and save this you’ll hopefully you’re already seeing that this is you know CX is making your life much easier here because what is happening is that you have separated the response from the users input right in the case of ES the intent had both in the same place which means that you could not reuse the intent but in the in the future like in the next few minutes you’re going to see how the reuse happens but but let’s let’s come back to this to the flow that we have here and remember what I said I said that if you want it to be self-contained you don’t want to have this agent say anything here but instead you just want to go to a new page and in this case the new page is going to be if you go and look at the flowchart if the user says no it’s going to ask are you a programmer correct
[05:59]
so get is programmer right so that is this page is meant to ask if the user it’s going to get the information about whether or not the user is a programmer okay so let’s go ahead and do that and as soon as I do that just like last time you will see that it would have created this new page and the page is called get is programmer and here what I’m going to do is I’m just going to say are you a programmer and just like last time I’m going to say yes and no and in case you aren’t you didn’t know that you can do the shift and enter together and that will cause the line break over here if you are not familiar with that okay so that’s the thing the fulfillment is going to ask are you a programmer so it’s no sort of self-contained and here I’m going to add a route a transition transition route but because we already have declared these two user says yes
[06:59]
and user says no intense I’m just going to reuse it so I don’t have to waste my time like typing out another intent and if the user were to say yes let’s go back to the flow chart and just see what it says it says if you’re a programmer then it’s going to say do you know NodeJS right so if they say are you a programmer and if they said yes it’s going to ask do you know NodeJS so let’s go here so this means it’s going to create another page right and this page is get knows NodeJS okay that’s what it’s going to be okay so save this okay I think there was just some internet problem all right so now there’s the other page which got created whether the person knows NodeJS but we haven’t finished this flow yet so if the user
[07:59]
says yes that’s the flow but let’s say the user says no so we are going to add another route for that in this case right and if you look at the flow chart and the user is going to say no it’s going to ask another different question which is are you technical right so what we are going to do is we are going to create a page for that also and it’s going to say get is technical okay that’s going to be this the state also the that is the name of the page okay so you can see that I have these two new pages created there’s this get is technical and get knows NodeJS and remember that we don’t have this filled out yet so as soon as the user says so you know we are trying to get do you know NodeJS but we haven’t actually asked that question yet and the reason I want to put the I guess the response into this particular page is because it will be more self
[08:58]
-contained so it’s going to ask you know NodeJS and again you can say yes so you can say no let’s go ahead and save that and here let’s go here and if the user were to say that they do know NodeJS right it’s just going to ask them to use NodeJS fairly simple right so what I’ll do is I create another route and the user is saying yes here because this ends the conversation I will put it into this place itself right just says use NodeJS since you are familiar with it and it has the best documentation for Dialogflow okay so we just we just end it right there there is no reason for you to and by the way this is something which is important to remember you don’t actually do a page
[09:58]
transition at that point right so not doing a page transition and having this empty is the same as staying on the same page which is of course that’s that’s exactly what it is but also if you look at it in terms of the state machine and I know I’m going getting fairly technical here but in the case of a state machine staying on the same page in Dialogflow CX is equivalent to a self loop in the state machine where you go from one state back to that same state okay and if you are familiar with state machines I think you understand what I am talking about if you are not don’t worry about it too much but the point here is the fact that people can stay on the same page is a really big improvement in CX I’ll you’ll see why as we go along during the course because that sort of takes care of a very annoying issue which we
[10:58]
had in ES where if the user were to do something very minor and went off track it just made the conversation a lot harder to manage so we don’t have the problem in CX because you effectively have this no page transition possibility okay this basically you don’t do anything you just stay on the same page and that is an option in Dialogflow CX okay so we have done this what I’m going to do is just quickly go and test whatever we have till now so let’s start with hi and if I were to say yes so this is great so let’s do a hi again so this time I’m going to say no and it’s asking are you a programmer I’m going to say yes it’s asking do you know NodeJS I’ll say yes and it says use NodeJS since you are familiar with it and it has the best documentation for Dialogflow so you can see that till now things are working as we expect
Lesson: Some Housekeeping Tips
[00:00] So before I go on and fill out the rest of the flowchart, I just want to give you a little housekeeping tip. You can see that just by going through this flowchart, so I go to the start and you can see that there is a Default Welcome Intent. And you can see that it goes to this get is AoG app as one of the possible transitions. And then in the AoG app, I can see the transition routes which are possible. You can see there are yes or no. And it actually goes to get is programmer.
And then it again has two transitions, yes or no. And it goes to these two different pages. Just by looking at this, you should be able to get a fairly good understanding of how the state machine works from both the high level picture as well as the nitty gritty details. Now, it’s not perfect. For example, the best example of that is that you can see that in the get is AoG app, you have user says yes.
[01:02] And you know that in the case where they say yes, you do end the conversation right there. I do wish that there was a way to represent it. I mean, I don’t know how to do that. But I wish they had a way to represent it in Dialogflow where let’s say that there was a checkbox here somewhere. I just checked that box and it shows this to be an end of conversation intent. That would have been just superb for in terms of like visual overview.
But it’s not. And there are a lot of tradeoffs when you design a flow diagram like this. I’m aware of that. So I’m still very happy with what is here. And in the same way, you will also notice that because we know that this is a binary bot, there are either yes or no answers and there’s nothing else. You should be able to do a quick check fairly quickly to see that, okay, where am I missing the transition route. So in this case, yes, no are both defined.
[02:02] In the case of get is programmer, yes, no are both defined. And in the case of get no SnowJS, again, you can see that yes is defined, but no is not defined. Get is technical. Both of them are not defined. Okay, so let’s go ahead and fill out the rest. But I just wanted to show you all that because it’s a good way to see what is missing and fill out that piece of information. If it was possible to get that high level picture without having to drill down even to this extent, that would be something quite amazing.
I don’t really know how somebody would visualize that. But if someone comes up with an idea to do that in Dialogflow CX, I think that that would be even better. So that’s the housekeeping tip just before we move on to the next set of videos.
Lesson: Building the remaining pages
[00:00] Okay, so now that we have gone over the housekeeping tip, let’s just use it to fill out the rest of the information in the bot. You can see that get is programmer is already completed. Now I am going to go to get knows NodeJS. I’m going to add a transition route and this is where they say no and let’s go down and so do you know NodeJS? What does it actually do? If you know NodeJS, it’s just going to ask you to use NodeJS. Let’s just check to see if I’m on the right track.
Okay, so get knows NodeJS. Yeah, in this case the user is saying no but they’re not saying yes. Okay, so then it’s going to ask do you know Python? So let’s add a page for that.
[01:02] Get knows Python. That’s what happens if they say no. So we have defined both yes and no for get knows NodeJS and let’s look at the get is technical and here let’s add the agencies. Are you technical? Yes. No. Save it and add the transition route.
User says yes and if they were to say are you technical then it’s going to say okay let’s go for the no first. Let’s go for the no first to end the conversation because it’s going to ask the programmer to choose in that case. So it’s going to say ask your programmer to choose the language. Okay, so let’s just go ahead and save that and the other transition route I’m going to add is where the user says yes and if they were to say yes it’s going to ask would you like to learn the basics of programming and let me add a new page to indicate that.
[02:15] Get wants to learn programming. Okay, so let’s go ahead and save that. So we have filled out the information inside this get is technical completely.
Now let’s go to get knows Python and let’s come back and see do you know Python? The user could say yes or they could say no but both of them end the conversation right there. So let’s add this do you know Python? Yes and no. Save it. Transition route if the user were to say yes it’s going to ask them to use Python and save it and on the other hand if the user were to say no it’s going to ask the programmer to choose the language.
[03:16] Okay, I think I got that right. Let me check. Oh wait, no Python. Yes, use Python. No, oh it’s actually wrong. So if the if the user were to say no here it’s going to say learn NodeJS and use it.
Of course that’s because they are a programmer themselves so they should be able to learn NodeJS in fairly quick time and be able to use it and you can see that after that there are no pages coming out of this get knows Python because that ends the conversation. Okay, and get is technical we have both yes and no defined. Get wants to learn programming so you can see that we have here would you like to learn the basics of programming you have yes and no and these two are both ending the flowchart right so it’s going to first ask would you like to learn the basics of programming yes or no and let’s say that transition route user says yes and in the case where they say yes it’s going to end it by saying learn and use Python on the other hand if they were to say no it’s going to ask the programmer to choose.
[04:52]
Okay, so that’s the end of this decision tree I think.
[05:00] Let me quickly do the same housekeeping thing I mentioned before the start is only going to go from Default Welcome Intent to the get is a og app and there is nothing else but you can see that in get is a og app you have yes and no transitions defined is programmer has both, get knows NodeJS has both, get knows Python has both, get is technical has both and get wants to learn programming has both.
Okay, so that’s the end of the definitions for all the states and in the in other words all the pages that we have inside this start flow and that we should be able to see how it works and let’s we will be doing that in the next video.
Lesson: Identifying test Cases
[00:00] So in this video I’m going to do a few things at once. The first one I’m going to do is of course test what we have built, but as I’m talking about testing what we have built I am also going to demonstrate a nice feature in CX which allows you to do this testing inside of the Dialogflow CX console itself and the third thing I’m going to do is I’m going to just give you a tip that you can use which will help you as you design your so-called test cases and I’ll help you how I’ll help you choose these test cases which without getting too confused.
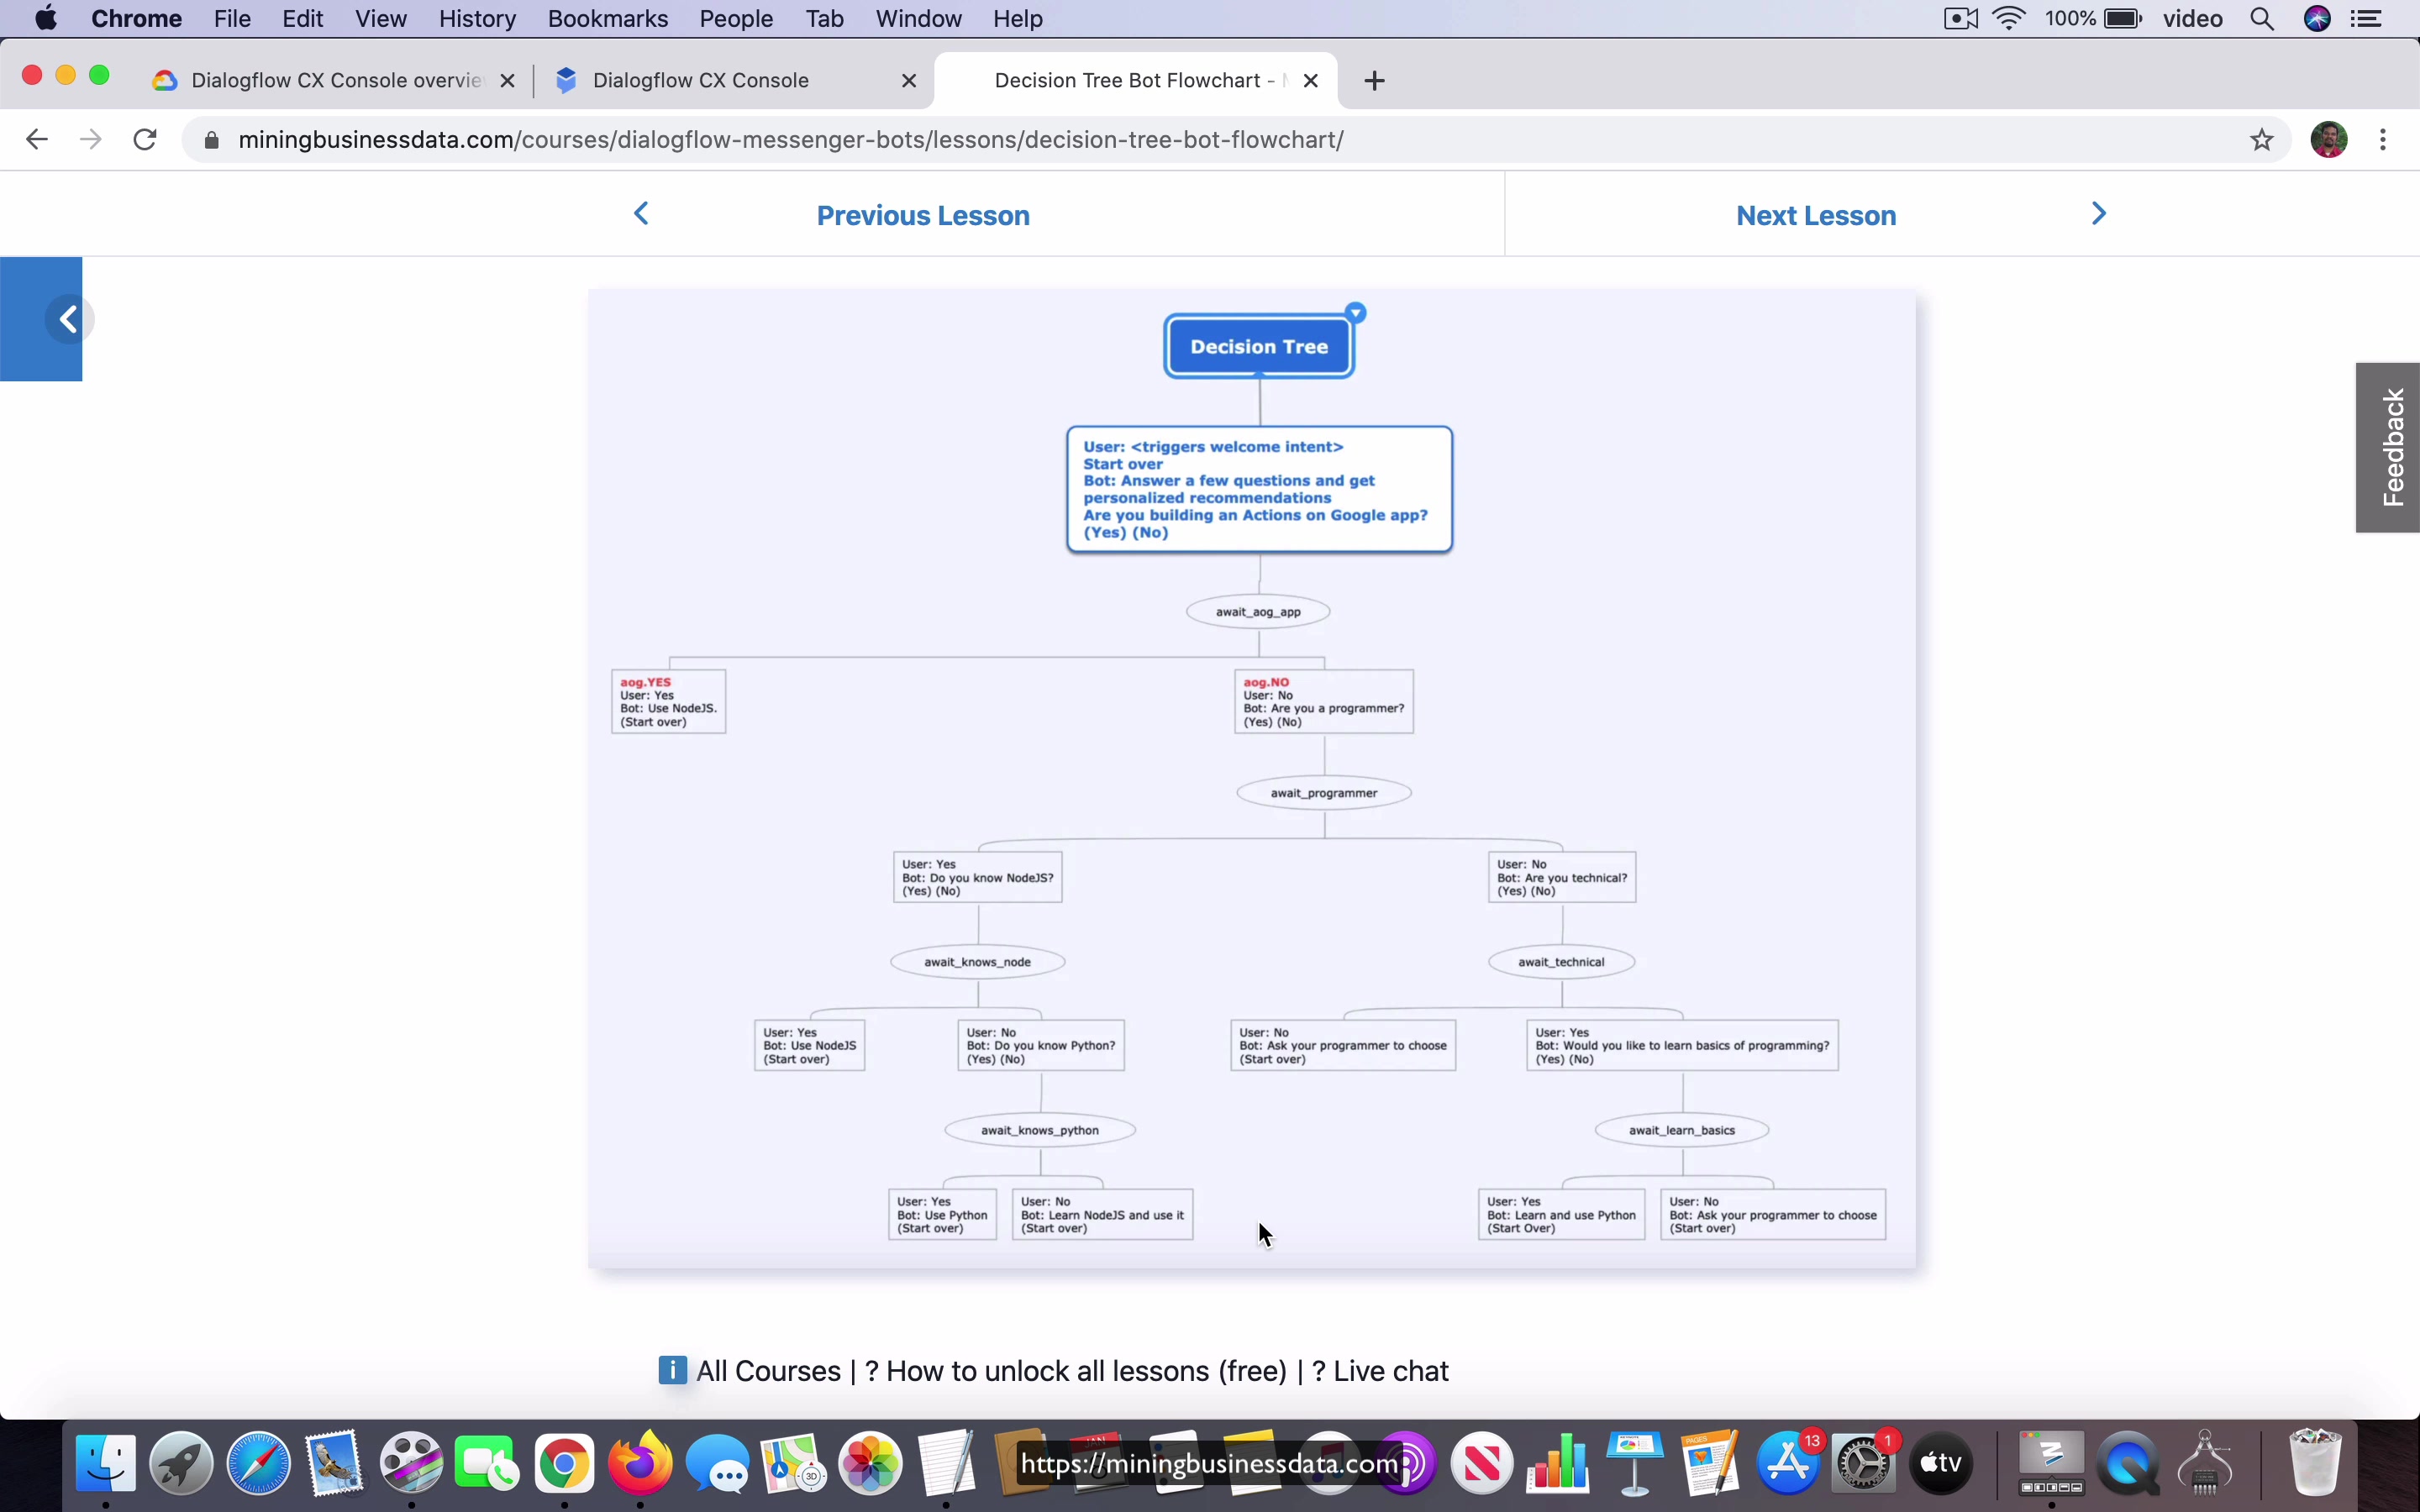
Let’s just put it that way okay, so the way you do that is you go to the you go to the flowchart we already have and you want to go to all the places where the flowchart ends. Now if you are familiar with graph theoretical terms you’ll know that these are called leaf nodes in the tree because you know this looks like an inverter tree and whatever is at the end it looks like a leaf in just the way leaves are usually considered as the ends of a tree.
[01:11] So you have these so-called leaf nodes, and you just take a look at all the ones that you have right so you have one here two three four five six and seven right so there are seven cases that you can design just by looking at this this flowchart you have right here, and just by looking at this tree diagram representation of that flowchart.
Lesson: Naming test cases
[00:00] So let’s take a look at how to use this flowchart and create the test cases. So you can see that when the user starts the chatting they’ll first say something like hi or hello or something like that and then it’s going to ask them are you building an Actions on Google app and then they will say yes. Okay, so the first test case is going to be the word hi or you know whatever you use to trigger the conversation and then you follow that up with just the phrase yes. Okay, and the second one will be hi, no, so this is like you start here and then you go to this one and you are going over here.
Okay, so are you a programmer and then it’s going to say this is yes and this is another yes. So this one is the second case. Okay, so they start with hi, no, yes, yes. Okay, and this one here will be this is hi, no, yes, no, yes.
[01:10] So you’re just keeping track of this by looking at the flowchart. Okay, and this one would be hi and no, yes, no, no. And then you have number five which is over here.
Okay, so this is this is going to be hi and then this is a no and then another no and then another no. Okay, and then you have six is going to be this one over here where you go with hi, no, no, yes, yes. And the final one is going to be this one hi, no, no, yes, no.
[02:08] Okay, so this is the this is a list of responses that you have to cover in your test cases. Okay, that’s why I made that list in my text editor. So let’s go ahead and try all of them. Okay, so let’s just go for the first one. It’s just going to be hi and yes.
So you can see that we have completed the first test case. Right, so what I’m going to do is I’m going to cut this and you will notice that it’s actually possible to save this test case. So I’m just going to give this as the name. Okay, there you go. That’s been saved. Okay, so the next thing I’m going to do is I’m going to take a look at this and also use it to go forward in the conversation.
[03:02] So I’m going to go yes, I’m sorry hi, and it’s going to ask this question. So it’s going to be hi, no, yes, yes. Okay, that’s what we are going to do this time. No, yes, yes. So you can see that this time it says use NodeJS since you’re familiar with it and has the best documentation for Dialogflow. Just for sanity check you can check to see if that’s what you are expecting over here and you went hi, no, yes, yes and you can see that it says use NodeJS. Okay, and that’s exactly what you are getting as the response here also.
So what I’m going to do now is I’m going to cut this and save this test case. Okay, it’s here. Paste this. You might want to name it in a suitable way. You don’t, you can’t always have, of course, these are all short phrases so in this case it just works pretty well, but there are obviously going to be situations when the user’s response is going to be a little longer and you might have to just abbreviate it to make it easier to understand what the test case is doing and of course there are going to be some situations where it’s going to be too long and it doesn’t even fit into the name of the test case.
[04:22] Use this as a guide and you don’t have to actually use this as the only way to create test cases. Just take it as a, you know, guide.
Take it as just like one possible way and find your own ways to do it based on what I have created here. You know, that’s that’s how I would put it. So I’m not going to go over all the cases. I will just do it off the camera. I’ll just do it for myself and then by the time I’m done I will have all these seven cases and then we will come back to the video recording.
Lesson: Running Test cases
[00:00] So now I have actually declared all the test cases as I mentioned in the previous lesson and you might have noticed that I made a change which is I put a prefix with the number 1, 2, 3 etcetera indicating the branch, the leaf number if you go in this counterclockwise order. This is 1, this is 2 and this is 3 and so on and the other change I had to make is I had actually copy over from the old agent to the new one called decision tree bot because apparently the for some reason if you choose a location as US West it is not able to run the test cases.
I had to change it to, I changed it to global, okay. I am not sure if that is just a bug or it is how it is but in case you find that your test cases are not working as expected one of the things you might do is when you create your agent you select global as the location for the agent. In any case you can now see that I have these five leaves all turned into test cases.
[01:05] If I were to click on one of the test case you can notice that it just has this you know the it just shows you what the user typed and what the bot responded with and I ran the test once and this is the response or rather the result of running the test. With this what has happened now is that I have created a set of test cases. This is the feature that I was going to show you.
Now, we have created a bunch of test cases one through seven based on the leaf nodes of this flowchart and of course you do see that if you were to reach the leaf that means you have tested all the paths which are available in this particular flowchart, right. Now, I do not want to get too deep into this subject because it is somewhat mathematical but I will mention that using this strategy will not work if you have too many of these branches because then you will run into what they call as an exponential problem which is to say that from the root of the tree to the leaf of the tree there are in theory exponential number of paths and if you try to cover all of these with a test case as your bot becomes very large I think that that is pretty much impractical but for a small bot like this it is definitely practical and that is what we have done.
[02:29] Now that you have all these in a sequence and available you can just like run all these test cases one by one and of course you do not have to do anything you just click on this button over here and you can actually see that Dialogflow CX is going to run those test cases for you.
By following this methodical approach right what you did is of course you first created this flowchart without this flowchart it would have been quite hard for you to visualize this everything in this bot and creating this flowchart and then using this flowchart and of course this is remember this is an ES bot this flowchart itself was created to create the bot in ES in the first place right but the same flowchart is definitely handy when you are creating your CX bot for the most part.
[03:23] Now if everything could have been done with ES then there would not have been a reason for Dialogflow to create CX right so but you will still see that having a flowchart in place will actually make your bot design much much easier even though you do have a visual state machine in Dialogflow CX in other words even though there is this visual state machine which shows you all this all the stuff in CX you will still be able to actually get a lot of you know you will still get a lot of assistance by designing your mind map of your flowchart the conversation flowchart outside of the Dialogflow CX and you can see that the other extra benefit you get from doing that is that it also provides you an easy way to come up with a list of test cases which you can use to test your CX bot okay so that’s the other thing I wanted
[04:23]
to show you so that ends the lessons for the decision tree bot and we will be moving on to the next bot in the next lesson