02 Dialogflow ES vs Dialogflow CX: Get user name
Lesson: Can you build this bot in Dialogflow ES?
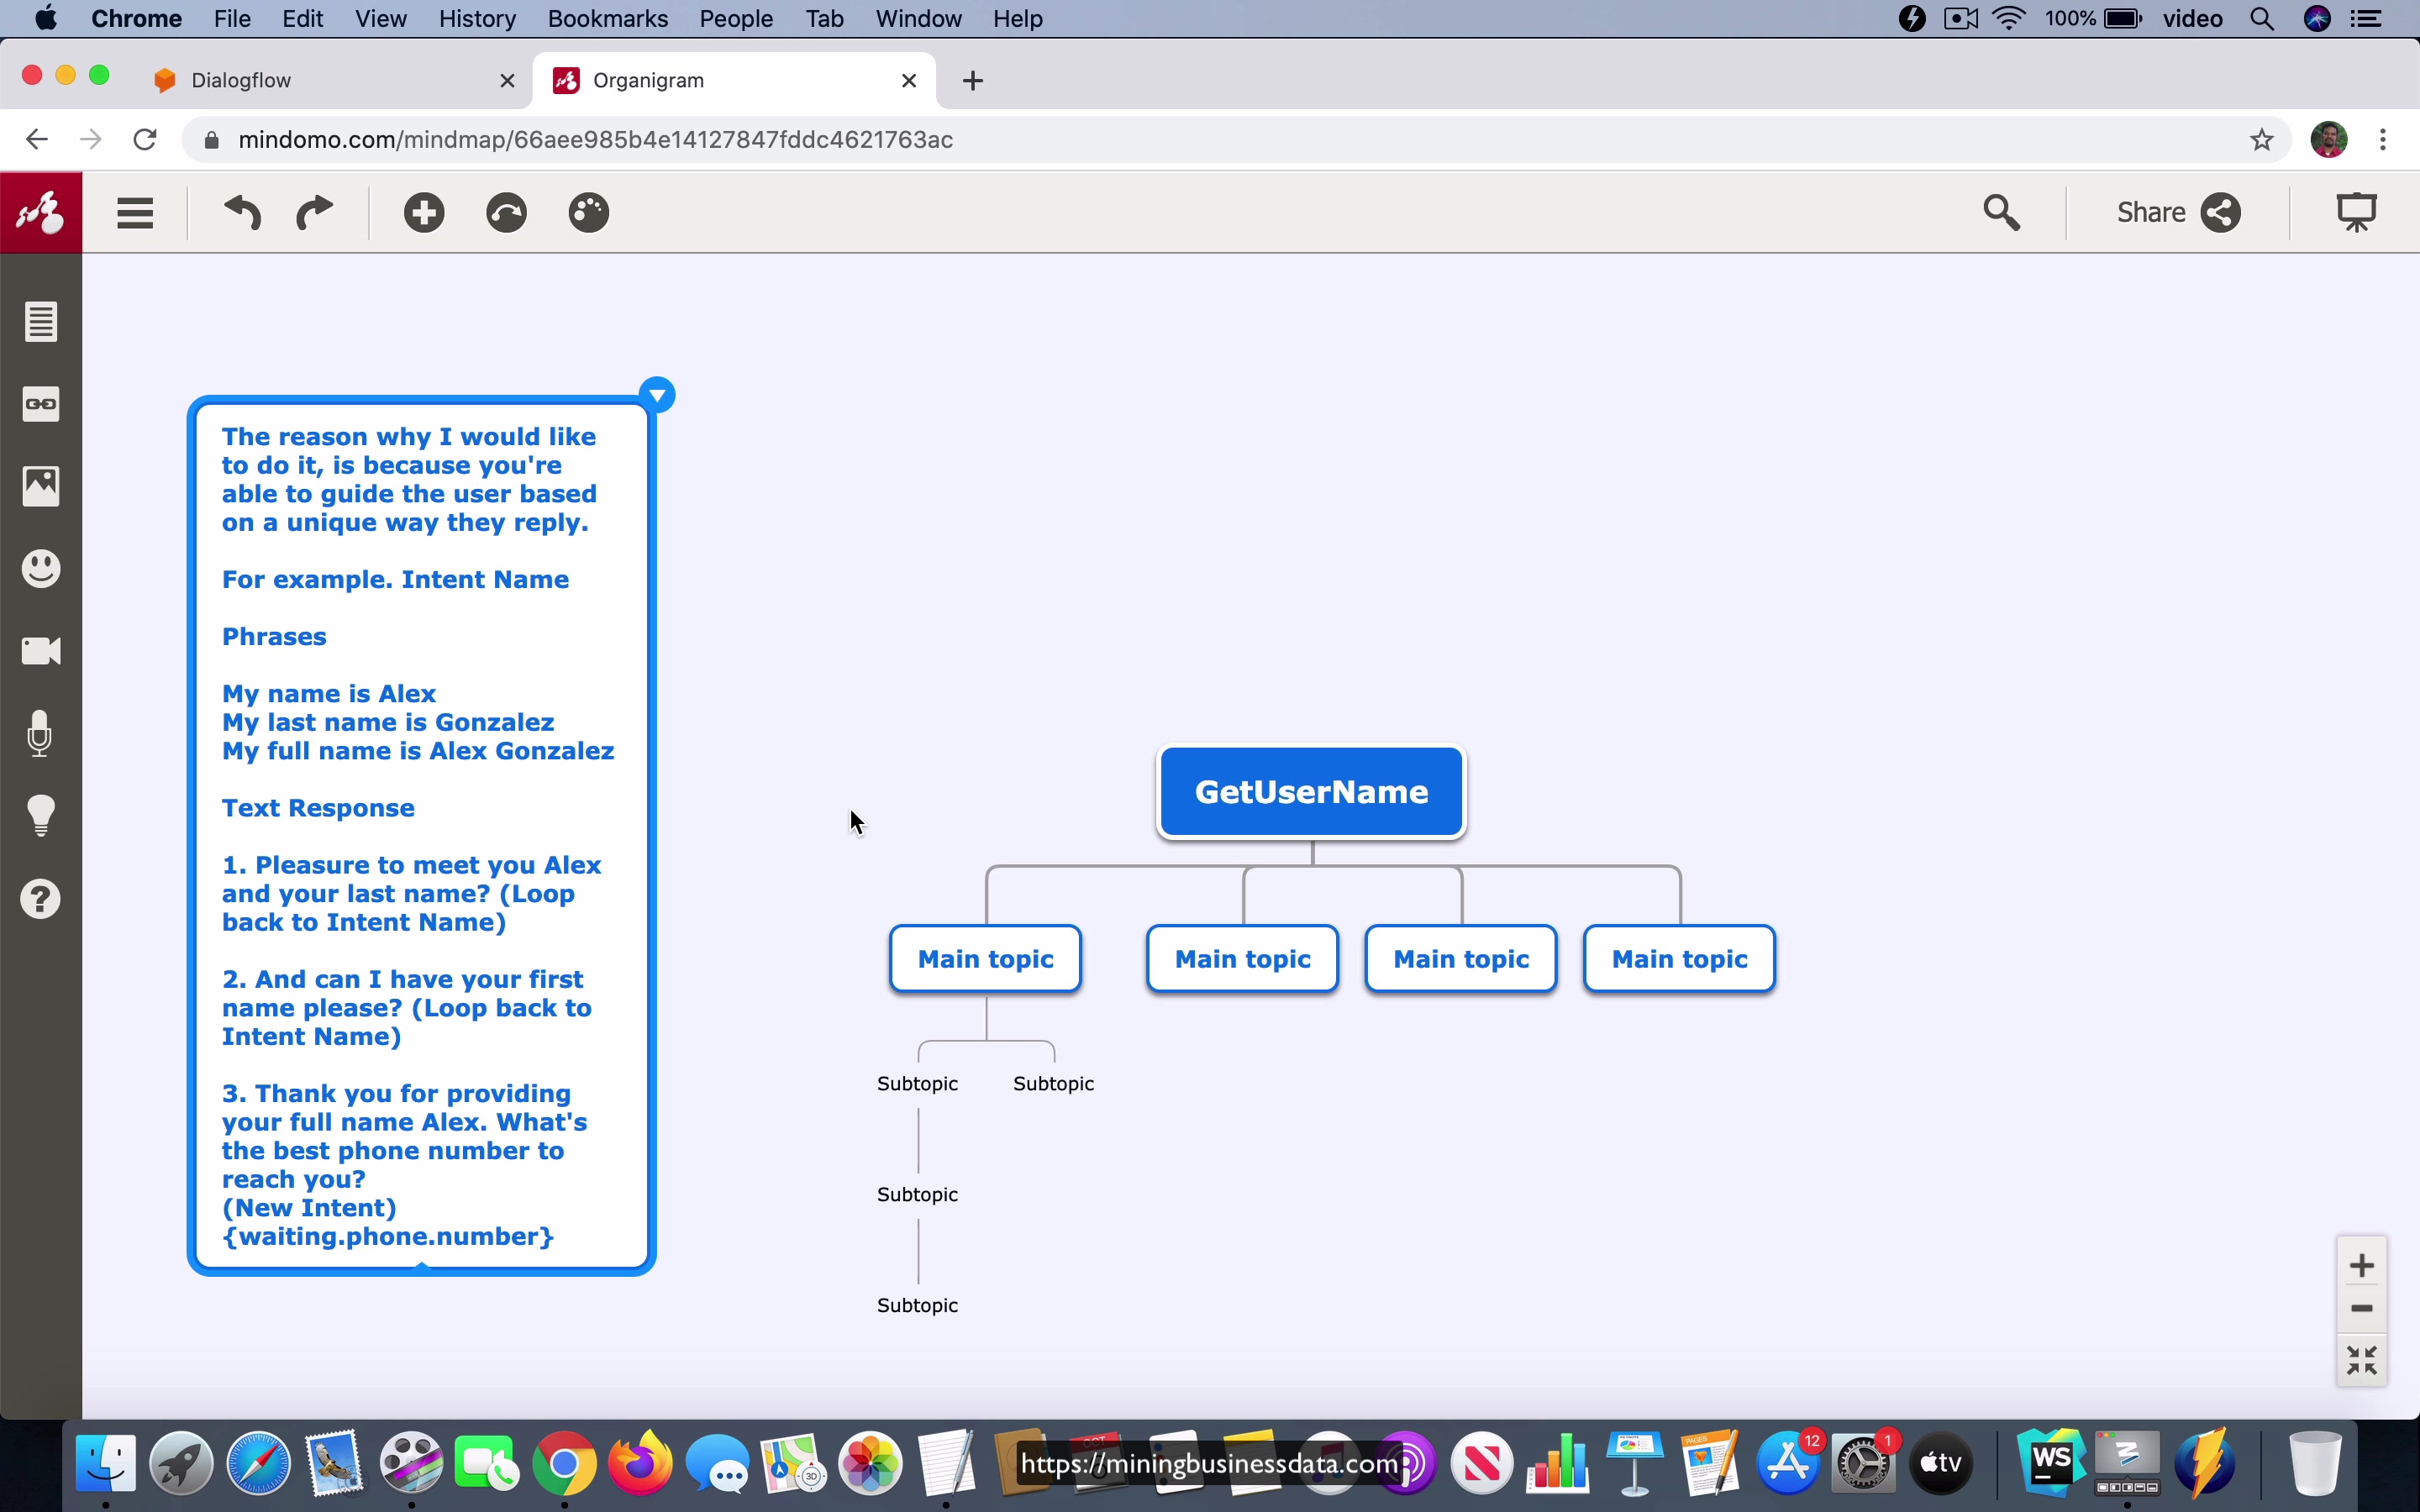
[00:00] So recently I got a message rather an email from one of my students who’s already in the courses and he was asking if it’s a good idea to use Dialogflow CX for a particular type of flow and the flow that he was interested in actually goes like this. So the first thing is that you have the bot asking for the user’s name and the user could say one of three different types of responses. They could say my name is Alex here, which is the first name, or they could say my last name is Gonzalez, or they could say my full name is Alex Gonzalez, right?
So that’s like three different variants where they either give the just the first name or just the last name or the full name, which includes both the first and the last name. And if they provide the first name, we are going to prompt them for their last name. If they provide the last name, we are going to prompt them for their first name.
[01:02] And if they provide the full name, we will just move on to the next step in the conversation, right? So here, for example, if this phrase is my name is Alex, the first one, which is, it’s going to say a pleasure to meet you and your last name. And then if it was a second one, it will say, and can I have your first name, please? And then for the third case, it’s just going to say thank you for providing your full name. What’s the best phone number to reach you? All right. So the question that the student had was, should I use Dialogflow CX for building a bot like this?
Now, you have actually, in my view, you have three ways to do this. The first is you use Dialogflow ES, the original version of Dialogflow ESsentials, and you use slot filling. Now, actually, it’s a really bad idea to use slot filling for a flow like this. And I’m not going to go over all the reasons, but I have actually written about it in many different places.
[02:03] And you can go and take a look at my website. But the key thing is that when certain type of entities are used, like names, when Dialogflow can’t identify it, it will go into an infinite loop. And yes, you can cancel it. It’s not actually an infinite loop, but it’s just too hard to design your conversation around slot filling for a use case like this. All right. So the next possibility is use Dialogflow ESsentials and don’t use slot filling, but just use regular conversation flow where you have many intents to handle these different scenarios.
And then the third option is to use Dialogflow CX. Now, the way this student asked me this question was whether it’s even possible to design a flow like this using Dialogflow ES. And I mentioned that, yes, it’s easily possible.
[03:02] It’s not very hard to design a flow like this. And that’s exactly what I’m going to do in the next video.
Lesson: Flowchart for the ES Bot
[00:00] So let’s get started. The first thing we are going to do is delete these and we are going to start the flow where you can say that the user will trigger the welcome intent and the bot is going to say may I have your name please. So now the next possible options we have will be the user is going to say my name is Alex and the bot has to say pleasure to meet you Alex and your last name or the user might say my let’s just copy from this say my last name is Gonzalez and then the bot would say can I
[01:22]
have your first name please and then the user could also say my full name is Alex Gonzalez at which point the bot should say thank you for providing your full name what’s the best phone number to reach you.
The next thing it is going to do is it is going to ask for a phone number. We will have something like this await underscore phone underscore number as you know.
[02:05] The thing is as we are designing the flow over here what we should first do is we will add the names of these intents. Here the user is providing their first name and let’s make it bold and I also usually like to provide a color for the title to just so that we can distinguish it easily and in this case the user provides last name and in the same way let’s provide it the color and finally this is the case where they are providing the full name and we have this color.
[03:02]
Okay. Notice one thing as I go through this by using this flow charting technique that I have you know explained in my material you can see that it’s actually very easy to go from just looking at the different ways the user might say certain things and the specific you know the way the bot should respond and all that you will be able to take that and write out those sample conversations and just start designing your whole bot just based on that information.
That’s the big strength of this using this technique that I have described for creating these flow charts. Now, you have all these are intents as you know. What I am going to do is I’m going to make sure that I give them the right shape.
[04:00] These should be rectangles and this is a context. What I’m going to do is I’m going to shape this as an ellipse. Right. If they provide the first name the next thing that you are going to do is you’re going to await last name and the thing is at this point okay we don’t have the context defined here which would actually make it a lot easier.
You might have something like this await underscore name as the context at this step and then we will make sure that we use the right shape and remember that this has to be a child of this in the flow chart that is there. This is this is exactly what we want because we are at this point as soon as the user has triggered the welcome intent the bot is going to ask may I have your name please and then it’s going to await the name and then either the user could provide first name or last name or full name and if they provide the first name it’s going to go to await last name and at that point the user might say something like this my last name is Gonzales and remember that the bot has to effectively go back to this step await phone number.
[05:34]
Okay. What you will do then at this point is you will copy this and it will say thank you for providing your last name and then what’s the best phone number to reach you and one of the things that I mentioned is that you want to number these contexts when you have to have these flows.
[06:05] You will just say one. This is like context number one and then you’ll just go to context one. This is effectively saying that at this step your output context is going to be await phone number which we have already declared over here. What I do the convention that I use is to just use a circle for this to indicate that it’s a connector as a context and then I’ll use a rectangle because this is an intent and here the intent should be provides last name after first.
You can name it whatever you want as long as you can make sense of the intent that you are describing and this one this is the context. We are going to change the shape to ellipse and you can imagine that the flow you will have over here will be very similar because here you will be saying await first name and then user will say something like this.
[07:05] My first name is Alex and the bot will say thank you for providing your first name. What’s the best phone number to reach you? And then you have the same thing because it’s going to go to that same context and there you go. This will be an ellipse too and this would be rectangle.
That’s the basic idea. I haven’t added the names name of the intent for this one provides dot first name after last. All right. This is the way you design this flow and this flow chart explains like what is going on if the user were to provide just their first name it will ask for the last name await the last name and then in the next step assuming that they provide the last name properly it is going to ask for the phone number and then point to this context.
[08:14] On the other hand if they first give their last name alone it will then ask for their first name it will await their first name and then assuming that they provide the first name properly it’s going to thank them and then it’s going to ask for the phone number and then point back to this context over here.
That’s the flow diagram for what we want here and what I want you to notice is that if you were to imagine like this whole thing being a part of a flow right when this flow ends you would have gotten both the first name and the last name and then you would be waiting for the user’s phone number and the context which would be active at that point in the conversation would be called await underscore phone underscore number.
[09:02] In our way in our I guess you can say that the end result that we are looking for in our case is we want both the first and last names to be collected and we want the await underscore phone underscore number to be set as the active context when we are finished with this particular flow and in the next video I’m going to show you how to actually do this in your Dialogflow console.
Lesson: Defining the intents
[00:00] So now I’m here in the Dialogflow console and what you see here is that in the Default Welcome Intent, I removed the usual response and I replaced it with can I have your name please, which is what we have here. And the output context is set to be await underscore name with a single, with a lifespan of one. All right. So now let’s create a new intent and all we have to do really is just effectively take this stuff and you know, copy pasting is probably enough because if you have defined your flowchart with a lot of detail, you will find that it’s not going to be very hard for you to copy over that stuff into your Dialogflow console.
So here the input context is await name, the output context will be await last name. This is what we have, await name is the input context, await last name is the output context.
[01:03] The user will say something which indicates that they are provided just their first name. So it will be like my name is Alex and it is taken as a given name, which is great. And the response would be, as you can see, you have to echo their name to them. So you will say something like this, pleasure to meet you. Instead of Alex, you will of course, you’ll have to say dollar given name and it says pleasure to meet you, given name and your last name, right?
So that’s pretty much it. You make sure we got it right. Let’s now go to the next one, would be provides dot last name. Once again, the input context is going to be await name. But in this case, await first name is going to be your output context, right?
[02:02] And it’s going to be something like this. My last name is Gonzales. So it did not take this, accept it as the last name. What I’ll do is it’s sometimes much easier if you just go for last name, the Dialogflow understands very well like that. And you will find that that will still take the last name, the Dialogflow does understand.
In other words, it may not do the annotation perfectly on all the last names. It might want to get somewhat more conventional or common last names. But the actual result will be that it will identify last names as long as it’s a reasonably common last name. So in this case, the response is going to be, and can I have your first name please, right?
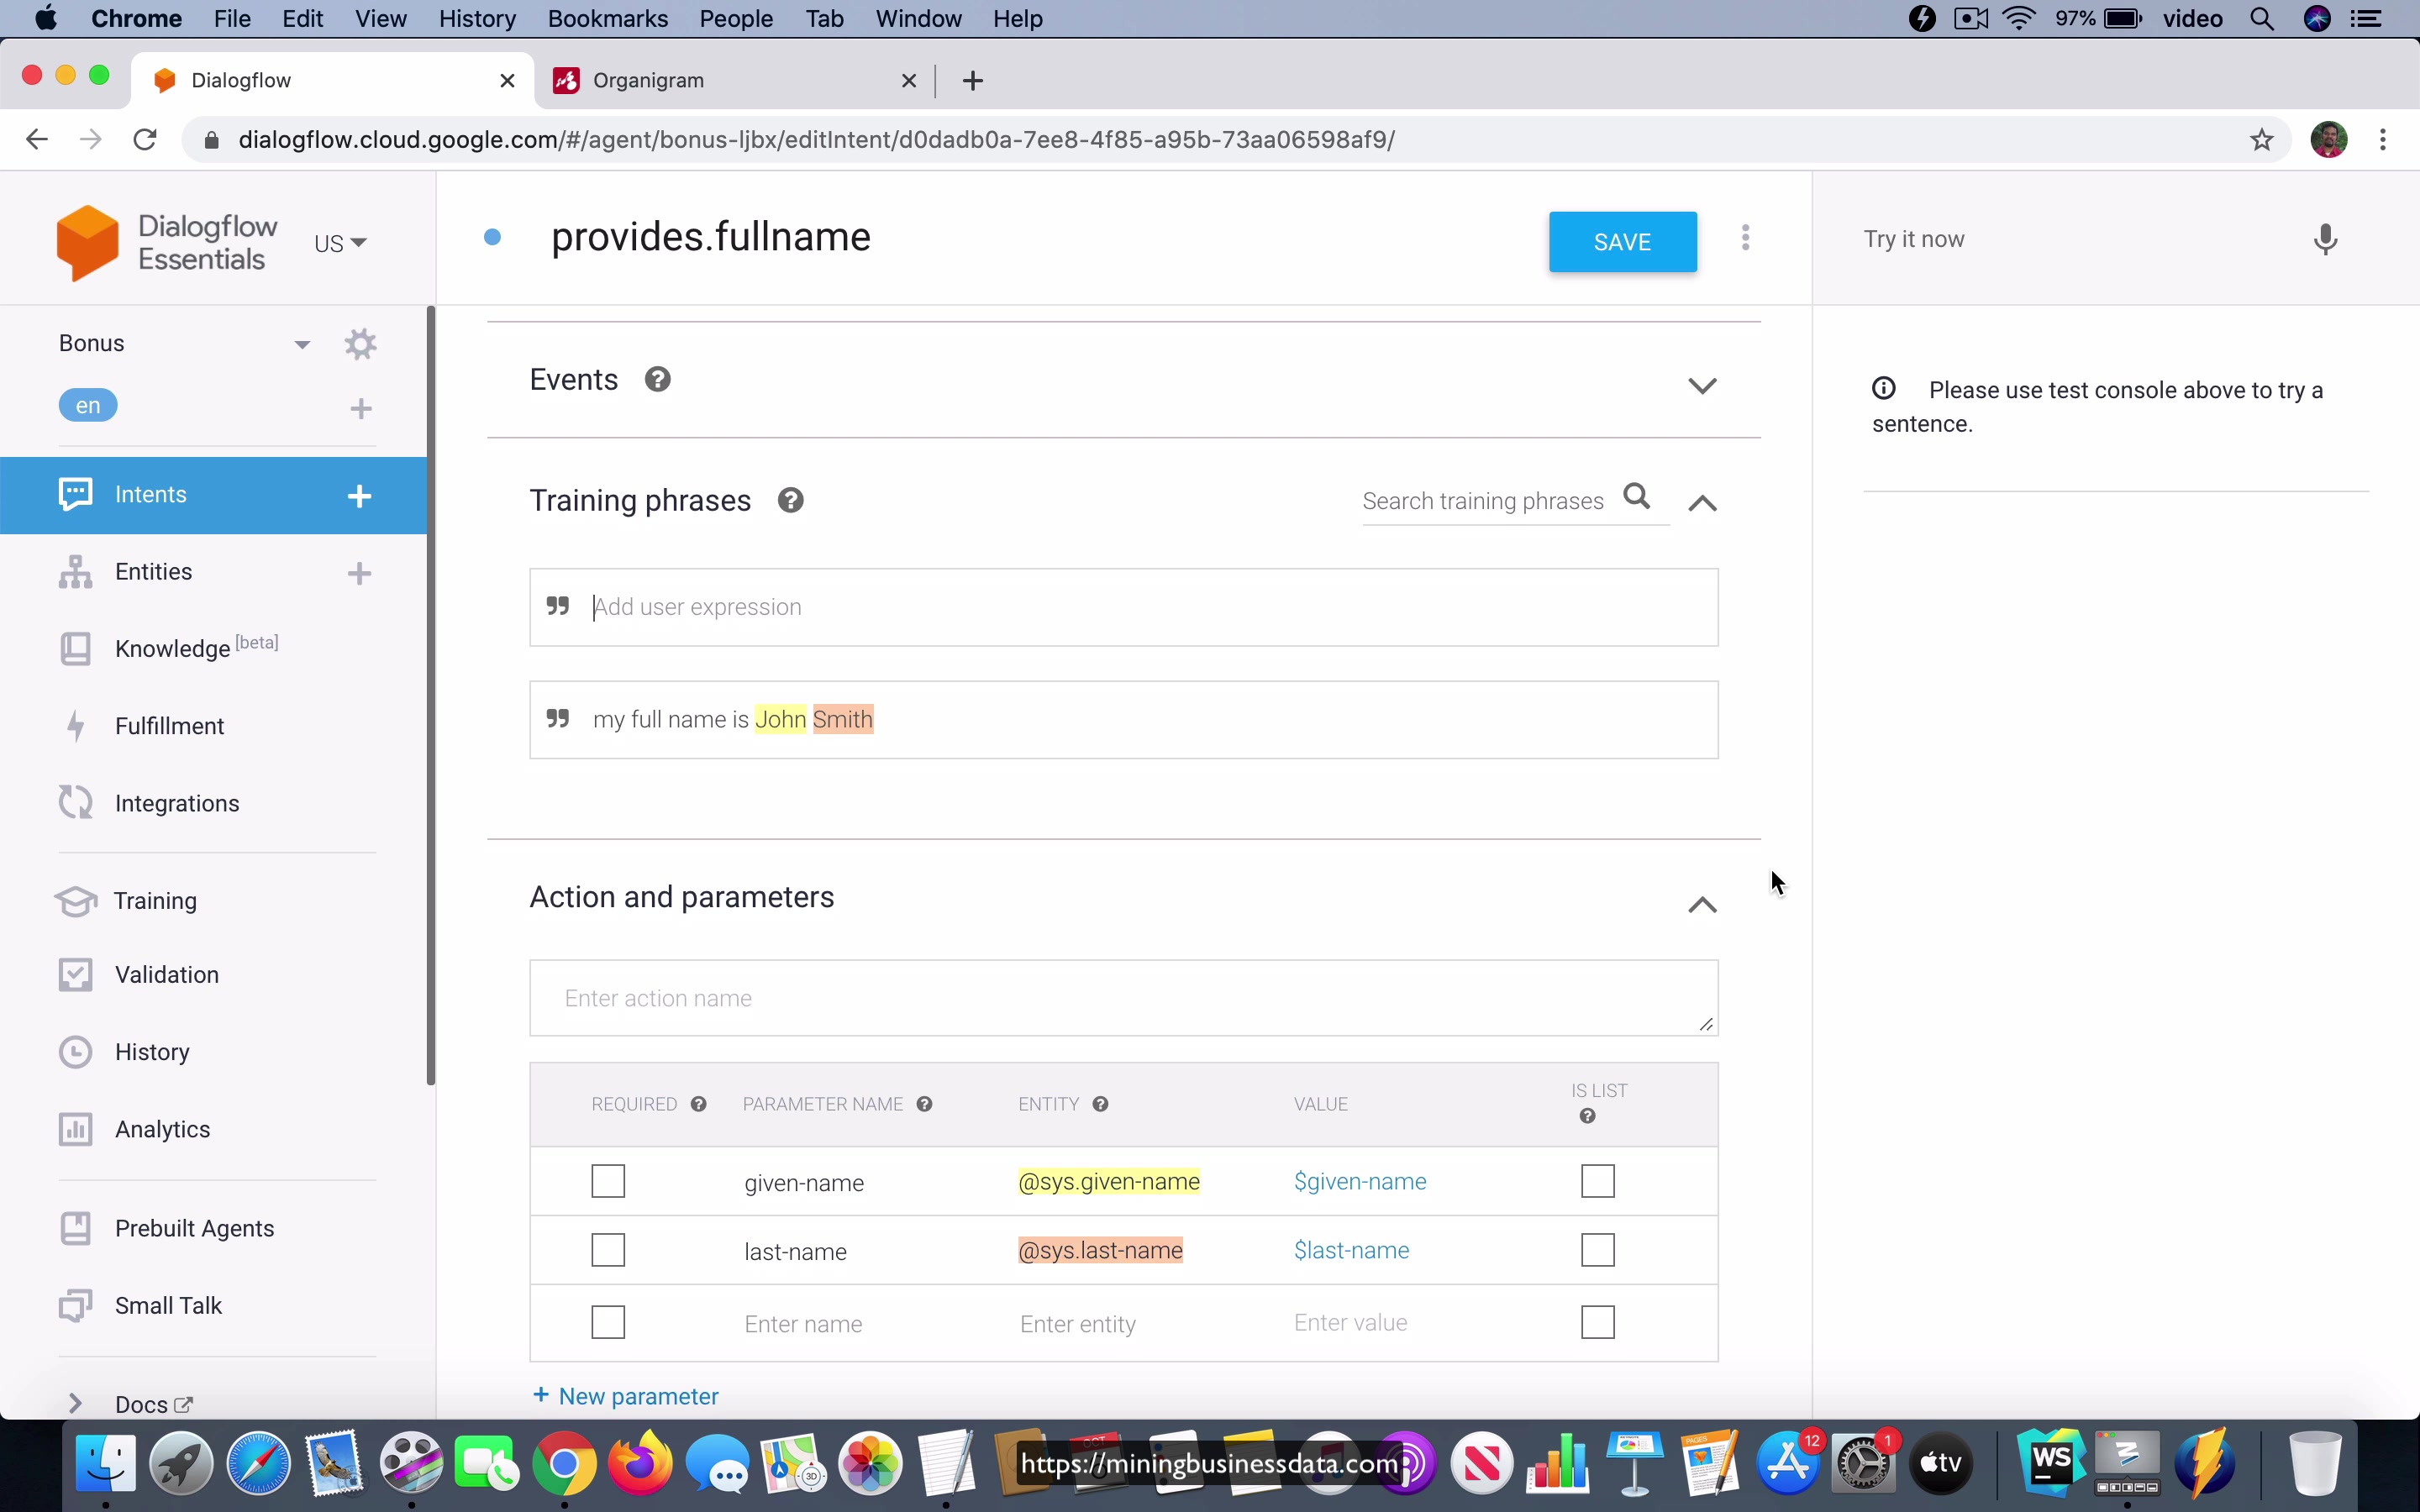
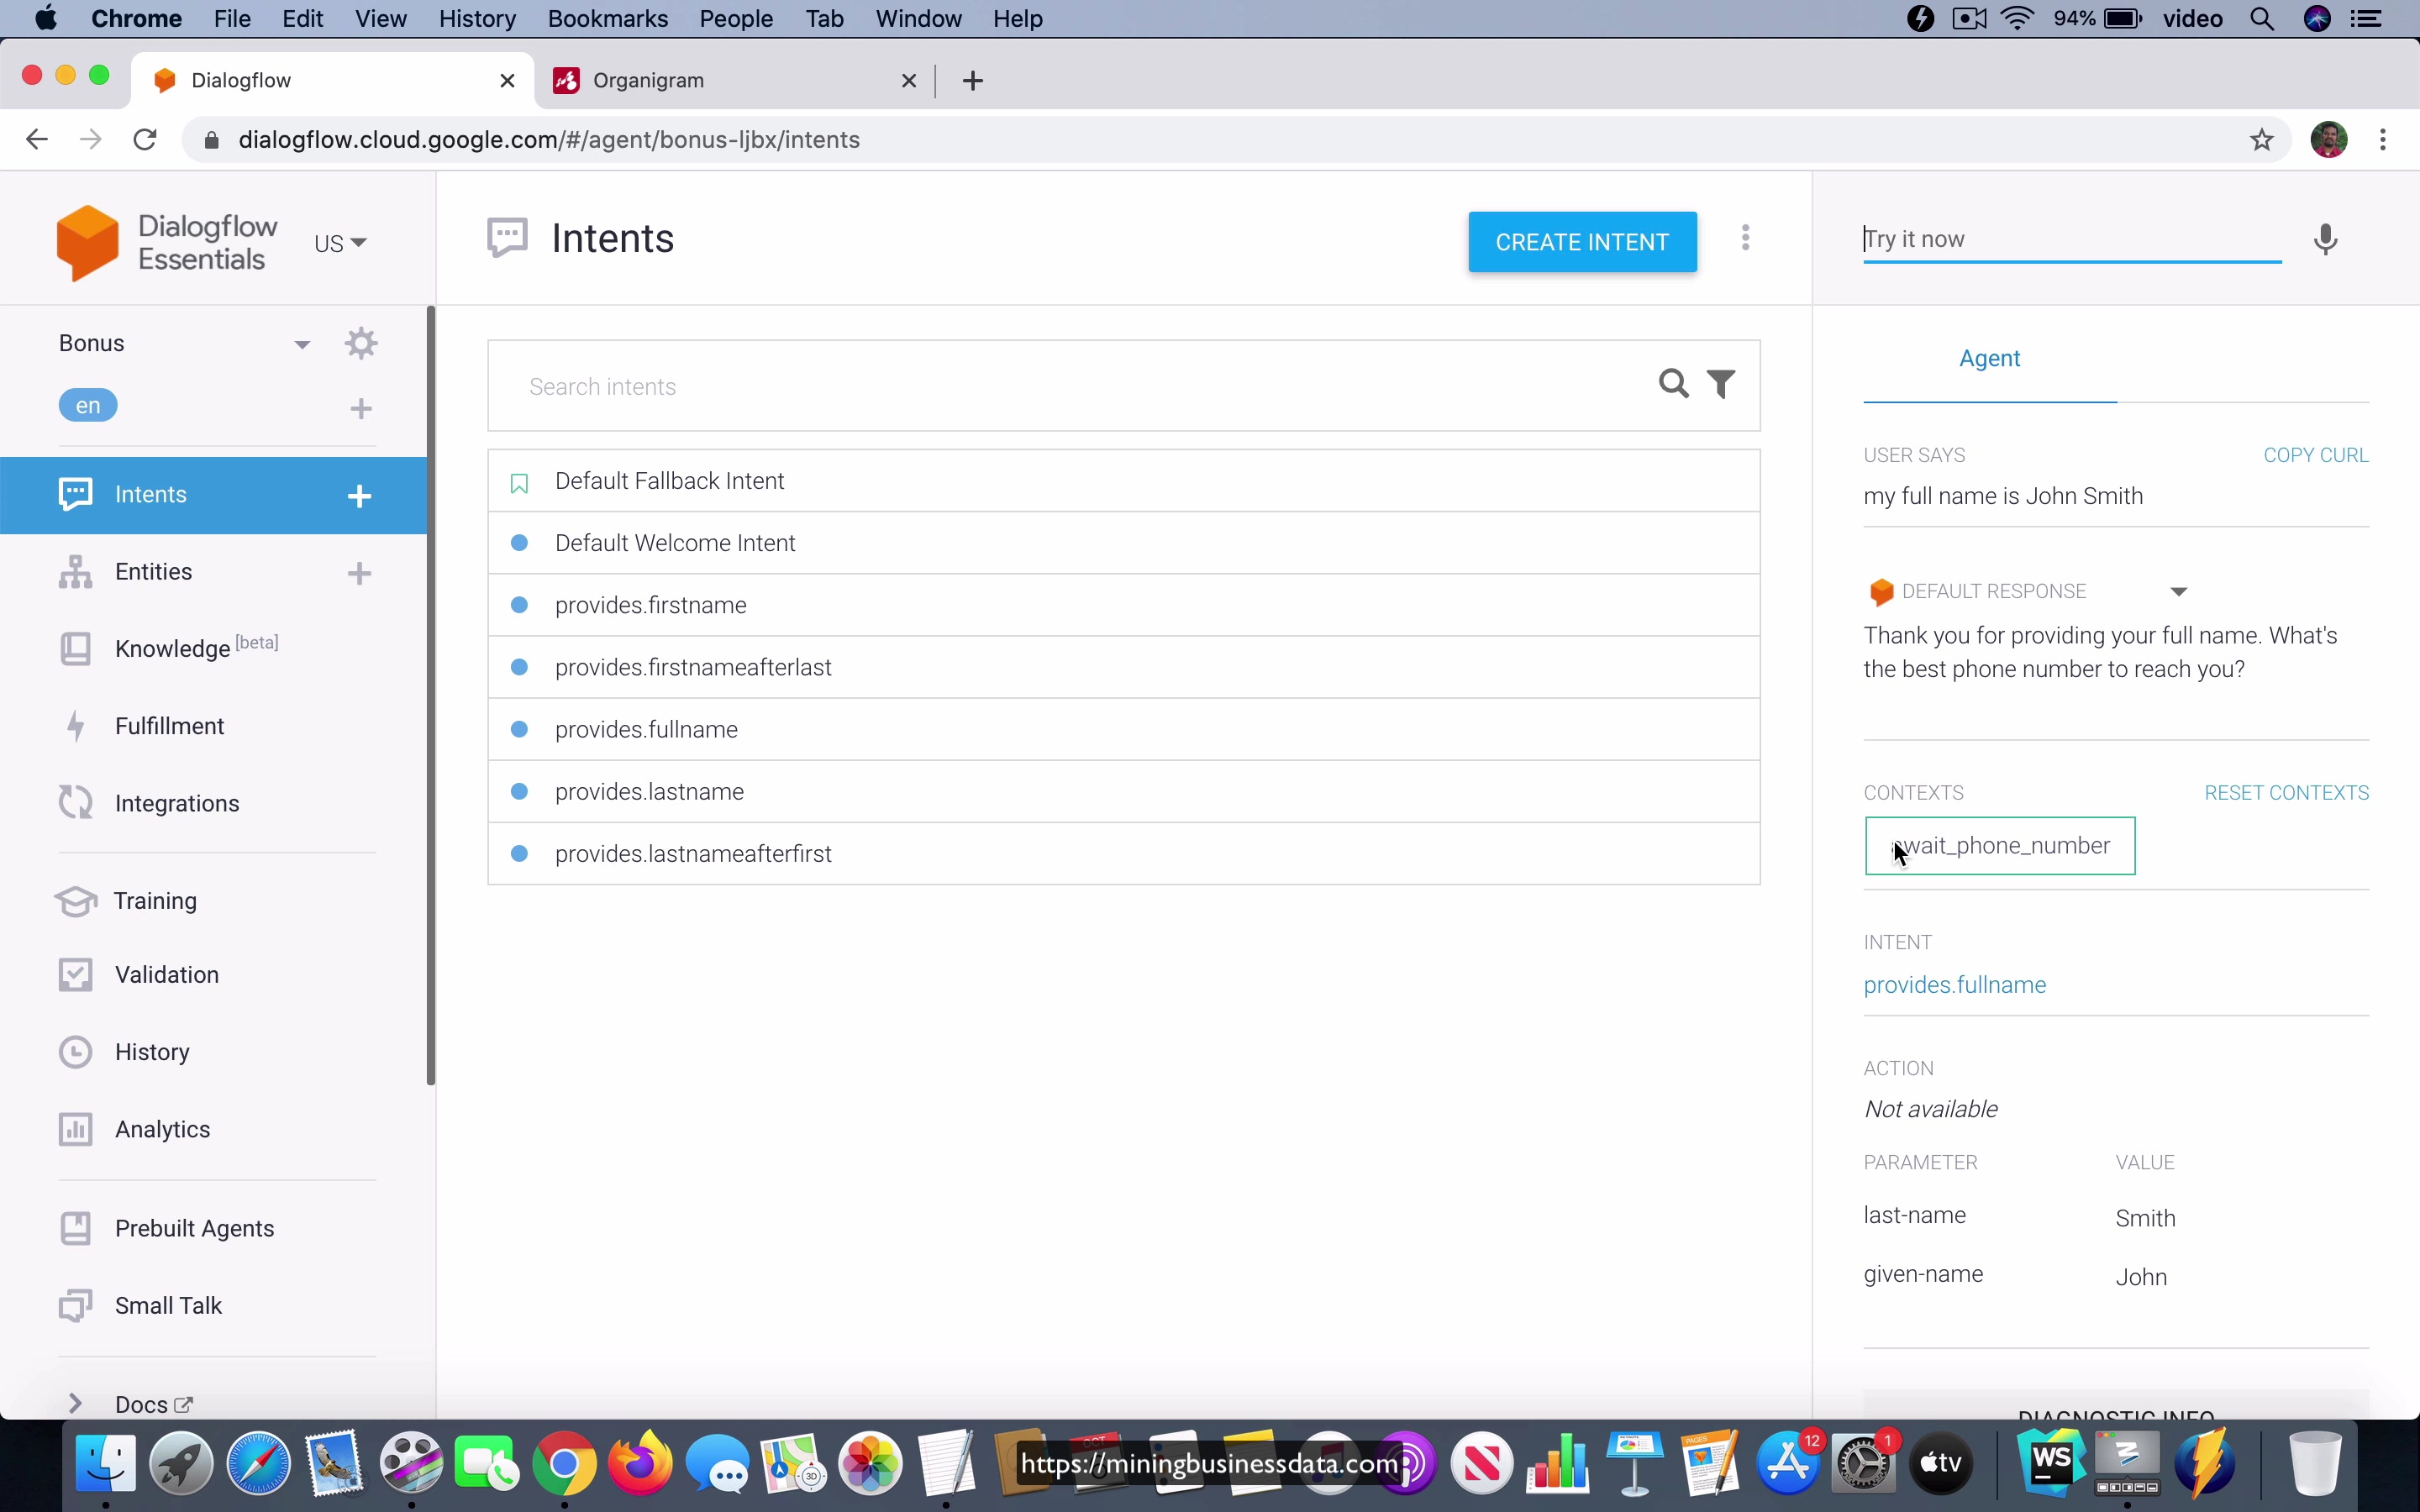
[03:01] And let’s add another intent, provides dot full name, and it’s going to be await name. And remember that in this case, it’s going to be await phone number, okay? That’s going to be the case where the user just provides the full name. And here, once again, what I’m going to do is I’m going to say my full name is John Smith. It’s for the same reason that I described in the last intent. You will notice that when you give it some very well understood and sort of conventional names, it’s going to understand it much better during the annotation process.
Just because we are going to use it in the annotation doesn’t mean that Dialogflow can only understand these given and last names. It will be able to identify a wide range, but this is just to help it along during the annotation process, okay? And also, it’s good for you because if you don’t allow Dialogflow to do this annotation, this entity annotation on its own, and you end up having to select it, and then you add the annotation yourself, what you’ll usually notice is, first of all, it’s a little more error prone, because obviously, if the system already identifies the entity, that’s a much better outcome than you having to tell the system that, hey, this is what this entity is.
[04:25] And the second issue that I’ve seen when you do this is that sometimes people don’t realize that they end up adding multiple parameters into this table, and that’s something that you’ve got to be very careful about.
Okay, so that’s for the provides full name. And in that case, the response is, of course, it’s going to ask for the phone number. It’s going to move on to the next step. And you can say that just this particular flow would have ended at the point, right? So now, let’s go ahead and add this case where they provide last name after first, I think that’s what I called it over here, provides last name after first.
[05:14] And in this case, they are going to, it’s going to await their last name, as you might remember. And what should be the output context here? I’m going to let you think about that for a second. So in the meantime, I’m going to say my last name is Gonzalez, well, actually, let’s just keep it with Smith.
Let’s help Dialogflow here. Okay. Now, that’s the last name. And it’s going to say, thank you for providing your last name. What’s the best number to reach you, right? So the stuff which goes here, the output context has to be, if you notice this, it has to be this, whatever is pointing to one, and that’s going to be await underscore phone underscore number, okay?
[06:05] That’s the actual context. So it’s going to be await phone number, all right? And keep the lifespan as one, because that’s the, I would say, the best way to handle this. And the other one is provides first name after last. Let’s make sure that we save this, and then we add a new intent, provides dot first name after last, and say await first name, and here it should be await phone number, as you might imagine, and the lifespan would be one, and here they would say something like my first name, or maybe they just say, let’s say my first name is John, and here it’s going to say, maybe it will say thank you, dollar, your name, what’s the best phone number to reach you?
[07:17]
Let’s do that. All right. So that’s the, you know, we’ve taken whatever is in this flowchart, and we’ve converted that into a list of intents. And you can, if you want to be extra careful, because, you know, you see that you have gotten like so many intents right now over here, the extra careful thing that you can actually do is, let’s mark this as Default Welcome Intent, and this is bold, and this is the color.
I guess it was, so you can do one more thing. You can actually number these intents so that you don’t end up missing something.
[08:05] So that’s a good way to test if you got everything translated over into your Dialogflow console. And of course, that becomes more important the bigger your bot gets, right? So you have five intents other than the welcome intent. We don’t, I guess, represent the fallback intent because it’s common, and everybody knows what the fallback intent should contain. Let’s save this just to be safe, and then go to the intents list.
And what you see is that outside of the default intents, you have one, two, three, four, five intents just as we expected. So this is how we describe the intents, or rather, this is how we translate the flowchart into the list of intents in your Dialogflow console. And in the next video, we will just take a quick look at how the bot actually works.
Lesson: ES Bot Demo
[00:00] So let’s test how the bot works. So the user will say start the conversation with hello and it’s going to ask can I have your name please. So let’s say the user says my name is… I’m going to stick to the common names first just to confirm that the flow works and then let’s go on to less common names after that. So if I say my name is John you can see that it mapped it to the intent call provides our first name and the response was pleasure to meet you John and your last name and you also see that await last name is the context right and at that point you might say my last name is Smith and it’s saying thank you for providing your last name what’s the best phone number to reach you and you can see that the context is await phone number and you can also see that the intent was correctly mapped to provides last name after first and the last last name value was extracted to be Smith right now we have to reset the context because we don’t want this context to be active as we test it for the next step.
[01:10]
So we start with the first step again as the user says hi it’s going to ask can I have your name please now the user might say my last name is Smith and it’s going to ask can I have your first name please and the user might say my first name is John let’s go for Jane and it says thank you Jane what’s the best phone number to reach you await phone number is the context and then you can see that provides first name after last is the intent the given name was extracted properly let’s reset that one also and let’s start the conversation over and this time the user will say my full name is John Smith now you can see that it actually mapped it to the intent called provides start full name and the context is await phone number thank you for providing your full name what’s the best phone number to reach you you can also see that it got the
[02:09]
values that we expected with the parameters last name being mapped to Smith and given name being mapped to John now there are a few more things to consider when you are designing a bot like this the first thing is that you will notice that not all the first names that you hope can be understood by Dialogflow not all of them would be actually understood in this scenario okay and the second thing which I guess people who have been following my material for a while already know is that you always want to declare a session vars variable in the beginning step of the conversation which is the Default Welcome Intent what I will also do is to add a session vars context which are very high lifespan like 50 or something and as the conversation keeps moving along the session was context will keep collecting all the information that we are getting from the user
[03:08]
so that when we reach the step where we are ready to process the inputs we can just take a look at the session was context and see all the parameters that it has obtained from the user okay so this is the overall like this is the flow for a bot like this and as you noticed when I went through this demo I just went through the best cases like I didn’t do anything which might sort of you know shake the boat so this is just giving exactly the answers that we expected so for now in this video in this demo we are at least sure that we have we have been able to satisfy the requirements which we started with with this particular flow right now in the next video I’m going to move on and show you how to handle some of the corner cases
Lesson: Extending the name system entity
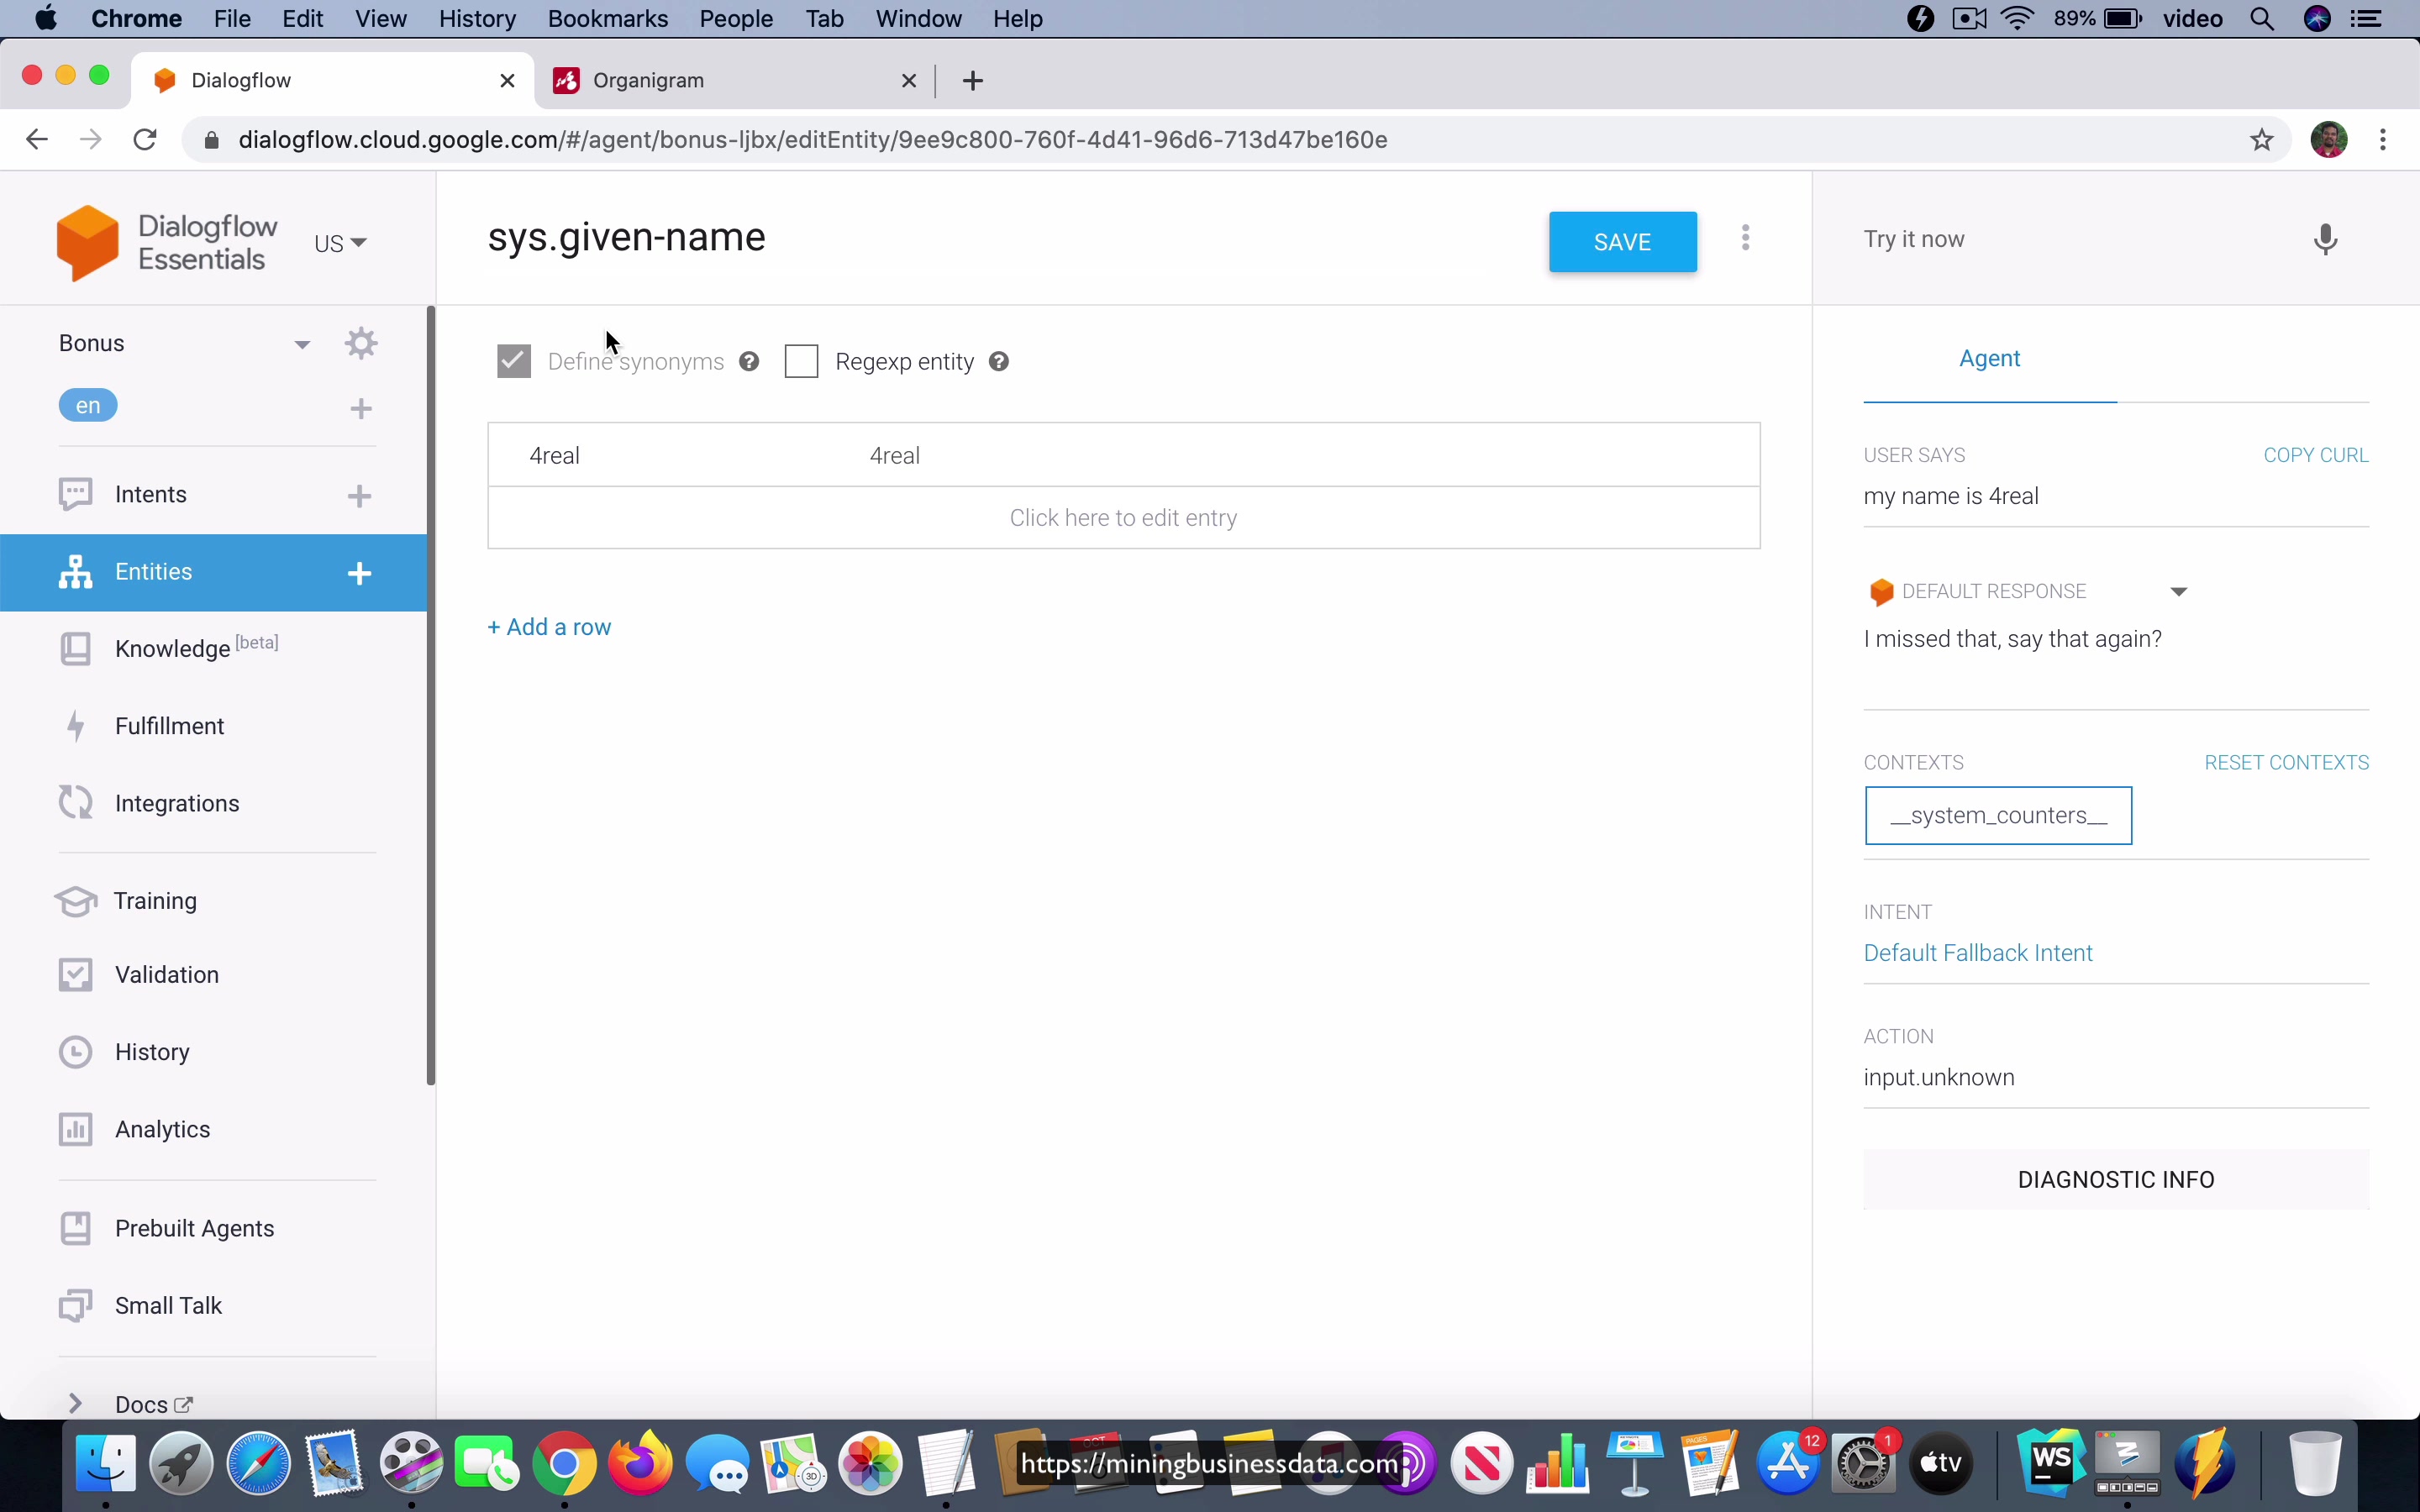
[00:00] So in the last video we were just giving inputs which were common names. So in this video let us try names which are a little more, a little less common. So let us start with saying hello and of course the bot is going to say can I have your name please. Now what I am going to do is I am going to give it a name which is actually a name that someone tried to give the kid in New Zealand and the New Zealand’s, I guess, birth and death registry office rejected.
It’s just the number 4 followed by the word real. So it’s just the name is for real and you will see that if I were to say this, it’s just going to say I missed that, say that again, right. So that means that it’s not able to handle these kind of names. Now, of course, I took a very extreme example because it’s obviously not a normal name.
[01:00] But you might have some names which Dialogflow’s given name entity is not able to identify. And if you already have a list of these names, a good example is let’s say employees in an organization where you already know the list of first names, only let’s say that only those people are going to interact with the bot. One way to handle this is to use the wildcard entity. But it actually turns out that there is a much better way now and Dialogflow has recently introduced, when I say recently, it’s actually maybe almost a year old now, but they have introduced this concept of extending system entities.
So if you notice what I did, I went to the entities tab here and instead of going to the custom, I went to the system entities. And also here, one thing that you might want to notice is that this is only going to show entities which were used in this particular agent.
[02:00] So let’s go into sys.givenName. And what I’m going to do is I’m going to add the name for real into that. So this name, this for real name is now actually a part of the given name entity, at least for this particular agent. Now, just because you added it into this agent does not mean that it will carry over to all the other agents that you have created, let alone carry over to other agents that other people have created.
I’m sure that this is local to this particular agent. So what you do now is let’s go back and try the same thing again. I start with saying hello. And it says, can I have your name, please? I’ll say my name is for real. And now you notice that it did identify the given name as for real. And it’s coming back with the response, pleasure to meet you and your last name.
[03:03] So that’s one way that you can extend the system entity to handle these names that are not natively identified by the given name entity in Dialogflow. The other option, of course, is to go for, there are actually two options. One option is to go for the sys.person entity, which actually captures a lot more names from my testing.
But the problem there is that you would not know whether it has a first name and a last name portion. That is, the person entity just captures the whole name, and it doesn’t split the name into first and last names. So you may not be able to address them with their first name if that’s what you want to do. So assuming that you don’t want to use the person entity, the other option is to use the sys.any wildcard.
[04:01] And the sys.any wildcard, as you know, captures anything and everything, including things which are not names. So let’s say for the sake of joke, somebody might say something like, my name is, let’s say, unknown. They just say my name is unknown or something like that. And you don’t want to capture that as if they actually provided that name. You may just want to save it, but not use the name in the next step because, of course, you don’t want to address them by their name if they provide some kind of like a joke name or some dummy name or something like that.
So those are the ways that you can handle the, that is, that’s how you can extend the capability of Dialogflow to get names from users. So I hope that by looking at this set of videos, you had a good idea of all the tools which are at your disposal when you are trying to capture names from your users.
Lesson: A note about entity annotation
[00:00] So I just want to add one more piece of information and this is about entity annotation in this flowchart. Now the reason that this is important is because if you just take a look at this flowchart just as it is you can see that so the users that is one branch could be user provides first name the second one could be user provides last name and the third is user provides full name but just by reading these training phrases by my name is so-and-so my last name is so-and-so and my full name is so-and-so it is not obvious that they are what what is different between them right well they you can see that the phrasing is slightly different but but what I am really referring to is by annotating the entity here and using the I guess the actual system entity name that Dialogflow will use and this is the convention that I use for that by annotating it it just makes it a lot more obvious what is different between these three
[01:09]
different branches okay so now this would be sys dot last name colon name to and this could be this would be annotated differently here you will have to do two annotations because this one is sys dot given name and this one is sys dot last name okay so one thing that I would just mention here is that it doesn’t matter if you don’t get the exact the sys dot given name maybe you put like a spelling error or something like that if you have a typo it doesn’t really matter this is just a flowchart and it’s under your control so you as long as you can read it and understand what is going on as long as you can do that you can just you know do the minimum possible to explain
[02:08]
that there’s some kind of entity annotation which is happening here in Dialogflow so in the same way here you you will do this change this and make it at sys dot last dash name and in the same way you do the name over here and just change it to sys dot given like that okay so this is just something that I wanted to add to sort of complete the picture and this is the flowchart that you have for the given flow that we are interested in
Lesson: Building the bot in Dialogflow CX
[00:00] So now let’s see how you can create the same bot in Dialogflow CX. So I’m inside my Dialogflow CX console. I’m going to create an agent called getUserName and let’s just go ahead and save that. And as you know, as soon as you start, you will have this Default Start Flow, which already comes with the Default Welcome Intent. So what I’m going to do in the default intent is I’m going to delete the existing, whatever the agent says, and I’m just going to replace it with, hi, may, can I have your name please?
So the thing is that the bot, as soon as the user says hello, the bot is going to ask them for their name. Now what should happen at this point? What I’m going to do, and I’m doing this to make it very clear about the fact that what we are going to get as input here is already a somewhat complex flow.
[01:07] So I’m going to actually create a new flow. Okay, so I’m going to call it getNameFlow. And once you press enter, you can see that there are these two flows. This is the default one, and then the one that I just created. So now I have this new flow that we created called getNameFlow. And once I click on it, you will see that it just has this start. And this is the start page of the getNameFlow.
And you can see that all these things are empty. There are no intent routes or condition routes or anything, right? So the first thing I’m going to do is I’m going to add a new intent into this. So this is going to be called provides.firstName. And this is literally the fact that the user is providing their first name. And the phrase might be my name is John. And remember what I said, where we are going to use the well-understood first names and well-understood last names just during this annotation process so that we can, we don’t have any issues with the annotation during the process of defining the training phrases.
[02:15] Okay, so let’s go ahead and save that. Now, once you have created this intent route, you have to decide what you have to do with the transition. And what I’m going to do, and what I suggest that you do is just take this flowchart itself as your guide.
And so it’s going to be await last name. So what I want to do is let’s go to the console. I’m going to add a page and I’m just going to call that page await last name. Pressing enter. And when you click on this await last name, you can edit it like that. And here you can actually add intent routes and things like that.
[03:04] So let me go back to this place. And what I’m going to do also, looking at this flowchart, I’m also going to have a page called await first name. So let’s add that. And you’ll shortly, you’ll see what I’m trying to do, await first name. And finally, I’ll have another page and this would be called await phone number. Okay, so all these things are available for us now.
And what I’m going to do is go to this get name flow. And in this intent, I’m going to use the provides that first name intent. So what this means is in the start of the get name flow, when the user provides their first name, I want the agent to ask please to meet you.
[04:01] And if you remember the syntax for this is going to be session.params.given name. May I have your last name. So that’s what the agent is going to ask once the user provides their first name. And as expected, you’re going to go to await last name because that’s what you’re actually expecting at this point. Okay, so the next thing I’m going to do is I’m going to add another intent.
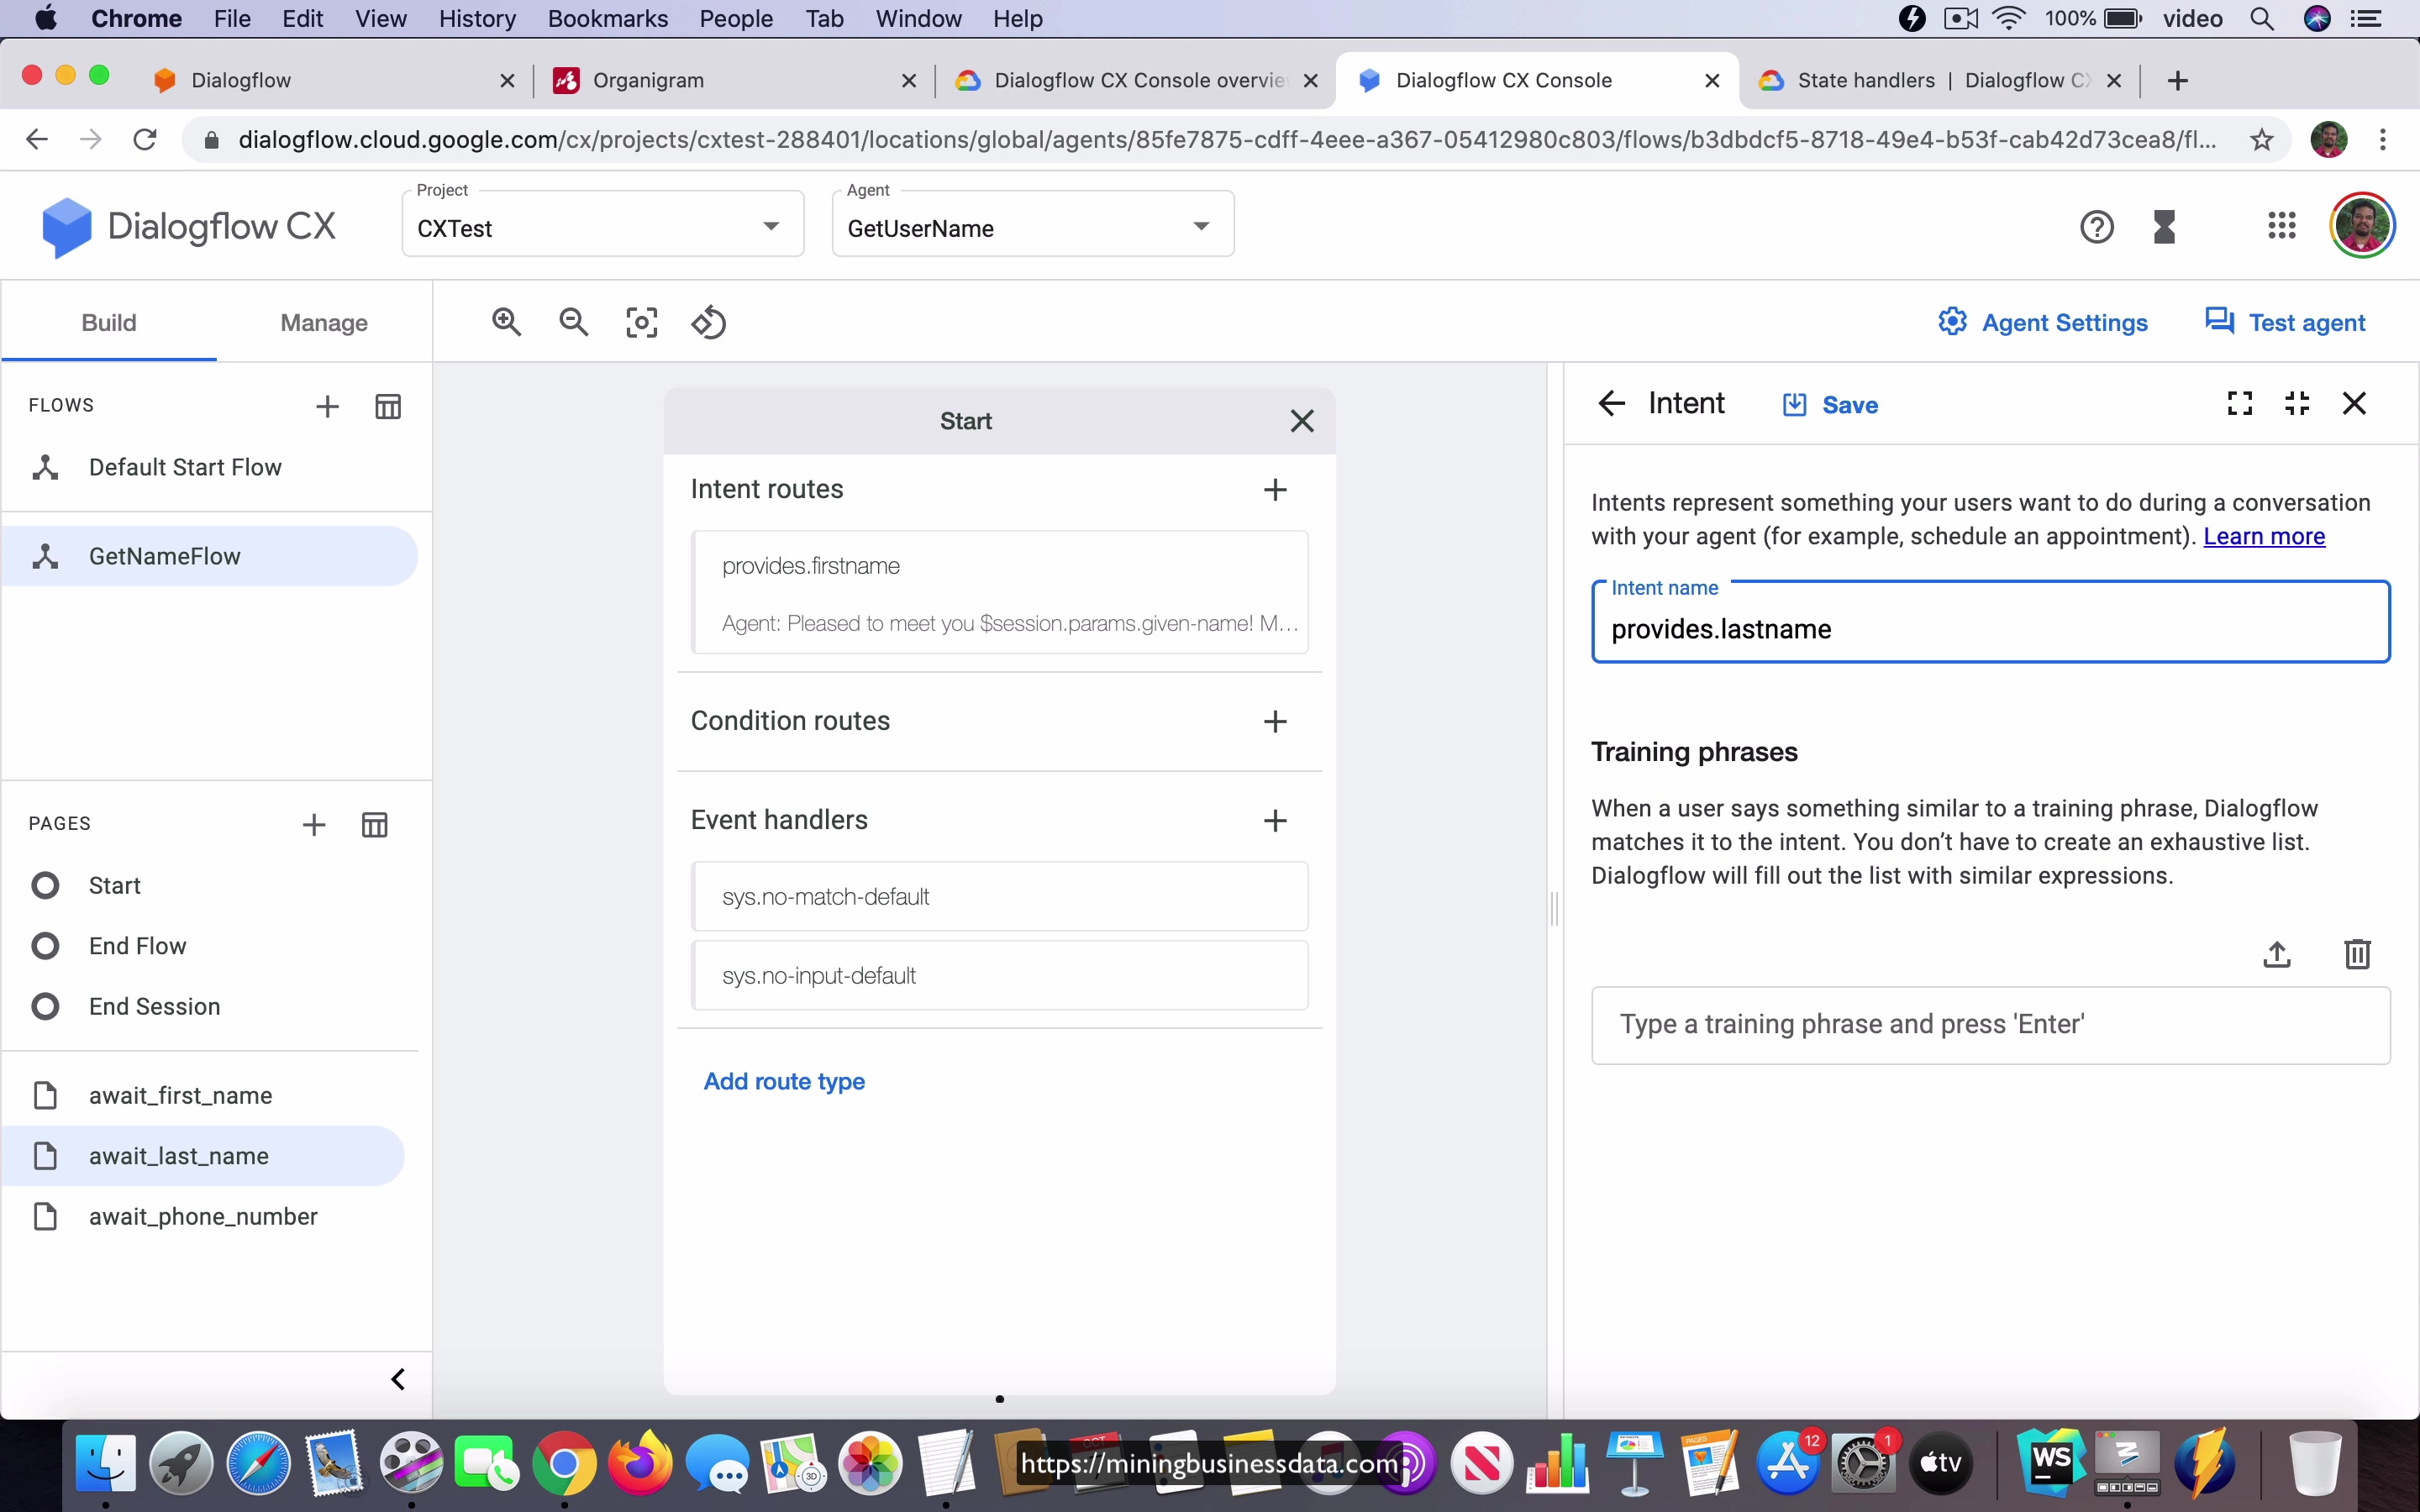
And this time I’m going to say provides dot last name. Training phrase is going to be my last name is Smith. And you can see that it got identified, right? Save it. And in this case, you’re going to ask what and may I know your first name, please, because they have provided with their last name in the start flow and the in the start page rather and you want to redirect them to get the first name.
[05:13] So here you’re going to redirect them to this page called await underscore first underscore name. And you save that. Okay. Now I’m going to add one more intent. No intent. And this one is going to be provides full name.
And here it should be something like my full name is John Smith. And as you expect, it was able to extract both the given name and the last name from the phrase that you just typed. So let’s just go ahead and save it. And what you want to do now is you want to transition this to await phone number and make sure that thank you for providing your name.
[06:05] What’s the best phone number to reach you? Okay. So this is what the agent is going to reply. And it’s going to go to the await phone number page. Okay. So now what I’m going to do is I’m going to go to this page called await phone number first name. And in this case, sorry, that’s wrong.
In this case, we are going to add an intent route. And remember that. So here’s the thing. We already have an intent which captures the first name. So all you have to do is just go with this. Okay. So you are awaiting first name. You choose the intent call provides first name because that’s where the user is. If you remember, if you were to edit it, you know, this is where the user is going to say my name is whatever the first name is.
[07:00] And then once you’ve done that, you know that you’ve got the first name also. So you can say, okay, dollar session dot params dot given name. What’s the best phone number to reach you? Okay. And then you are going to select await phone number as the page to which it’s going to transition.
Right. So now let’s minimize this going to await last name. It’s the same concept here. You know that they already gave the first name. You’re expecting them to provide that last name. So select provides dot last name from this list. And then you’re going to say, thank you. What’s the best phone number to reach?
[08:01] And once again, you’re going to select await phone number and you’re going to go ahead and save that. Right. So let’s close the screen, minimize this and just take a look at what we have in terms of the flow. So in the start page, you can see that the user can do provide any of these three things, first name, last name or full name. And if they were to provide their last name, it’s going to go to this await first name page.
And then if they provide their first name, it’s going to go to the await phone number page. Okay. I’m not going to fill out the information about awaiting the phone number. In fact, you can even have that as an entirely new flow. Maybe you can have a flow here called get phone flow. I’m not going to go over that because I just want to make it in par with what we created with the ES bot. Right. So in the start, you could also have the user providing their first name, in which case you will go to await last name.
[09:04] And if they provide their full name, it is going to directly jump to the await phone number page. Okay. So now let’s take a look at how this works by clicking on this test agent.
Lesson: Testing the bot in the simulator
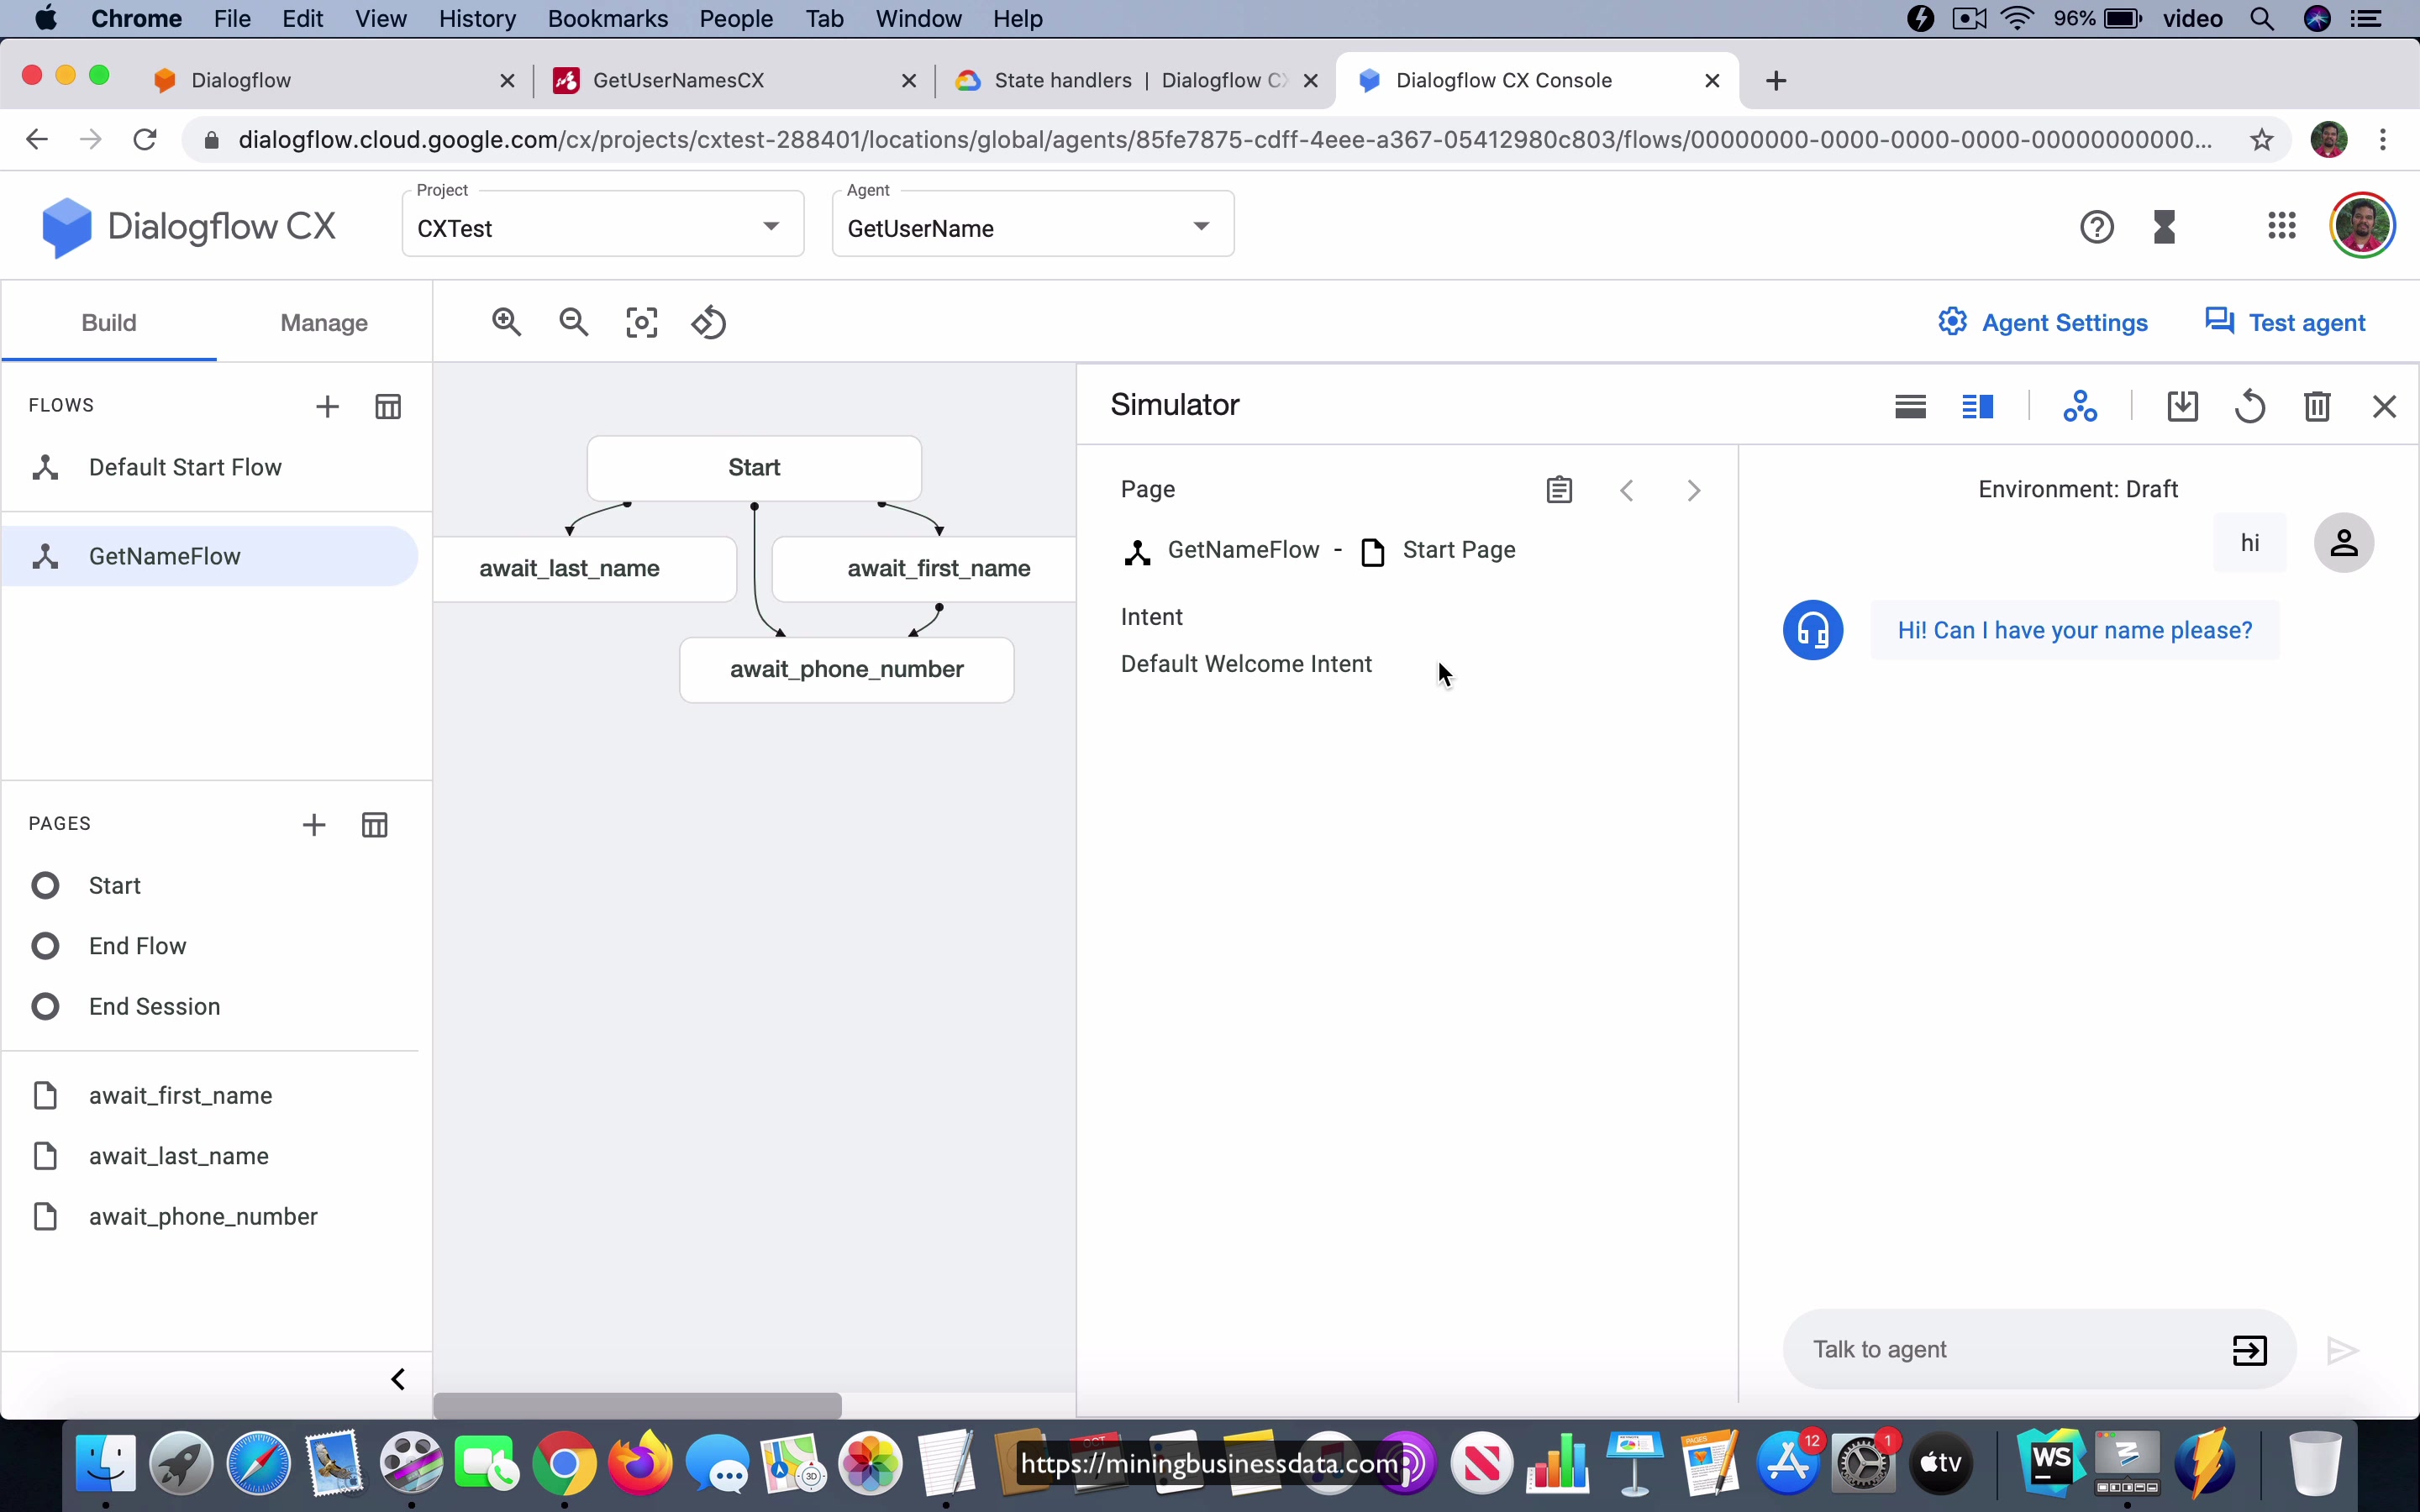
[00:00] So now that we have built out what we wanted, let us take a look and see if things work as expected by clicking on this test agent over here. And you can see that it is opening this simulator and I just going to change it to the horizontal view, so you get more information at a glance. Now, one thing you can see is that the simulator is similar to the Dialogflow ES simulator. Let us just type the word hi, and you can see that it is going to show you the page and the flow.
I have typed the word hi, and it is going to come back with hi, can I have your name please? Now, let us go with the input my name is John. And you can see that it is actually coming back with can you say that again, which means that it actually went to the fallback in the Default Start Flow. What is happening here? Just think about it for a minute. As soon as I typed the word hi, you notice that it is saying that you are in the Default Start Flow, and you are on the start page.
[01:09] But then you might remember that as soon as we go to say the word hi, it is supposed to go to this get name flow. And what is actually happened, which is a mistake that I made is that I have not actually done the transition. Even though I declared this Default Welcome Intent and change the fulfillment, I forgot to change the flow.
What I should have actually done is change this so that it went to this get name flow as soon as it got that input. Let us close this. And let us reset it. And let us try again. I am going to say hi. Now, it is coming with can I have your name please? What I want to do is the horizontal view. We have more, it is easier to read what is going on. And as soon as I did that, you would have noticed something, which is now you see that the page is get name flow and start page.
[02:05] It is in the flow called get name flow and it is in the start page. Now if I were to say my name is John, you can see that it just as you might have expected, it is now saying please to meet you, John, may I have your last name. And also notice one more thing. Now, this is saying that the flow is get name flow and the page, the current page is await last name, which is what we want, if you remember.
Now I am going to say my last name is Smith. Thank you. What is the best phone number to reach you? And notice the simulator again, it says get name flow, await phone number. Also notice that it has extracted these parameters. And these are session level parameters for this particular session. Now, I am not going to go over this next step because we stop here when it asks what is the best phone number to reach you, we are going to reset it and start over.
[03:07] Now let us try it again. I say hi. And it is going to ask can I have your name please? Then this time I am going to start with my last name. Last name is Smith. And notice that now the flow has become get name flow, await first name and it is asking may I know your first name please? And now I will say my name is John.
And it says okay, John, what is the best phone number to reach you? And it is awaiting the phone number. And you can see that it was able to extract the two parameters as we expected. Let us reset it and start again. And this time I am going to say my full name is John Smith. And now you can see it is just going to thank you for providing your name, what is the best phone number to reach you? And it is jumped over to this get name flow, hyphen, await phone number, which is again what we want.
[04:06] We are awaiting the phone number. We went to the stage called await phone number and the message which is shown to the user is also explaining that that is exactly what we want. In this way, we have built the bot to simulate what we had done with the ES bot. And you can see that the behavior of the CX agent is now on par with what you are able to achieve using the ES bot.
Lesson: Pros and Cons of Dialogflow CX for this bot
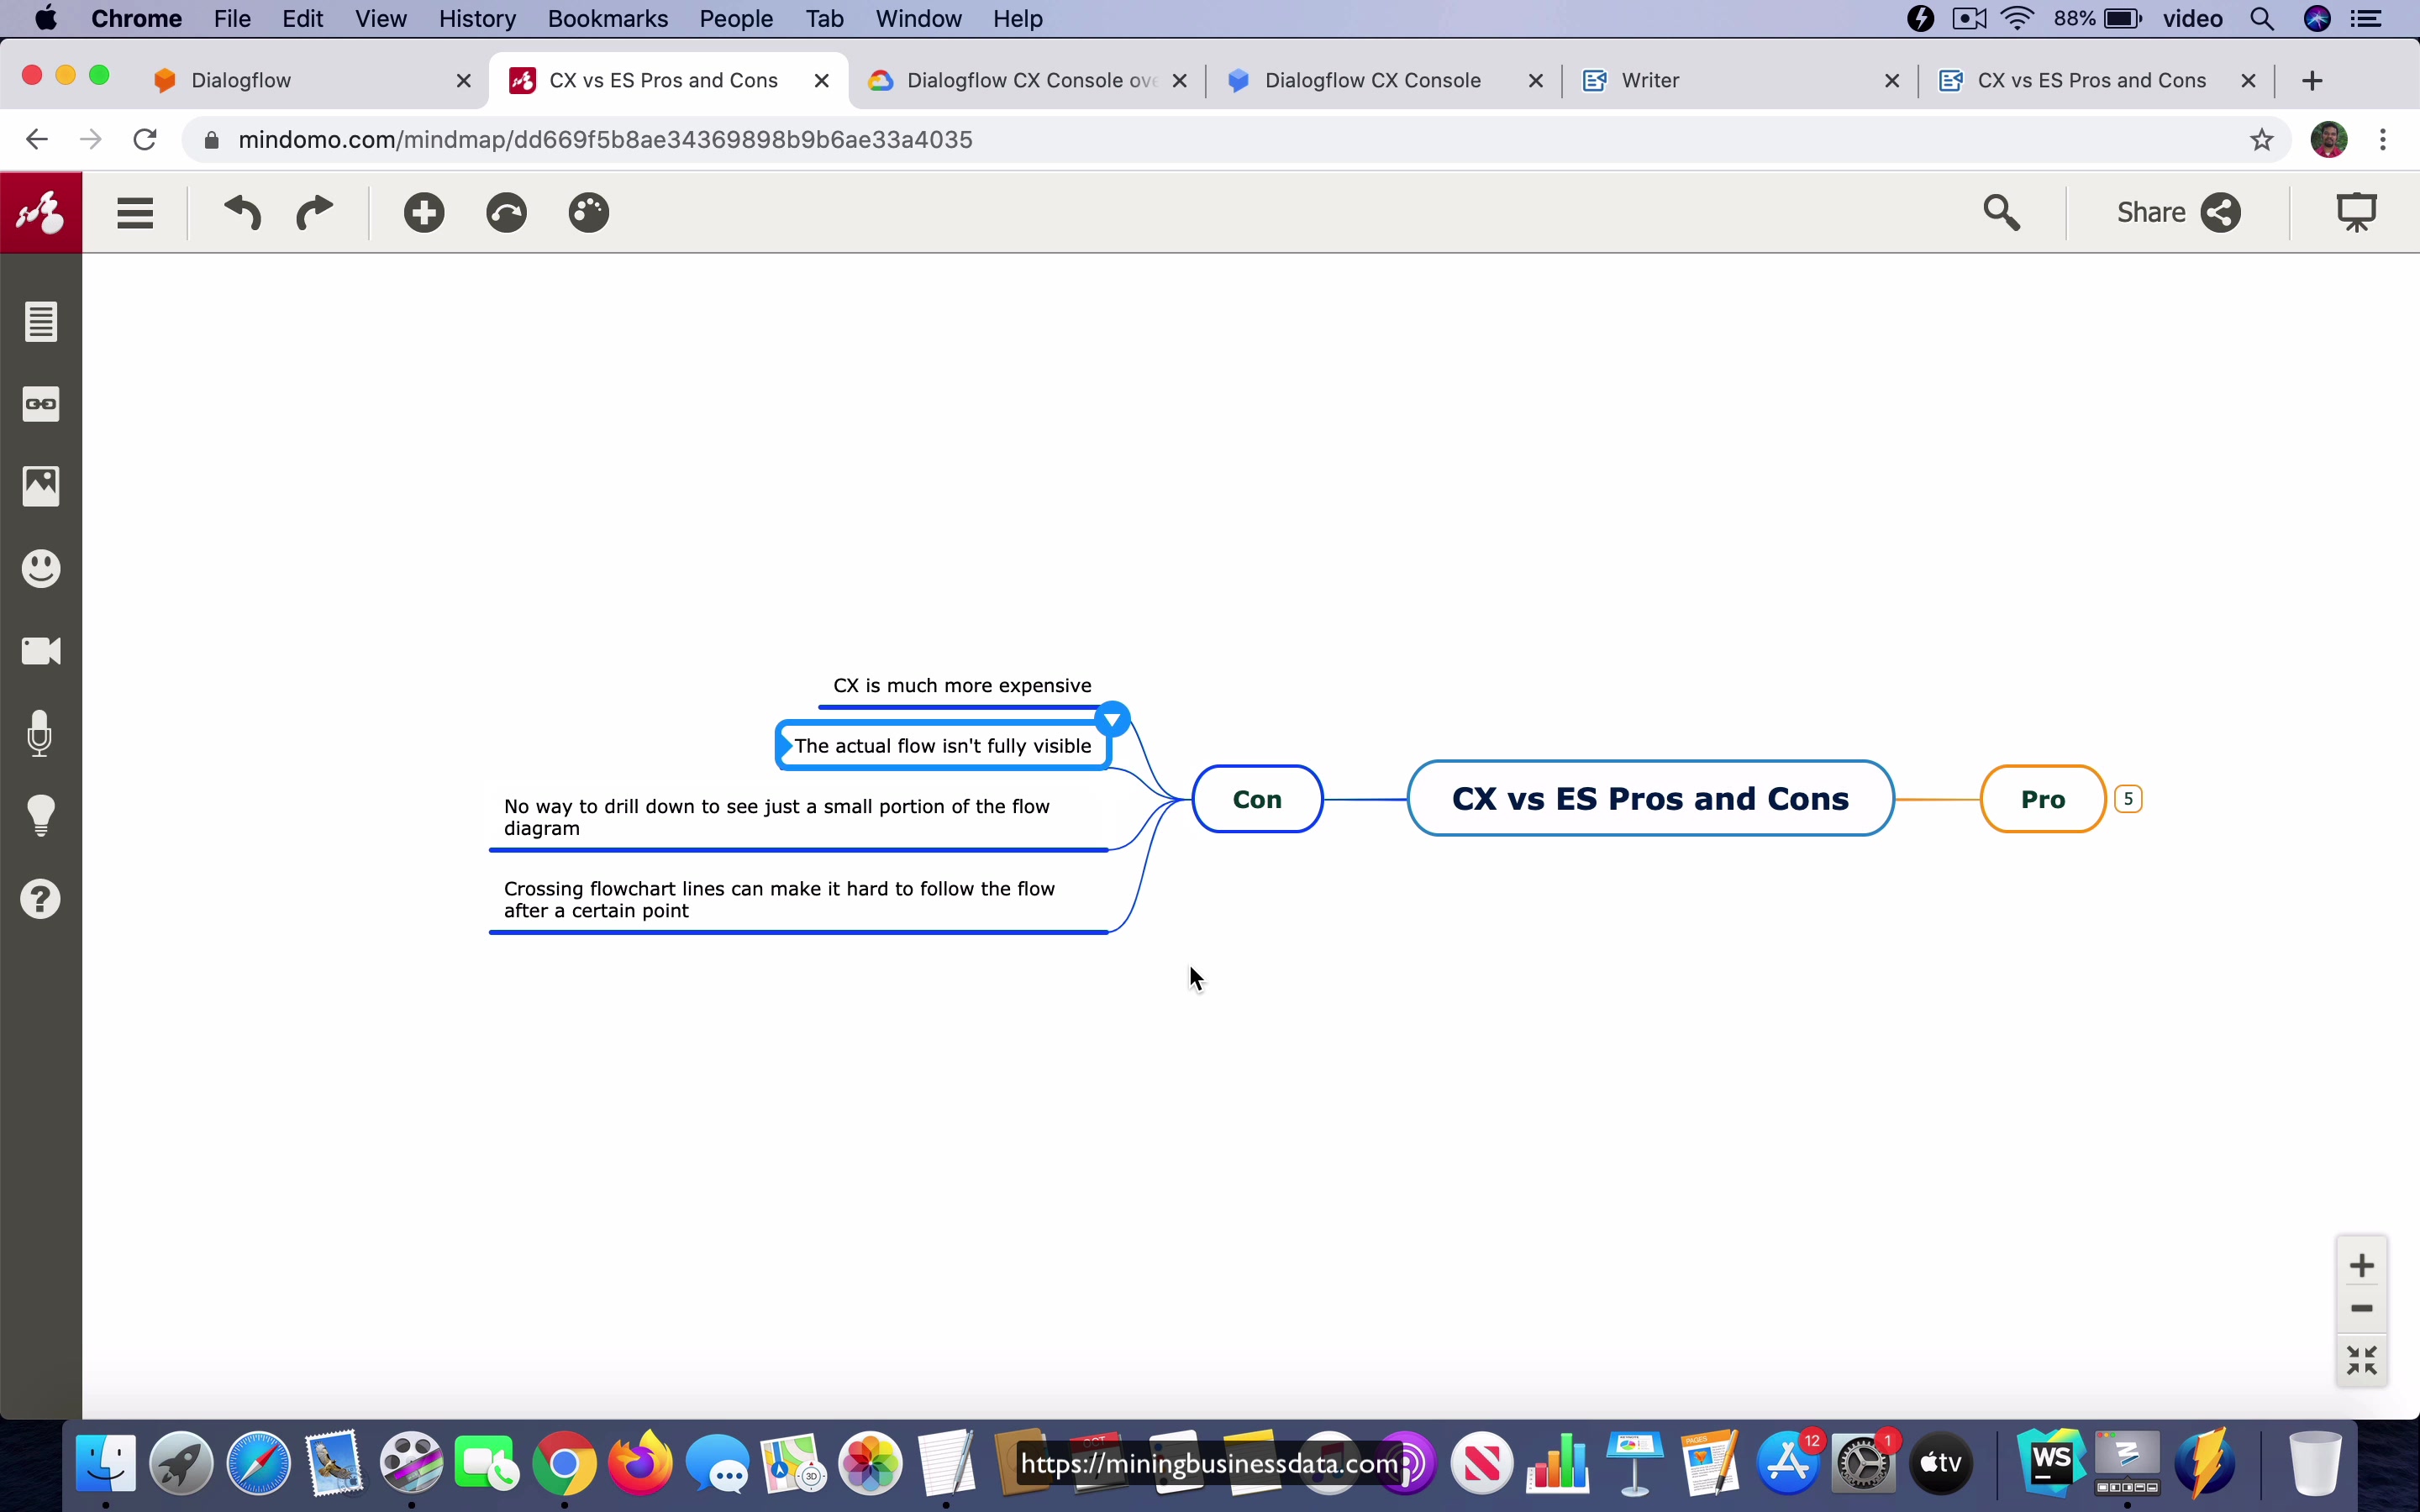
[00:00] So let us take a look at some pros and cons of using Dialogflow CX just from whatever you have seen and learnt till now. Now of course this is not a full comparison for obvious reasons because CX has got a lot more features and in general you would say that it is a lot more powerful. But if you had to just look at what has been built till now, one of the big pro that you notice is obviously the fact that you can reuse intents. You might remember that I was just able to select an intent from the list and just use it as part of the flow.
The other thing is that the flow visualization is part of the bot building process, which means that there is no need to have a separate process outside for your flow charting. On the other hand with ES, there is no real flow charting capability. So what happened is that we had to use a tool like Mindomo and create the flow chart first and then we go into ES and then we have to manually type out all the stuff so that we can get the, we can translate the flow chart into the ES part that we wanted.
[01:08] And the other thing is which you must have already started noticing is that the really complex flows can be managed using the flow plus page paradigm that is provided in Dialogflow CX and this becomes even more obvious once you notice that the flow chart that I used to show you, it had a lot more intents and it had a lot more, you can say like lines, a lot more things happening in the flow chart on the whole.
On the other hand, with Dialogflow CX, because they have this well-defined flow paradigm and then you have these pages inside of these flows, it was possible to construct these really complex flows. And in fact, if you have not been using my flow charting technique, this becomes even more true because otherwise all you were left with was just the follow-up intents which was the only way for you to visualize the flow and the hierarchy which was just, it was just not adequate in my opinion, that is the follow-up intents were not adequate for that purpose.
[02:24] Now, on the other hand, what are the cons that we have seen?
So the first one is the biggest one, CX does not have a free tier as of this recording which is happening in October 2020 and not only is it much more expensive, it is sort of like, it is a weird thing because ES has a very generous free tier which means that you can do a lot of things in Dialogflow ES before you ever hit the point where you are going to start paying money for the Dialogflow bot.
[03:01] So this means, because CX is like you start, as soon as you build out a bot and have real people use it, as soon as that happens, it starts, you start getting build, it means that it is obviously a big part of the trade-offs that you have to consider. Now the other thing is that the actual flow is not fully visible. So even though in my flow charting approach, you do have a lot more nodes and a lot more edges and all that, the flow, the full complete flow is actually very clear by looking at the flow diagram.
In the case of Dialogflow CX, that is not true because let us just quickly take a look at this. If I were to go to the get name flow and if I were to even in the maximize state, what you see is that there is your start page and you can see that it is just going to these different pages, but you do not really know.
[04:04] So you do not know just by looking at this picture, what caused the transition to await first name, what caused the transition to await last name and what caused the transition to await phone number. You just know that something causes this transition. What you would ideally want is if you, if they were to have a way to connect this provides full name, this exact location, if that were somehow connected to this await phone number page, which is displayed here, that would be a lot more closer to what is going on.
Let us put it like that. I do not, the flow charting approach that I proposed does not have this problem because it actually is much more explicit. It is much more like clear which phrase and which intent moves to which next intent. That is much clearer.
[05:00] Now the other thing is that there is no way to drill down to see just a small portion of the flow diagram and this becomes important once you have a lot of pages within a single flow. Even though it does have this sort of like zoom out and zoom in, the zoom out and zoom in is only going to work for the region which is under focus and the region which is under focus is sort of decided by the way these arrows are joined in the dialog for CX and you do not really have much control over that.
So this is not a true drill down in the sense that I cannot just concentrate on like let us say this part of the flow alone. And if you imagine that the flow is much larger, you cannot concentrate on just a small part of the flow because it is actually the, whatever falls within the viewport is based on these edges that Dialogflow ES, I am sorry Dialogflow CX has created.
[06:08] And finally if you have a lot of crossing flowchart lines, it can be pretty hard to follow the flow after a certain point. Now you do not actually have that problem here. So you do not really see this but if I were to go to one of the prebuilt bots, let us say that I go to this payment arrangement and I am going to go to, maybe this is not the best example.
Let us say I go to the phone plan and I go to post plan. So when it starts getting like this and you can see that these lines start crossing over, you can see that here these two lines are crossing over and this is even worse. So when you start seeing something like this, this actually makes it quite a bit harder to follow what is going on because as you all know if you start seeing these lines crossing, sometimes it is kind of hard to follow like what the flow is actually doing and things like that.
[07:09] So that is the list of the pro and the con that you have for CX just based on what we have learnt till this point.
Lesson: Understanding scope in Dialogflow CX Part 1
[00:00] Okay, so in this video, we are going to take a look at this concept called scope. Okay. Now, there are a lot of things that you can see, which are defined by the scope. And certainly, there is a good reason why they have added all these things into this list here. But if you are already familiar with my material, and if you are already familiar with Dialogflow ES, I think that I can reduce the definition of scope down to scope is what decides which intents are candidates.
Okay. You already know what candidate intents are, if you have been following my material for a while. And if not, you can always go and look up that information on my website. And you also know that the reason that I keep emphasizing that people should use the explicative approach to Dialogflow is to reduce the set of candidate intents.
[01:03] In other words, if you make sure that the possible intents which could fire at any given step in the conversation, if you keep that as low as possible, what you’re really doing is you’re giving Dialogflow ES the best chance to map the user’s phrase to the intent that is, you can say expected at that point in the conversation. And a good example of messing up candidate intents would be to use the default context lifespan, which is five, because what it does is it just keeps, it sort of explodes the number of candidate intents which are available at each step, and causes Dialogflow to quite often, you know, it causes the wrong intent to be mapped.
And, you know, that’s certainly not something that we want. Scope in this case is, it’s a way to decide which intents are going to be candidates. Okay. Now, there is a sort of order in which the scoping rules are applied.
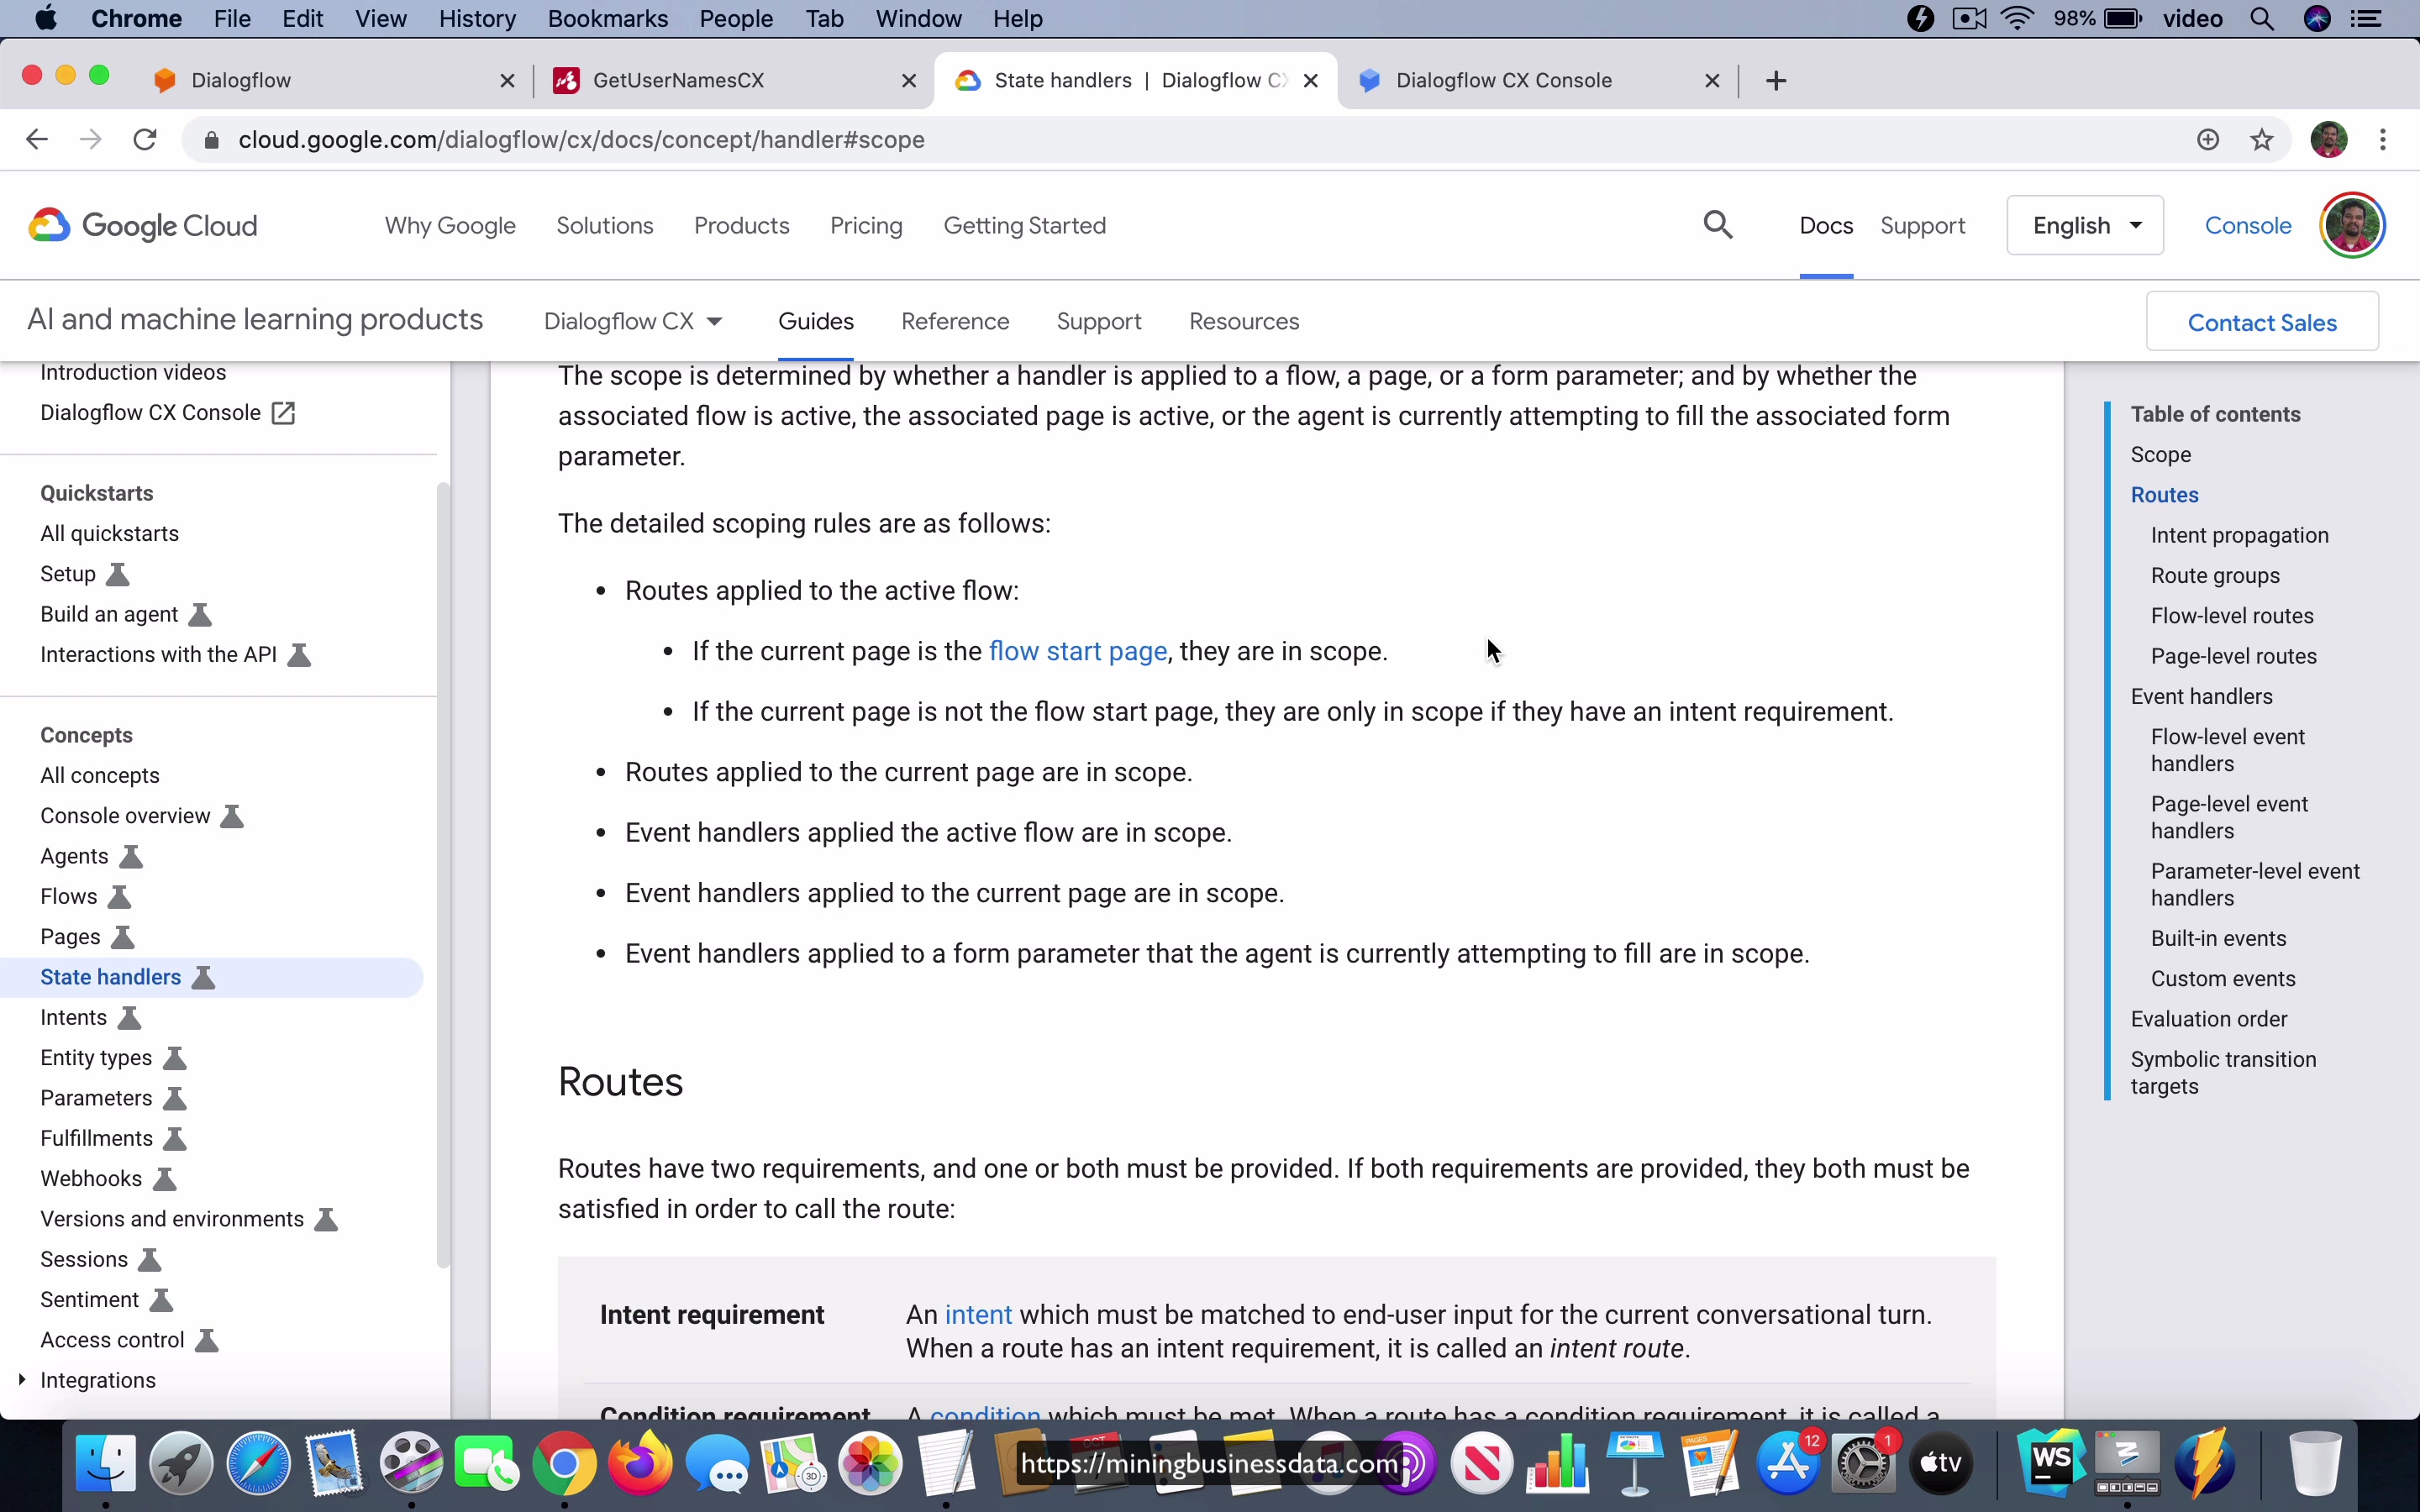
[02:04] And I’m going to go over just the top three, because I think that’s pretty much all you need at this point. And maybe later in the course, as we go into more detailed material, I can cover the other stuff. You can see that it says routes, routes applied to the active flow. Okay, these are intent routes, of course, if the current page is the flow start page, they are in scope. Now, the analogous concept in ES would be the fact that there are some intents which don’t have any input context, and they are always going to be candidates.
I’ve discussed this quite a bit on my website also, where I talk about things like entry versus non entry intents. And the entry intents are analogous to the flow start page, okay, and basically the routes which are defined inside the flow start, okay. And if the current page is not the flow start page, they are only in scope if they have an intent requirement, okay, that is you take a current page, and that page can only be in scope if they actually have an intent requirement, that is they have an intent route.
[03:18] And then it also says routes applied to the current page are all in scope. Okay, so if you have a current page, which is the active page, any route which is in that page is going to be in scope.
Let’s not worry about these last three concepts. Okay, so now let’s go back to the part that we have created. And what I want you to note is this. Okay, so here, once the bot enters into the get name flow, and you know that it happens when you say hi, the first step, as soon as that happens, it’s going to transition to this get name flow. At that point, all these three intents are actually in scope.
[04:03] Okay, and then let’s say that the user provides the first name, you know that at the point it’s going to transition to this await last name page. And if I were to look at this await last name page, you can see that there is a route called provides dot last name and intent route. So this would be in scope, this intent would be in scope at that point in the conversation. And because there is a start page for this get name flow, which also has provides dot last name, this will also effectively be in scope.
And in other words, this is also a candidate intent, if you were to follow along with my definitions for candidates from my previous material. And I’m going to prove this by doing a very, very simple test. And as soon as I do that, I think that it will become very obvious what CX defines as scope.
Lesson: Understanding scope in Dialogflow CX Part 2
[00:00] So what I am going to do in this video is I am going to do a very small test and I think that it will help understand what scope actually is, okay. So as I pointed out in the last video, you can see that the provide start last name intent is both the part of the start page as well as the await last name page, okay. So what I am going to do now is I am going to go to the test in the test simulator and you can see that right now the get name flow has been entered and the start page is the current page.
And by the way, this is the current page, whatever shows up here in the simulator is the current page. And you can see that it says, can I have your name please? So I might say something like my name is John. And notice that now await last name is the current page and it’s saying, please to meet you, may I have your last name? And here I might say my last name is Smith.
[01:02] Now, here’s the thing. It said, thank you, what’s the best phone number to reach you? And you can see that it’s now moved to the page called await phone number, which has become the current page. And you can even see that these are like the previous steps in the conversation and you can see that it went from await last name to await phone number. It has collected all the information. Now, my question for you is the intent which fired is the provides last name intent, but it’s a part of both the, if you were to see the start flow, you can see that it’s there in the start page, not start flow, the start page.
And it’s also in the await last name page. It’s in both places, right? So why did Dialogflow CX choose to fire the one which is contained in await last name? And that’s actually answered by the scoping rule, because it says routes applied to the active flow, if the current page is the flow start page, they are in scope.
[02:04] If the current page is not the flow start page, they are only in scope if they have an intent requirement. Routes applied to the current page are in scope. I guess you can say that even though this is correct, it’s not actually providing the order or the priority right there. And that you can actually infer by looking at the behavior, because what has happened is that even though the start page was also, these intents were also in scope, that is these were also candidates at that step.
The one which was chosen to map, the one which was chosen to fire was this one. Now, of course, you have to understand that effectively, they may be the same intent, but they do contain very different actions, right? Because if this intent were to fire, it actually transitions to this await phone number page. On the other hand, if the start page provides last name were to fire, it goes to the await first name page, right?
[03:08] They do have very different behavior. So based on what happens as a result of that intent firing, you will be able to understand which of these intents was actually mapped. Okay, so now that’s kind of understood. You can see that in the case where the same intent could be either in the current page, or it could be in the start page, the priority is always going to be the intent which is in the current page.
And that’s exactly how we want this to behave, right? Now, what I’m going to do is I’m going to delete this provides.lastname intent route from await last name, okay? So now there’s something else is going to happen. And let’s take a look. So I start again with the same message, hi. And you can see that it says, hi, can I have your name, please? Let’s have this view.
[04:00] So we have a good understanding of what happened. It went to the get name flow, and it’s in the start page, right? Cool. Now, I’m going to say, my name is John. So far, so good, because it actually did go to this page called await last name, we are still in the get name flow, it still came back with pleased to meet you, John, may I have your last name. Now, the only thing is, this doesn’t have, I’m sorry, the await last name doesn’t have any intent right now, okay?
And you can also see that in another way, which is that there’s no outgoing arrow from this page. Okay. So now, if I were to type my provide my last name, you can think of two possible things happening, right? One is that, hey, there is no intent in this await last name page. So technically, nothing should happen.
[05:01] Or there is a provides last name intent in the start page of the flow, and it’s possible that that intent might actually fire. Okay, so now what I’m going to do is I’m going to say, my last name is Smith. And you can see that it actually came back with and may I know your first name, please. So what’s happening here? Even though await first, actually, before this await last name was the current page, the current active page, what has happened now is that the Dialogflow CX first tried to find if there is an intent route in await last name, which is able to handle the phrase that we just typed out, which is my last name is Smith.
And it doesn’t find anything, right? There’s nothing here. So what it’s going to do based on the rules, which you see here, you can see that if the current page is the flow start page, they are in scope, but the current page was not in the flow start page.
[06:08] But it also says that the flow start page intents are always in scope. Okay, so that’s the way to interpret this. And what’s happened here is that the start page has provided start last name as an intent. And it was a candidate at that step.
Okay, even at the step where await last name page was active, the start page was still all these intents were still candidates. And when I said my last name is Smith, it’s actually fired this particular intent. And you know that because it’s the same response, and may I know your first name, please, right? That’s what that’s exactly what we got over here. Okay, so that should tell you what is going on. Right.
[07:00] And it also tells you, I think it gives you a good idea of what exactly the scope really means, right? Because what has happened here is, because this intent, there were no intent routes in await last name page. And all the intents in the start page of the currently active flow. So you can’t expect it to map to an intent, which is in the default start, that’s different, right? The currently active flow is the get name flow, which has a start page.
What they are saying is all these intents, they can effectively they can be mapped at any point in the conversation provided we are still in the same flow. As long as we haven’t exited this flow and moved on to some other flow, all these intents are always going to be candidates at every step of the conversation. That’s exactly what the scope means. And that’s exactly how you can see that the current behavior of the bot is exactly reflecting that concept of scope.