How to bulk upload intents in Dialogflow ES
Managing Large Dialogflow ES Bots
This article explains how you can bulk upload intents in Dialogflow ES.
Dissecting the Dialogflow agent ZIP file
I recently built an app which lets you do full text search across all your Dialogflow intents, as well as filter on input and output contexts.
In the process, I needed to get a good understanding of what the Dialogflow agent ZIP files contain. Here is a summary of things I learnt. This could be useful if you wish to use the agent ZIP file to build out your own Dialogflow tooling.
ZIP file structure
First, I unzipped the ZIP file and loaded it into WebStorm, which is an excellent IDE for working with JavaScript.
The folder structure looks like this:

The agent.json file has metadata about the agent itself, while package.json has versioning information.
UserSays and Response JSON files
On expanding the intents folder, we see the following:
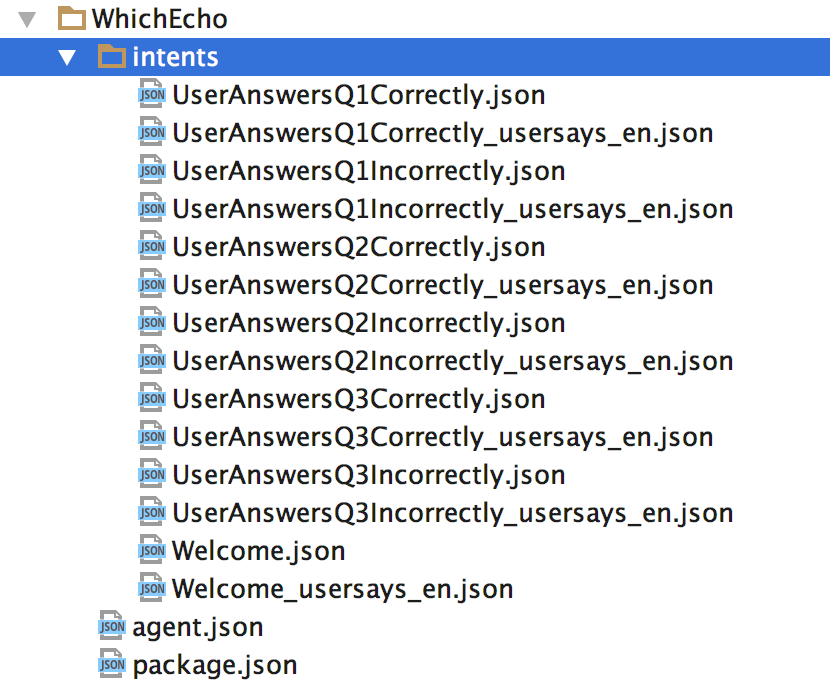
Notice that for each intent, there is a JSON file corresponding to the userSays and another corresponding to the response.
Locales
If you use different English locales in your agent, you will see one userSays file per locale.

Locale Specific Responses
However, all the locale specific responses are still added into the single Response JSON file:

The UserSays file
The user says file contains the following fields:

The structure of the user says JSON file is quite simple to follow.
Here data is an array of JSON objects – and each data object corresponds to the different userSays declared in your intent. Inside, you see a field called text which contains the actual user says text.
Response JSON file
The response JSON file is more complex. It has information about
- input contexts (lines 5-7)
- whether the contexts will be reset when this intent is mapped (line 10)
- the output contexts and their lifespans (lines 11-17)
- parameters defined in the intent (lines 18-25)
- the actual response messages (lines 26-32)
- does this intent use a webhook (line 38)
- whether the webhook is used for slot filling (line 39)
- events which may be used to trigger the intent (line 42)

Inside the response JSON files, the different platforms (channels) are distinguished by the platform field.

Within the platforms themselves, the individual message types are distinguished by using the type field.

Using the information you can extract from the agent ZIP file, you can do some cool stuff like build a full text search tool, and perhaps tools for analyzing your agent, or to add some source control to your agent ZIP file.
How to build your own FAQ Bot Generator
Want to build it yourself?
First understand the agent ZIP file format. Then write some code in your favorite programming language to construct the agent ZIP file.
Steps:
1 Construct the package.json file
2 Construct the agent.json file
3 Create a folder called intents
4 For each intent (based on the CSV data), construct the response JSON and the training phrase JSON files and add them into the intents folder
5 ZIP them into a single file
Simple question and answer FAQ chatbot
If you just want to create a simple FAQ bot with one question corresponding to one answer, it requires a simple CSV format. There is a column with a user says message (Query), and then another column with the text response (Response).
This is the format of the CSV file.

Adding multiple training phrases per intent
Now, the simple 2 Column CSV format is not sufficient. For example,
- how can you handle multiple user says (training) phrases per intent?
- what if you want to add multiple text responses?
- what should be used as the intent’s name?
Suppose we create the following CSV column structure to accommodate the points from the previous section. You have an intent ID, followed by intent name, followed by userSays phrase, and the final column will be your text response.
For example, this is what the CSV format would look like. All rows must have an intentID to identify the intent. Notice that you can have multiple queries (training phrases) and multiple responses per intent.

Adding input and output contexts
If you would like to add input and output contexts into the CSV format, you need to consider the following:
- you can have multiple input and output contexts per intent
- every output context should have an associated context lifespan
Here is the format I came up with for this purpose:

Adding entities
Specifying entities inside this CSV format is more complex.
Why is this?
It’s because when you add a training phrase containing an entity, Dialogflow automatically parses the entity value (annotates it, that is). For example, you can see below that the word tomorrow is automatically annotated as a date entity.
If you download and inspect the JSON of this intent, it looks like this:

So adding entities via a CSV format will have two issues:
- it makes the CSV format more complex (not such a big problem)
- the annotation will not automatically work (bigger problem)
For example, you might annotate a name as @sys.given-name in your CSV file, for example. But that will not automatically be accepted by Dialogflow which might reject the entity value since its system entity cannot handle it.
(I am working on a solution to this also, and will update this post soon).
Adding followup intents
Sometime in mid 2017, Dialogflow (which was then API.AI) introduced the followup intents feature. These allowed you to have a hierarchy of intents, like below.

Since the number of hierarchical levels is (theoretically) unlimited, you can imagine that it is not possible to capture this very complex structure in the CSV format at all.
So an app which can convert a CSV file into a Dialogflow agent ZIP file will NOT be able to capture followup intents.
However, with the 10 column CSV format described above, you can simulate the behavior of followup intents by setting the appropriate input and output contexts. For an example of how to do this check out this article.
Adding slot filling
First of all, I don’t recommend slot filling in Dialogflow ES.
And if your bot does need slot filling AND also has a lot of intents, you are probably better off using Dialogflow CX.